
Followers

Total Pageviews

Showing posts with label Creative Expressions. Show all posts

Friday, 22 February 2019

Blazing Poppies

Products used; White card stock, Spectrum Noir Harmony Water Reactive Ink Pads, Spectrum Noir Aquablend Watercolour Pencils, Versafine Ink Pad Back, Gel Glue, PVA glue, Heartfelt Creations Blazing Poppy Die & Stamp, Heartfelt Creations Blazing Poppy Stems Stamp, Creative Expressions French Collection Burgundy Die, Black Sparkly Gems, Red Mirri Card.
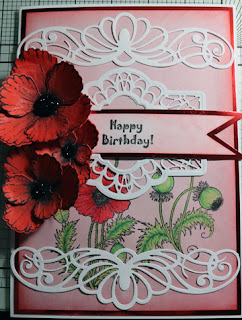


Instructions; Card base, white card stock A4 size folded in half to form A5 base card (6" x 8.5") with side fold. Cut a piece of Red Mirri card 5.5" x 8" adhere to base card. Cut a piece of red paper 5" x 7.5" and ink round the edge with Harmony Water reactive ink pad Chinese Red. On this paper stamp the Heartfelt Creations Blazing Poppy Stems using Black Versafine Ink and colour in using Spectrum Noir Aquablend Watercolour Pencils. Adhere this to the mirri card using red liner tape.

Stamp the Heartfelt Creations Blazing Poppy Stamp onto white card stock and colour with Harmony Water Reactive inks Chinese Red & Bordeaux. Then place the die Heartfelt Creations Blazing Poppy in position over the top and die cut.
Shape the flowers using a flower shape tool, adhere the smaller petals on top of the larger ones with gel glue to make the flowers and put to one side to dry.

Die cut two Heartfelt Creations Regal Boarders & Pockets with the straight edge and die cut one Creative Expressions French Collection Burgundy omitting the center piece, put these to one side.
Make a banner out of Red Mirri card and cut more of the Red paper to fit inside the banner, ink the edge of the red paper as before, stamp onto this the Heartfelt Creations Heartfelt Wishes sentiment 'Happy Birthday' then adhere the red paper to the mirri card banner using gel glue, adhere the flat end of this inside the Burgundy die so the banner comes up and over the edge of the die. Adhere the two Regal Boarders & Pockets dies to the top and bottom of the card as seen using PVA glue then adhere the burgundy die with banner under the top die cut so you can still see the stamped Blazing Poppy Stems underneath.
Place a Black sparkly gem in the center of your poppies, arrange and adhere them with gel glue to the side of the card so they cover the edge of the Burgundy die and banner.

Thank you for looking Jacquie xxx

Saturday, 24 September 2016

AMOR ETERNO

Morning my crafting friends, hope this finds you all safe and well. I had a request from my daughter last week to make a DOTD wedding card as her friends were having a Mexican themed wedding so here is what I made, it was originally A4 size as we wanted the skeletons on the side but it seemed to big for a wedding card so made it into an Gatefold card. My apologies got to Ang lol! ...


This was the front, I did not want it too fussy so kept to the corner and edge stamps with sentiments and just added a few flowers.


For the inside I chose Creative Expressions Foundation card Rich Plum and Silver Miri card for the layering, although the main colours had to be Pink & Blue I chose these as contrasts.


So I got my Rich Plum card and embossed it with the Sheena Douglass Indian Lattice Embossing Folder so it had some texture. 

I made each skeleton from Sheena Douglass day of the Dead Range of Perfect Partners up in a certain pose, the man with his top hat and cane the woman with her veil and flowers. I even coloured their boots to go with the colour scheme lol!


For the main feature inside I chose the Sheena Douglass DOTD Union of Souls stamp, I got a piece of White card and stamped the couple on then painted Pebeo Drawing Gum over the top, let it dry before I coloured the background with Aquatints Pastels to get the light Blue & Pink then I removed the Drawing Gum.


Using Aquablend pencils I coloured in the couple keeping to the colour theme but adding a little Purple in certain places. Once coloured I ran it through the Sheena Douglass DOTD Frame Embossing Folder, this just fitted round the couple perfectly, I decided not to colour over the embossed area as I did not want the focus lost from the couple and the beautiful deep embossing you get from these folders made it stand out anyway. I matted this onto some Silver Miri card. 

For the inside I matted with the Silver Miri card and Rich Plum  Embossed card but before I stuck down the Rich Plum card I wrapped some Vintage Lace Ribbon round the bottom, not only did this give it a slight vintage look and filled up the empty space but I think the pattern of the lace went well with the DOTD theme. I glued this down in place then added the couple so the bottom of the card just covered the top edge of the Lace.

There you have the finished card. I am happy to say the recipients absolutely loved it and are getting it framed.

If you have any questions please do not hesitate to contact me.

Thank you for looking, Jacquie xxx

Wednesday, 25 May 2016

SHOUT!

Morning my crafting friends so good to have you visit me today. Sorry for the confusion yesterday it was not two cards I posted but one, the second picture is what is inside the gatefold card lol!

Thank you for all your wonderful comments I really do appreciate them and I apologize if you have a blog that I have not got round to viewing and commenting on, I do try but finding it more difficult to find the time of late so I can only apologize. 

Todays post is another sample for our Sheena shows on Hochanda on Friday at 10 & 2, Saturday at 11 & 3 and Sunday at 11 & 6. 


This one showcases 'The Band' from Sheena's Sketchy Stamp Shout! For the background using Sheena Douglass White Stamping Card I used two of Tim Holtz Distress Inks Squeezed Lemonade and Fired Brick blending them together as best as I could then dabbing the ink pad over the background with Fired Brick.

I then stamped my image on top using my Versamark Ink Pad then heat embossed it with Creative Expressions Cosmic Shimmer Embossing Powder Black.
  
Using Sheena's Sketchy Stamps Grunge Band  I then stamped and heat embossed them into two opposite corners with Papermania Gold Embossing Powder, with more of the Grunge band stamps I inked them up with Pebeo Mixton Relief Paste and left it to dry a short time, not the hour it says just until it was almost clear then I added the foil on top rubbed it down and left it to dry a bit longer before rubbing the foil with the flat end of a paint brush until it released itself from the card. I then inked up a small piece of card like the background, stamped my sentiment on top with Stazon Jet Black Ink, matted it onto a piece of Black Card then placed it on the card as seen.

I hope you can manage to see one of the shows, please do let me know what you think. Do take a look at all the stunning cards the rest of the Design Team have created.

Thank you for looking, Jacquie xxx


Thursday, 14 April 2016

Let it Snow Globe

Hello my crafting friends, hope today finds you safe and well?

I have a Christmas card to day that I do not think I have posted as yet, so I apologize if I have at any time lol!


This was quite a simple card. I had my base card, I measured two pieces of card, one Black and one White for matting and layering and put these to one side.

On another card I had die cut one of Creative Expressions Sue Wilson Christmas Ornaments (sorry cannot remember at the moment whether they were 2010 or 2011) but I had mounted it onto double sided adhesive paper ready to glitter up and emboss. This bauble was the backing paper of the self adhesive paper, a bit like wax paper but I thought it looked so pretty I did not want to throw it away so used it on here instead! So I cut a piece of Black card out just big enough to mount this onto, I placed this piece of card on top of the other Black & White card I had cut out and wrapped some Creative Expressions Vintage Scalloped Lace Cream around all three layers of card and secured it at the back. I then placed my wax paper bauble on the top.

In my stash I had these stamps but unfortunately I do not know who they were by I had them as a free gift with a Magazine a long time ago! The stamps, as you can see, were of a snow-globe and various stamps you could put inside the snow-globe so I used this village scene along with the words 'Let it Snow', I stamped them all with Versamark Ink Pad and heat embossed with Papermania Black Embossing Powder. I then placed this inside the wax bauble as seen.

There is the finished card, hope you like it?

Thank you for looking, Jacquie xxx


Thursday, 31 March 2016

Be Unique, Be Creative

Hello my crafting friends, hope today finds you all safe and well. Well down here in the South East its another beautiful day, full of sunshine, a bit chili but very little wind so quite nice.

I had a bit of play time yesterday so put this together, was not sure how it was going to turn out as I just went along adding things on as I went, I don't think it turned out too bad lol! At least it gives you all a break from Skeletons & Skulls eh Ang? lol! At least for a little while...!!!


I started with a piece of paper stained with a tea bag, yes I did say a tea bag, these old tricks still work lol! I stamped all over with Sheena's Script stamp using Tim Holtz Distress Ink Ground Espresso then ran it through one of the Crafter's Companion Textures Embossing Folders Wind, the embossed areas I inked with Chipped Sapphire.

With a piece of White card and Sheena's Decorative Stencil Sackcloth I spread Galleria Modelling Paste over the top and left to dry. Do wash your stencil straight away to remove all residue of the paste, I just rinsed it under warm water. Once dry I painted over the top with Aquatints Bright & Beautiful Blue then when that was dry painted over the top again with Aquatints landscape Light Brown.

Using some stamps from Crafter's Companion Textures Words To Inspire Set 1 I stamped 'Be Unique' and 'Be Creative' onto White card using Stazon Black Ink then painted over the top with Aquatints Bright & Beautiful Blue, I put these to one side.

In my stash I found some die cuts that I had cut out of White card with Creative Expressions Sue Wilson dies Italian Collection Calabria and French Collection Corner Boarder & Tag, I placed the boarder along the bottom third of the sackcloth card, wrapped it round the back and stuck this down with Foam tape onto the 'wind & script' background. I die cut some Leafy Flourish from Crafter's Companion Sara Davies Signature Collection, I placed these along the bottom of the card and in the top left corner, in my stash I found some flowers that had been cut using Spellbinders Delicate Asters so I placed these on top of the leafy flourishes. I cut the Calabria die cut in half so I could place half on top of the Boarder strip but I did not like it being White so as the center of the flowers had gems from Queen & Co Twinkle Goosebumps Self Adhesive Orange stones on them and one of the flowers was Orange I decided to keep the colour and painted the half circle with Aquatints Bright & Beautiful Orange.

Out of Gold Miri card and Kraft card I die cut the little bird from Crafter's Companion Sara Davies Signature Collection 'Wing of Love'. With this you can use the legs as legs for the bird or as I have done as a little branch for the bird to sit on, I cut the wings out of the Kraft card so they stood out on the miri card. I added a little Black stone on for his eye then placed him as seen on the card.

I inked the edge of the word with Aquatint Essentials Black and placed them on the card as seen. To finish the card I added a little Butterfly that had been painted Orange & Blue with Pebeo Iridescent paints.

I would like to enter this into http://anythingbutcutechallenge.blogspot.co.uk/2016/03/challenge-11-crazy-for-colour.html

I hope you like this little creation and thank you for looking, Jacquie xxx

Tuesday, 22 March 2016

Thinking of You Floral

Hello my fellow crafters, hope today finds you all well, thank you for visiting me today I do appreciate it very much and I love reading any comments which you may wish to leave.

Today's post is a card I made for a friend who is not well just to let her know I am thinking of her, so I wanted it bright and cheerful.


I started by die cutting a piece of Sheena's White Stamping Card with the Creative Expressions Striplets Die Rococo three times and attached this over the top of some Dark Blue Miri card, I then attached this to my base card.

Out of Sheena's Black card I made a frame using Square Nesting Dies from Presscut and placed this over the top of the card.

To brighten the card up I die cut some flowers from Sheena Douglass Day of the Dead Floral Fantasy using copy paper and painted them with Aquatints Bright and Beautiful, these are such vibrant colours that stay true and do not fade. I stamped them using darker Distress Inks Dried Marmalade & Fired Brick to match the colours. To finish the flowers I shaped them with a embossing tool and added a Kaisercraft Sparlet Gem in the center of each one.

I also die cut some Ivy using Creative Expressions Sue Wilson Finishing Touches Trailing Ivy and coloured this with Tim Holtz Distress Ink Crushed Olive then painted over the top with Green Aquatint from the Landscape set leaving the edge to show the colour underneath. I attached this on the card as seen.

Using more White card I stamped my sentiment with Tim Holtz Distress Ink Crushed Olive and Justrite Large Fancy Sentiments then die cut with Spellbinders Nestabilities Decorative Curved Square, whilst still in the die I inked through the die with more  Crushed Olive Distress Ink. I then placed this on the card.

There you have the finished card. I am glad to say the recipient loved it.

Thank you for looking, Jacquie xxx

Thursday, 28 January 2016

Christmas Wishes for You

Hello my crafting friends, hope this finds you all safe and well. Not long to go and the first month is over my 'o' my!

Now for todays post  I have another Christmas card for you.


I started by folding a sheet of Centura Pearl Pastel Blue card in half to make and A5 size card then cut a piece of White card and Periwinkle Blue card to size for matting and layering. I distressed the edges on both of these using a pair of scissors.

In the middle of the Blue card I die cut a circle out then stamped my Christmas Wishes sentiment using Stazon Jet Black onto the White card underneath so it showed through the aperture.

On the Blue card I stamped a musical melody across the top with my Versamark ink pad then heat embossed with White embossing powder. I then ran the Blue card  through a snowflake embossing folder to give it some texture.

I die cut the Peace sentiment twice out of Silver miri card and cut it down so I trimmed off the 'Peace' word  and placed the decorative edges around the circle aperture. 

In my stash I already had some Poinsettias, snowflakes,  a sleigh and reindeer, the sleigh and reindeer I had inked with my Versamark then covered with Glamour dust to add some sparkle.  All these I placed on to the card as seen.

I had some beads on wire in my stash that were recycled from some old Christmas crackers so I placed them on the card randomly. To finish the card I added some snow writer all around the edges and on the Poinsettias.

There may be a lot going on in this card but I think it works, its different anyhow lol!

Items used:

Inkylicious Clear Polymer Stamps Musical Melody & Christmas Wishes
Spellbinders Snowflakes
Spellbinders Layered Poinsettia
Spellbinders Peace Sentiment
Tattered Lace Embossing Folder Snowflake
Cottage Cutz Elegant Sleigh
Memory Box Leaping Deer
Deco Art Glamour Dust
Deco Art Snow Writer
Papermania Embossing Powder Seafoam White
White Hammer Card
Crafters Companion Centura Pearl Pastel Card Blue
Creative Expressions Foundation Card Periwinkle
Create and Craft Silver Miri Card
Beads - Recycled from Christmas Crackers 
Stazon Jet Black
Versamark Ink Pad

Thank you for looking, Jacquie xxx

Tuesday, 5 January 2016

Daughter & Sons' Christmas Cards

Hello my crafting friends, hope this finds you all well? I promised last week that I would show the Christmas cards I made for my Son & Daughter, sorry a bit delayed but here they are.


For my son's card I used some of the shaving foam technique for a background using Purple Aquatints and printed off one of the Christmas images from the House Mouse CD Collection along with the sentiment. I added the die cut 'Son' that was cut out of Red miri card.
 

For my Daughter's card I printed off an image from the House Mouse CD Collection along with a backing paper and sentiment to match, I covered the backing paper with a self adhesive sheet and coated it with Micro beads before matting it up onto Red miri card then added the word 'Daughter' which was also cut out of Red miri card.

Items Used:

Basic White and red card stock
Joanna Sheen House Mouse Triple CD Collection
Red Miri Card
Aquatints Purple
Joanna Sheen Signature Dies Son & Daughter
Shaving Foam
Creative Expressions Micro Beads


Thank you for looking, Jacquie xxx


Saturday, 2 January 2016

Snowy Victorian Park

Hello and a Very Happy New Year to ALL my crafting friends so good to have you visit me today, I do hope you have had enjoyable festivities over the last week or two. I certainly have, such a shame its getting near to returning back to work lol! I think we need another week off to relax now!

Its a bit late I know but our Sheena is on Create and Craft today at 2pm and 6pm showing some more of the last stencils and aquatints so there will be some fabulous demos I have no doubt. 

I made three more cards for her including this one, which is my favourite. I had to do a snowy scene being Christmas but glad we don't have scenes like this just yet!


 For the main card I used a basic White card base and matted up with some Black card.

For the image itself I started with a piece of White card and  inked it up with DI Pumice Stone and Hickory Smoke, blending together all over the card. I then added a few water drops  to make it look like snow in the background.

On the right of the card I stamped the Christmas Tree, coloured it in slightly with DI Forest Moss then added the snow on the branches with a Snow Writer. I then got my stencil Victorian Park and placed the railings in front of my tree and inked through with my Versamark Ink Pad then heat embossed with Black embossing powder, this gave the railings a shine that looked like painted metal. I then moved the stencil across to the middle and using the cobbled stones part of the stencil inked through with Pumice Stone and Brushed Cordroy giving some definition to the cobblestones, on the left side of the card I inked through the Lamp-post with my Versamark and heat embossed it with Black embossing powder. I then faux bleached out the light in the Lamp-post by painting over with just water and blotting it with kitchen towel, this removes most of the ink in the background, I also added some rays from the light by the same method of painting on with water and blotting with kitchen towel. Using a Bright Yellow Aqua marker I painted in the light.

I wanted some trees in the background, just a shadow  to give the illusion of depth so I second stamped the top of the trees from Country Christmas stamp set, I also turned the stamp round and second stamped them by the side of the lamp-post to give the effect of bushes. By second stamping I mean ink your stamp up as you normally would, I used Black Ink, then stamp it onto some scrap paper then stamp again on to your image where you want the stamp to go, its called second stamping as you are using the ink on the stamp a second time but it comes out a little faded and not as dominant as the first stamping. I hope this makes sense to those who have not done this before? I was more than happy with the results this gave.

With my Snow Writer I squeezed some onto my glass mat and using a paintbrush I painted over the railings, lamp-post and the cobbled stones, painting more along the edge of the railings and by the lamp-post, the ink from the cobbled stones actually blended a little with the snow which made it look more realistic!

I then used a little White Acrylic paint and using an old toothbrush splattered it all over the card to give the effect of falling snow. Make sure you do this in a box or some other sort of cover so you don't get paint over everything lol!

To finish the card  I made a sentiment using the same colour background, heat embossed the sentiment and splattered some Acrylic paint as snow over the top, matted it onto some Black card then placed it onto my card as seen.

Items Used:

Sheena Douglass White Stamping Card
Sheena Douglass Black card
Sheena Douglass Stencil Victorian Park
Sheena Douglass A little Bit Festive Country Christmas Stamps (Tree tops)
Creative Expressions Create a Scene Stamps, Designed by Sheena Douglass Christmas( Christmas Tree)
Creative Expressions Create a Scene Stamps, designed by Sheena Douglass Vintage Christmas (Sentiment)
Tim Holtz Distress Inks Pumice Stone, Hickory Smoke, Forest Moss and Brushed Cordroy.
Versamark Ink Pad
Deco Art Snow Writer 
Papermania Black Embossing Powder
Aqua Markers Sunflower Yellow
Acrylic Paint White

Thank you for looking, Jacquie xxx


Saturday, 19 December 2015

Wishing you all a Very Merry Christmas and Dazzle Snowflake

Hello my crafting friends, I do hope you are all safe and well and ready for the big day. I have decided to make this my last post of 2015 so I can concentrate on last minute preparations before we go to my Daughters for Christmas so may I take this opportunity to WISH YOU ALL A VERY MERRY CHRISTMAS and a  HAPPY NEW YEAR.

I hope to be more organized next year and my new year resolution will be to start making my Christmas cards all year, that way by next Christmas they may be all done lol! Watch this space!!!

Today's post is of one of the few Christmas cards I have managed to make, this one was for my dear friend, I liked it so much I have made a few more like it for my Family members!!!

This was inspired by Sue Wilson's design which you can view HERE, it is very similar but not exact but I loved the design so I went with it.


I matted up my base card with some Blue hammer card. Using the shaving foam technique, which you can find HERE  I made the background, I used two different Blues from my Aquatints paints ( I also made some using two Purples) in my shaving foam, I cut to size and stuck a piece of Double Sided Adhesive sheet over the top and coated it with Micro beads then matted this onto my card. I matted up a small rectangle of Blue card onto a piece of White card and placed this in the centre of the card.

I die cut  some snowflakes out of White card and some Dazzle miri card, mounted them together and attached it in the center of the card. In the middle of the snowflake I added a Blue crystal gem. This finished the card.

Items Used:

White Base card
Blue Hammer Card
Aquatints Bright & Beautiful & Pastel sets
Shaving Foam
Spellbinders Create a Flake die
Spellbinders Snowflakes die
Hunkydory Dazzle Miri Card
White card
HobbyHouse Blue Ocean Gem 
Double Sided Adhesive Sheet
Creative Expressions Micro Beads


Thursday, 12 November 2015

Fabulous Fushias

Morning my crafting friends, good of you to visit me today, sorry I have been a little absent again, lots of work and long suffering toothache, now sorted!

Its that time again when our lovely Sheena has shows coming up on Create and craft showcasing some new and stunning flower dies and stamps along with stunning Butterfly and dragonfly. The shows start on Monday at 9am. So if you are able to please come and watch the lovely Sheena in action and view all the stunning creations made by the Design team.

Here is one of mine...


This is showing the beautiful Fushia die, these are so easy to make and look wonderful when finished.

For this I coloured the background with D.I then stamped over the top with Sheena's script stamp using my Versamark Ink pad and Clear embossing powder.

I then stamped over the top of that with Sheena's Fusion Fushia stamp, not the stamps that are out with the die, coloured this in with Distress Inks then placed the die cut flowers, these were coloured using Aqua markers, down the side of the stamped image.

I loved the finished look of this card, I matted and layered it with White and Plum card to match the flowers.

Items Used:
Tim Holtz Distress Inks
Sheena Douglass Die & Stamps Fushia                       

Sheena Douglass Fusion Fushia stamp
Sheena Douglass White Stamping card 
Sheena Douglass Script Stamp
Spectrum Noir Aqua Markers
Creative Expressions Plum Card
Clear Embossing Powder
Versamark Ink Pad 

Thank you for looking, Jacquie xxx

Friday, 21 August 2015

Thinking of You Butterfly

Hello my crafting friends, sorry I am a bit late posting, I hope this finds you all well, lots of hugs to those who need them.

Now I decided to play again today, get a bit messy like we crafters do and whilst I had some colours on my glass mat I came across an old stamp of a Butterfly so I painted the colours onto the butterfly and stamped it onto water colour card and this was the result, a bit wishy-washy but I liked it.


I was playing with some Lumin Art mica powders, not brilliant but I got an image and rather than waste it I turned it into a card adding the sentiment at the bottom with Peacock Feathers DI.

A few self adhesive pearls in each corner finished the card.

Items Used:

White Hammered card
White Water Colour Card
Creative Expressions Butterfly Stamp
Lumin Art Mica Powders Various colours
Creative Expressions Friendship Stamps
Tim Holtz Distress Ink Peacock Feathers

Thank you for looking, Jacquie xxx

Monday, 27 July 2015

Happy Retirement

Hello my crafting friends, another weekend has been and gone, hope you all had plenty of time to craft? I was away visiting my family in Birmingham so we had a fabulous weekend, now I am itching to get crafting lol!

The card I have for you today is one I made for a work colleague who retired last week, I had held it back as I gave it to the gals to sign before adding the flowers, its hard to sign on the back otherwise lol! However, silly me, after adding the flowers I forgot to photograph it so I am afraid you only have the none flower version!!! I had put little Camellia flowers and leaves on the bottom left corner using Blush & White card so I am afraid you will just have to imagine them there!


I had these gorgeous papers from the Flights of Fantasy Collection with Roses all over so I used this as the background. To add some definition and decoration on the front I used Tonics Art Nouveau dies and cut the pieces out of Blush card, layered these on the card as seen.

Out of more of the paper I die cut the background for the sentiment using Oval Majesty, using a smaller die I cut out the sentiment that I had done on the computer, I inked round the die with Victorian Velvet then added a self adhesive pearl at each point. I placed both of these in the center of the card.

Then as I said earlier I added the flowers in the bottom left corner. The inside was left blank for everyone to write their own messages.

The dimension od the card was 7"X7".

Items Used;

White base card
Crafters Companion Flights of fantasy Papers 
Creative Expressions Foundation Card Blush
Tonic Art Nouveau Collectable Die Set
Spellbinders Oval Majesty Die Set
Self Adhesive Pearls
Tim Holtz Distress Ink Victorian Velvet


Thank you for looking, Jacquie xxx

Saturday, 4 July 2015

Silhouette Elephant Paisley

Hello my crafting friends, its time for challenge 13 over at http://lilpatchofcraftyfriends.blogspot.co.uk/  so I do hope you will come and join in the fun. We have 3 fabulous sponsors for this challenge:

 Fabulous prizes on offer from our wonderful sponsors.

 Prize ~ 7 free digis

Prize ~ $10 digi shop credit


Prize ~ $12 Gift Certificate


My card was made from a beautiful Silhouette digi from Bugaboo Stamps http://www.bugaboostamps.com/Silhouette--elephant-paisley_p_2287.html  as soon as I saw this image I thought of all the wonderful China Elephants we had around certain cities a couple of years ago so I chose this one to colour in using lots of different colours. 


I started by printing off the Elephant digi three times and coloured in each one the same using Spectrum Noir pens, I then started to cut into two of the Elephants so I could decoupage her. The bottom layer was the whole Elephant, the second layer I cut off the two legs from behind then the third layer I just had the head and ears, the tail was kept from the bottom layer,  after colouring each one I pasted them with glaze to add the shine. I stuck these together using foam pads.

My base card was made from Black card matted and layered with White card then more Black card. The top layer I embossed with the Mandala Embossing Folder, I used some glitter glue round the edges of each of the embossed flowers then placed the finished Elephant in the center of my card. 

For my sentiment I made a small tag using  basic tags die, White card and Teal card, I stamped the sentiment onto the White part of the tag and attached it to the Elephants tail which I thought looked rather cute!

There you have the finished card, dimensions are 7"X5".

Items Used:

Bugaboo Stamps Silhouette Elephant Paisley 
Black Card
White Card
Sheena Douglass Taste of India Embossing Folder Mandala
Glitter Glue
Foam Pads
Creative Expressions Foundation Card Teal
Creative Expressions Unmounted Stamps Kind Thoughts
Spellbinders Basic Tags 
Spectrum Noir Pens 
Archival Ink Black
Pinflare Glaze 

Please do go over to http://lilpatchofcraftyfriends.blogspot.co.uk/ and see all the other beautiful creations from the rest of the team.

Thank you for looking, Jacquie xxx

Monday, 29 June 2015

Bird House

Morning my crafting friends, hope today finds you all safe and well, thank you for visiting me today, its much appreciated, I do read all your lovely comments and view your blogs if you have one, please leave a link to your blog if you do have one then I can return the favour.


This was another little mixed media card I did, the base card is using the 'leather' card, this is matted and layered using designer paper and Peacock papers, in-between those I have placed a doily. I have added two corners on top of the Peacock paper.

The top layer is designer paper again that has been embossed with the Lattice mask then inked with Vintage Photo through a Brick work Stencil before being painted over with a thick layer of Crackle Glaze, this does not crackle as much as I would like it too and I do not think it shows up on these images too well either, sorry.

The Bird house stamp was a free gift along with some Art products I ordered from Paper Artsy, I stamped it with Vintage Photo then heat embossed with Copper embossing powder then inked over with Rusty Hinge, cut it out a stuck to the front of the card with foam pads.

I stamped the Bird from Anne Marie Birdcage set on top of the bird house then added two dragonflies from DM Flutterby stamps using Black Archival Ink.

A little card which did not take too long to make, I have left the sentiment off until I decied a use for it lol!

Items Used:

Printable Heaven Leather Card Cream
Anne Marie Floral Bird Cage Stamps 
Debbie Moore Flutterby Stamps- Dragonflies (free with magazine)
Theresa Collins Designer Paper Pad
Heartfelt Creations Peacock 12 X 12 Paper Pad
Do Crafts Paper Doilies
Sue Wilson Configurations Dainty Lace Edger
White Card
Ranger Dina Wakley Mixed Media Stencil
Creative Expressions That Special Touch Mask Lattice
Tim Holtz Distress Ink Vintage Photo & Rusty Hinge
Tim Holtz Distress Crackle Paint
Paper Artsy Bird House Stamp
Papermania Embossing Powder Copper
Archival Ink Black

Thank you for looking, Jacquie xxx

Friday, 19 June 2015

Happy Father's Day Card

Hello my crafting friends, good to see you here, hope you are all well, plenty of hugs going for those of you who need them.

Thank you all so much for all your wonderful comments of late I really do appreciate them. I am still up in cloud 9 with joining Sheena's Design Team, the others have been extremely welcoming, a lovely team so full of talent. Maureen please feel free to use any technique I put on here, we are all crafters and crafters share right?

Now today's post is the Father's Day card I have made for my FIL, I know its early to show it but hey!!! I knew I wanted a Photography theme as he used to do quite a bit of photography and still does bits now from time to time. I wanted an old looking Photography theme, hopefully I have achieved it?


I first used a sheet of Kraft card and folded it in half to form the base. Using some White Hammer card I put it through the Movie Theme embossing folder twice to extend the pattern, I lightly inked over  the top of the embossed part with Black Soot to show up the film reels.

I had the idea of incorporating old pictures of my hubby & his brother when they were small children so after putting them onto Photoshop I inverted each image to turn them into a negative.

Using the film die I die cut some Black card so it looked like a negative and carefully glued the images behind, I did not have much space to glue as obviously I did not want the images to cover the film cog holes down the side of the negative, once attached I added a strip of Black card to the back to strengthen it up a little, I attached these to the embossed film part on the right side of the card to try and make it look like it was part of the film. Not sure I achieved this but I am sure you can see what I mean lol!.
Using some Kraft card cut to size I stamped some images  with Vintage Photo then  inked round the edge of the card to make it look darker and more sepia toned. On more Kraft card I stamped the sentiments and made them look like little tags, I inked round the edge of these, tied some twine through and put them to one side. I re stamped the small film strips twice and the camera using my Versamark ink pad and heat embossed them with Black embossing powder, I placed these over the original stamps on the Kraft card using foam tape, I felt this made them stand out a bit more. I attached this onto my base card at an angle along with the sentiment tags as seen.

I typed various words on the PC including 'Happy Father's Day' and printed them off, cut them out and placed them in the spare space on my card, there you have the finished card, hopefully my FIL will like it!

Items Used:

Create and Craft Kraft Card
Darice Embossing Folder Movie Theme
Creative Expressions Sam Poole Stamps Vintage Photography
Marianne Designs Collectables-COL 1390 (Film strip die)
Tim Holtz Distress Inks Vintage Photo & Black Soot
Black Card
Papermania Embossing Powder Black
Versamark Ink Pad
Family Photos scanned in and inverted on Photoshop
Sentiment word typed up on the PC


Thank you for looking, Jacquie xxx


Saturday, 6 June 2015

Toadstool Princess Fairy

Morning my crafting friends, its time for our challenge number 11 over at http://lilpatchofcraftyfriends.blogspot.co.uk/  as usual its Anything Goes so please do come along and join in and take a look at all the other DT members beautiful creations.

The sponsors this challenge are:


Kenny K  - Prize: 3 Images
 Drawn With Character - Prize: 3 Images

Lemon Shortbread - Prize: 3 Images 


My beautiful image is from Lemon Shortbread titled Toadstool Princess Fairy. You can find her HERE

I coloured her in with Spectrum Noir pens, I added some glue with my glue pen and sprinkled some Diamond Sprinkles to add some sparkle on parts of her dress.
I die cut her out using the Innsbruck, I inked round the edge with Vintage Photo then threaded some Pink ribbon in and out of the die cut round the edge and tied a bow at the bottom.

For my base card I used a 7"X 7" White card and matted it with Green card that I had embossed with Maple Leaf Embossing folder.
I cut a piece of Kraft card to size and embossed it using the Acorn Leaves Mask then rubbed two Gilding Waxes, Cast Bronze & Spring Green, over the top. I inked the edge with the chisel end of a Spectrum Noir pen. I attached this to the top of my card with foam tape.

I placed my image in the center of my card, again using foam tape, then placed some fern leaves in the bottom left corner and added a tiny bow from my stash.


I hope you like this card, you can find this and many more beautiful images  HERE

Items Used:

Lemon Shortbread Digi Toadstool Princess Fairy
White card
Spectrum Noir Pens
Creative Expressions Sue Wilson Austrian Collection Innsbruck
Creative Expressions That Special Touch Mask Acorn Leaves
Creative Expressions Foundation Card Green
Creative Expressions Gilding Wax Cast Bronze & Spring Green
Creative Expressions Diamond Sprinkles
Create and Craft Kraft card
Sheena Douglass Embossing Folder Maple Leaf
Fantastic Ribbons Pink Ribbon
Bow Own Stash


Thank you for looking, Jacquie xxx


Wednesday, 3 June 2015

Someone Very Special

Hello my crafting friends, I am back, for now at least lol! I am still off work but am starting to get round a bit more, my GP has put a request in for me to have an appointment at the Orthopedics as urgent so we wait to see how quick that comes, hopefully they will do a scan to see what is going on but I don't hold my breath for that one! I am taking it easy being very careful with what I do but at least I am managing without too many pain killers now as they just send me to sleep! Thank you all so very much for the fabulous comments I received, they are all appreciated very much, you are all such a fabulous 'family' to have around.

Now this next card I post was done a while back, by that I mean a few weeks but I have not got round to putting it on here so I may as well now until I can get to crafting again.


This is a very simple card I went for the background rather than anything else, inking an A4 sheet of card using different colour distress inks then spraying with Gold & Blue spray inks, I think the fact it was on the 'leather look' card adds interest to the background. I love doing these type of backgrounds lately for my cards.

So I did not deter from the background I just added a single Gold Sweet Pea leaf and a small sentiment in the top corner.

For the inside I placed another piece of the same patterned card and placed a piece of White card over the top to write on.

Items Used:

Printable Heaven 'Leather Look' Cream Card
Tim Holtz Distress Inks Tumbled Glass, Bundled Sage, Shaded Lilac and Abandoned Coral
Creative Expressions Cosmic Shimmer Vintage Mist Egyptian Blue & Marigold
Tattered Lace die (Free with magazine) Sweet Pea
Gold Miri Card
Sentiment old Hunkydory
White card


Thank you for looking, Jacquie xxx