Followers

Total Pageviews

Showing posts with label Spectrum Noir. Show all posts

Friday, 27 May 2016

Two for ya!

Hello my crafting friends, well today is the day Sheena showcases her wonderful new Sketchy  Rock n Roll stamps, the shows start on Hochanda at 10am this morning so please watch and enjoy.

Here are more of my samples...


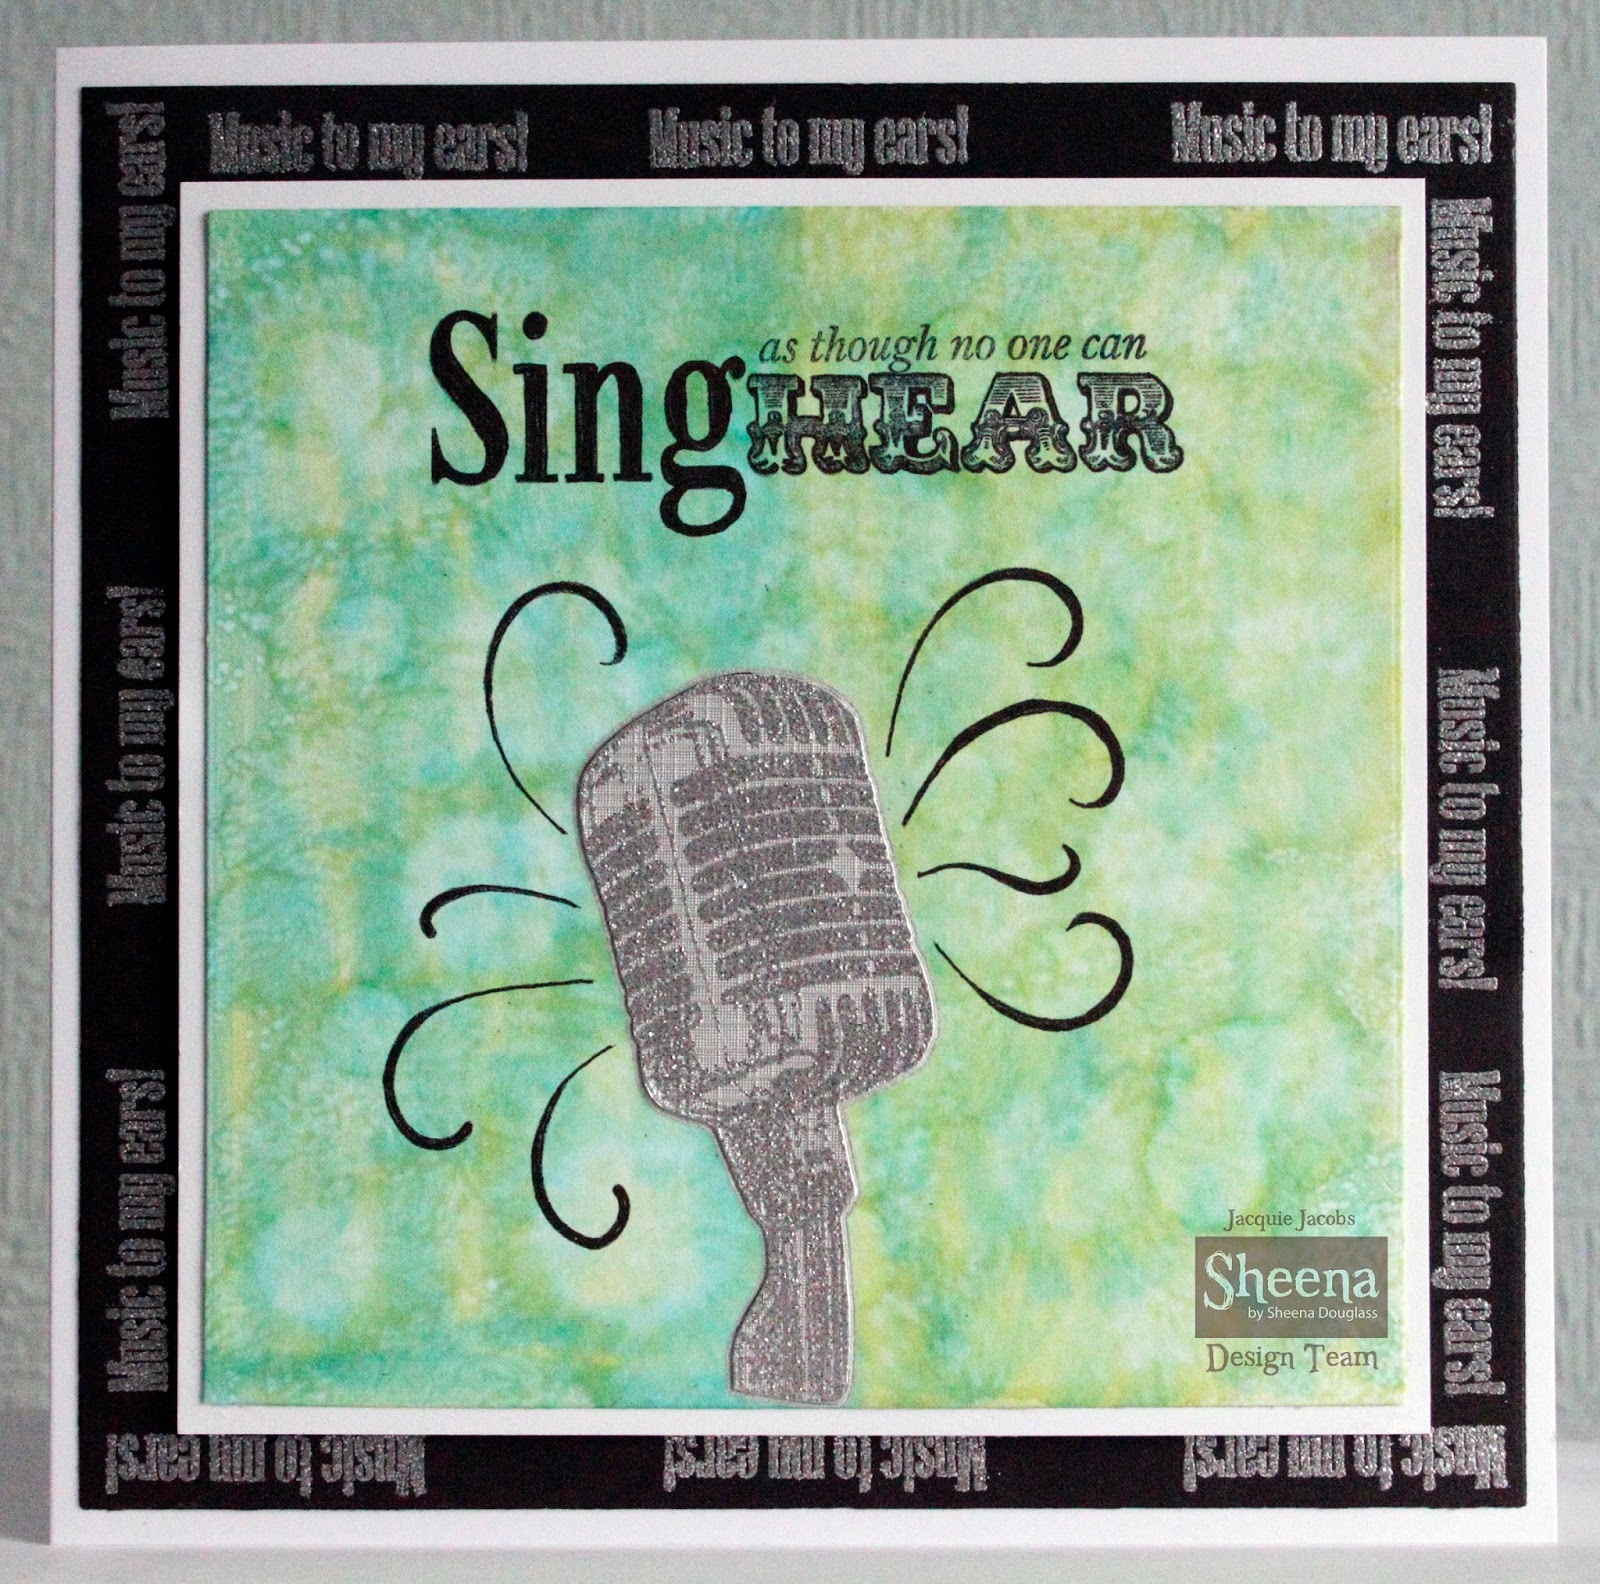
This one shows the Microphone from the 'SING' set. I have coloured the background with Spectrum Noir pens then dabbed some blending solution over the top on a cotton wool pad. The microphone is embossed with Papermania Silver Embossing Powder as are the word round the edge of the card. The sentiment is stamped on with Stazon Jet Black.


This one I stamped the two different Drum sets from the 'BEAT IT!' set on separate squares of Black Card and heat embossed them with Papermania Silver Embossing Powder. They are all matted onto Silver Card and then onto some Silver striped patterned Card. I embossed the sentiment the same way and matted it onto Silver card and placed it in the center as seen.

I hope you enjoy the shows, do let me know what you think?

Thank you for looking, Jacquie xxx


Wednesday, 20 April 2016

The Country Life

Hello my crafting friends, cannot believe its been a week since I last posted, I am really sorry for my absence but I have been quite busy!

Now our lovely Sheena Douglass has a One Day Special on Hochanda 24th/25th April showcasing some 'old' but wonderful stamps so here is my first one to show you.


I decided I wanted to have an aperture on the front of the card so went the whole hog and did three layers!!!

I first cut my cards to size then with the Sheena White Stamping Card I embossed my Sheena Douglass Country Life Embossing Folder Loosestrife, I coloured this in with Tim Holtz Distress Inks Victorian Velvet & Crushed Olive then die cut the circle from the middle using the largest die from Spellbinders Standard Circles Large and put to one side, I then repeated this with the Sheena Black Card and base card going down a size with each die matching them up carefully.

On another piece of White Stamping card I drew the fields and hills with Spectrum Noir Aquablend Pencils then wet my paintbrush and painted with just water to release the beautiful colours in these water colour pencils. Once dry I stamped the Tractor from Sheena Douglass Perfect Partners The Country Life and coloured it in with Tim Holtz Distress Inks Rusty Hinge, Forest Moss and Hickory Smoke. On another piece of card I stamped the Loosestrife from the same stamp set, coloured it in with the Aquablend Pencil then cut it out and placed it at the bottom of the card. I then die cut the fence using Sheena Douglass Perfect Partner Fields of Gold 'The Country Fence' die. I painted this Brown with the Aquablend Pencils and placed it over the Loosestrife at the bottom of the card.

I stamped my sentiment from The Country Life using Black Stazon and inked round the edge with Victorian Velvet. To finish the card I painted over the loosestrife on the front  with Spectrum Noir Sparkle Pens Clear to add a little touch of sparkle. I then adhered the card together.

Please don't forget the shows and see what beautiful creations the rest of the Design Team have made.

Thank you for looking, Jacquie xxx


Friday, 8 April 2016

Bluebells

Hello my crafting friends, great to have you with us today please do leave a comment so I know you have visited.
I would love to know what sort of craft some of you enjoy the most, is it card making, canvas, home decor? Or maybe sewing and knitting might be more your scene. Do you like Mixed media or vintage or maybe die cuts to messy crafting? Lots to think about but I would love to know, there is so much out there at the moment.

Well today is the last day of my school holidays for a while so although I have loved posting more often it will no doubt go back to 2 or 3 times a week as I wont have as much time to craft, oh how I would love to give up work and be able to craft all day lol!

Today's post I created using some of Sheena's older stamps, I am ashamed to say I have some that I have never got round to using yet and this Bluebell on is one of those, I must say I shall most definitely be using again.
I have always loved walking through the woods to see the Bluebells once they come out so this was my inspiration of that, they have always been one of my favourite flowers since I was a child and they bring back lots of happy childhood memories and they have the most gorgeous scent too lol!


I started with a piece of Sheena White Stamping card cut to size then I stamped Sheena Floral Fantasy Bluebells & Daffodils stamp just once with Black Stazon and painted over it with Pebeo Drawing Gum, once dry, which only takes a couple of minutes, I then proceeded to stamp the Bluebells twice more each time painting with drawing gum. So in all I stamped the Bluebells three times. I was happy with that amount but you could do more.


I then took the Yellows and Greens from the Aquatints Bright & Beautiful and Pastel sets and the Blue from the Pastel set. I painted the sky in with the Blue first followed by the Pastel Yellow, B & B Yellow, Pastel Green and finally the B & B Green at the bottom, I then brushed a wet paint brush over to blend the colours together and dry with a heat gun.

For the background I love this little stamp from Sheena's Perfect partners Enjoy the Silence, I have used this many times, as if you did not know already lol! I think its lovely for scenes as it shows perspective and depth of field. So I stamped the little trees on the hill in the background so the branches were over the sky area, this stamp gives a wide print of the ground area but as I still had the drawing gum on my Bluebells that did not matter as once the gum was removed the trees would be behind the Bluebells. I mixed a little Yellow & Green from the B & B set of Aquatints and painted over the trees lightly.


With a little of the Green from the Bright & Beautiful set I painted over the Grass stamp from Sheena's Enjoy The Silence stamp set and stamped the grasses in three places, one being right over to the left so it would look behind the Bluebells. If you find the Aquatint is too runny just clean the stamp then go over the stamped image again with no ink on the stamp and this removes some of the ink but leaves the image. 

Now I removed the Drawing Gum by rubbing it off gently a bit at a time making sure it was all off. I then mixed a little Green & Light Brown from Aquatints Landscape set to make a darker Green to paint the leaves of the Bluebells with, if you go over the edge of the stamp at all just faux bleach it with a little water and dab it dry with some kitchen towel straight away and this will remove the excess paint, this should work with Aquatints or Distress inks as they are both water based. I repainted the areas of the leaves I wanted to look a little darker to add some depth. I then took the Purple from the Bright & Beautiful set of aquatints and painted the flowers, I know they are 'Blue'bells and I could have painted them with the lovely Blue but real Bluebells are a more of Purple colour so I went with the Purple. I did paint over the top of the flower heads again to make them darker but I was not getting the depth I wanted so I then went over  the flowers with Spectrum Noir Professional Colouring Pencils just in the areas I wanted darkened, I was quite pleased with the results this gave.

To finish the card I added a sentiment from Creative Expressions John Lockwood Daisy Chain Elements stamp set along with the Happy Birthday sentiment from the same set with Black Stazon.

I mounted it onto Black Card then onto my base card, there you have the completed card. I hope you like it as much as I do?


Thank you for looking, Jacquie xxx


Sunday, 22 November 2015

Diwali Henna Sparkle

Hello my crafting friends, hope this finds you all safe and well, It's getting a lot colder here now of a night and I know some of you have had snow, let's hope its brief lol! Though I have to admit I do like to go out and play in it!!! A big kid at heart.

Some of you may know it was Diwali week last week, the festival of light and we have two Hindu teachers at our school so I made them each a card.


This one I made for Sujahta an English teacher, I knew I wanted to use Sheena's Indian products and I wanted it lovely and bright so I started by inking up a piece of card using Crushed Olives DI, I then ran it through the embossing folder  Henna and re-inked over the embossed pieces, I then coloured in the flower with Aqua Markers. I coloured in some of the edges using Spectrum Noir new Sparkle pens to add a touch of glitter too.

I stamped the flower  Henna onto some White card and cut it out the best I could then coloured it in with Spectrum Noir Sparkle pens and put this to one side to dry.

On more of the White card I stamped the decorative edge using my Versamark Ink Pad then heat embossed with Gold embossing powder, I had to repeat this process in order to get the lengths I wanted to fit round the card as its only a small stamp. I then cut it out the best I could using a sharp craft knife.

I matted the embossed background onto some Black card and then onto the base White card, I attached the decorative edge round the four sides of the card trying to match them up so they were the same both sides. I then attached the stamped flower I had cut out using 3D glue.

I made a simple sentiment and inked round with the Crushed Olives DI to match the card and there you have the finished card.

Items Used:

Sheena Douglass White Stamping Card
Sheena Douglass Black Card
Sheena Douglass Taste of India Embossing Folder Henna
Sheena Douglass Taste of India Stamp Set Henna
Tim Holtz Distress Ink Crushed Olive
Spectrum Noir Aqua Markers
Spectrum Noir Sparkle Pens
Papermania Gold Embossing Powder
Versamark Ink Pad

Thank you for looking, Jacquie xxx


Saturday, 6 June 2015

Toadstool Princess Fairy

Morning my crafting friends, its time for our challenge number 11 over at http://lilpatchofcraftyfriends.blogspot.co.uk/  as usual its Anything Goes so please do come along and join in and take a look at all the other DT members beautiful creations.

The sponsors this challenge are:


Kenny K  - Prize: 3 Images
 Drawn With Character - Prize: 3 Images

Lemon Shortbread - Prize: 3 Images 


My beautiful image is from Lemon Shortbread titled Toadstool Princess Fairy. You can find her HERE

I coloured her in with Spectrum Noir pens, I added some glue with my glue pen and sprinkled some Diamond Sprinkles to add some sparkle on parts of her dress.
I die cut her out using the Innsbruck, I inked round the edge with Vintage Photo then threaded some Pink ribbon in and out of the die cut round the edge and tied a bow at the bottom.

For my base card I used a 7"X 7" White card and matted it with Green card that I had embossed with Maple Leaf Embossing folder.
I cut a piece of Kraft card to size and embossed it using the Acorn Leaves Mask then rubbed two Gilding Waxes, Cast Bronze & Spring Green, over the top. I inked the edge with the chisel end of a Spectrum Noir pen. I attached this to the top of my card with foam tape.

I placed my image in the center of my card, again using foam tape, then placed some fern leaves in the bottom left corner and added a tiny bow from my stash.


I hope you like this card, you can find this and many more beautiful images  HERE

Items Used:

Lemon Shortbread Digi Toadstool Princess Fairy
White card
Spectrum Noir Pens
Creative Expressions Sue Wilson Austrian Collection Innsbruck
Creative Expressions That Special Touch Mask Acorn Leaves
Creative Expressions Foundation Card Green
Creative Expressions Gilding Wax Cast Bronze & Spring Green
Creative Expressions Diamond Sprinkles
Create and Craft Kraft card
Sheena Douglass Embossing Folder Maple Leaf
Fantastic Ribbons Pink Ribbon
Bow Own Stash


Thank you for looking, Jacquie xxx


Thursday, 28 May 2015

Amber Camellia

Hello my crafting friends, good to have you visit me again, I hope its a Happy Thursday for you all, if not BIG HUGS are sent your way.

This is a scheduled post but i am adding this...I apologize for the lack of comments on peoples blogs, with my MIL funeral and now a very close friend of mine, who has always been like a second mother to me, has fallen and broken her hip, she has just had a hip replacement so I have been up Norfolk visiting her, its all happening this week!!! Take care everyone. xxx

I am hoping we will have some decent weather this week, this May has got to be one of the worse Mays  for weather, I am convinced the seasons are changing and getting later lol!


Remember my card from the other Monday when I did two quick cards? Well this is the second one.

I painted the background using Aquatints again but this time using the Pastel colours, I used the Blue and Purple blending them together then spraying with water and dabbing dry.

I matted this up onto a White Base card that I had previously stamped with my sentiment.

I die cut some Complete Petals from the Camellia dies and inked them with Fossilized Amber, beautiful colour, I quite liked how I got the two toned look by using less or more of the ink. I glued three layers  together to form a substantial flower, pinched the ends of the petals together and added a pearl in the center of each finished flower.

In the center of the card I placed a couple of Faux Quilled Leaves and added the flowers on top. There you have the finished card. Dimension 6"X4".

Items Used:

White Card
Sheena Douglass Spectrum Noir Aquatints Pastels
Creative Expressions Sue Wilson Finishing Touches Faux Quilled Leaves
Creative Expressions Sue Wilson Finishing Touches Camellia Complete Petals
Creative Expressions John Lockwood Elements Stamps Daisy Chain Elements
Creative Expressions Self Adhesive Pearls
Tim Holtz Distress Ink Fossilized Amber

Thank you for looking, Jacquie xxx

Sunday, 24 May 2015

Roar with Pride

Morning my crafting friends, hope you are having an enjoyable weekend, there are plenty of hugs going round to those who need them right now.


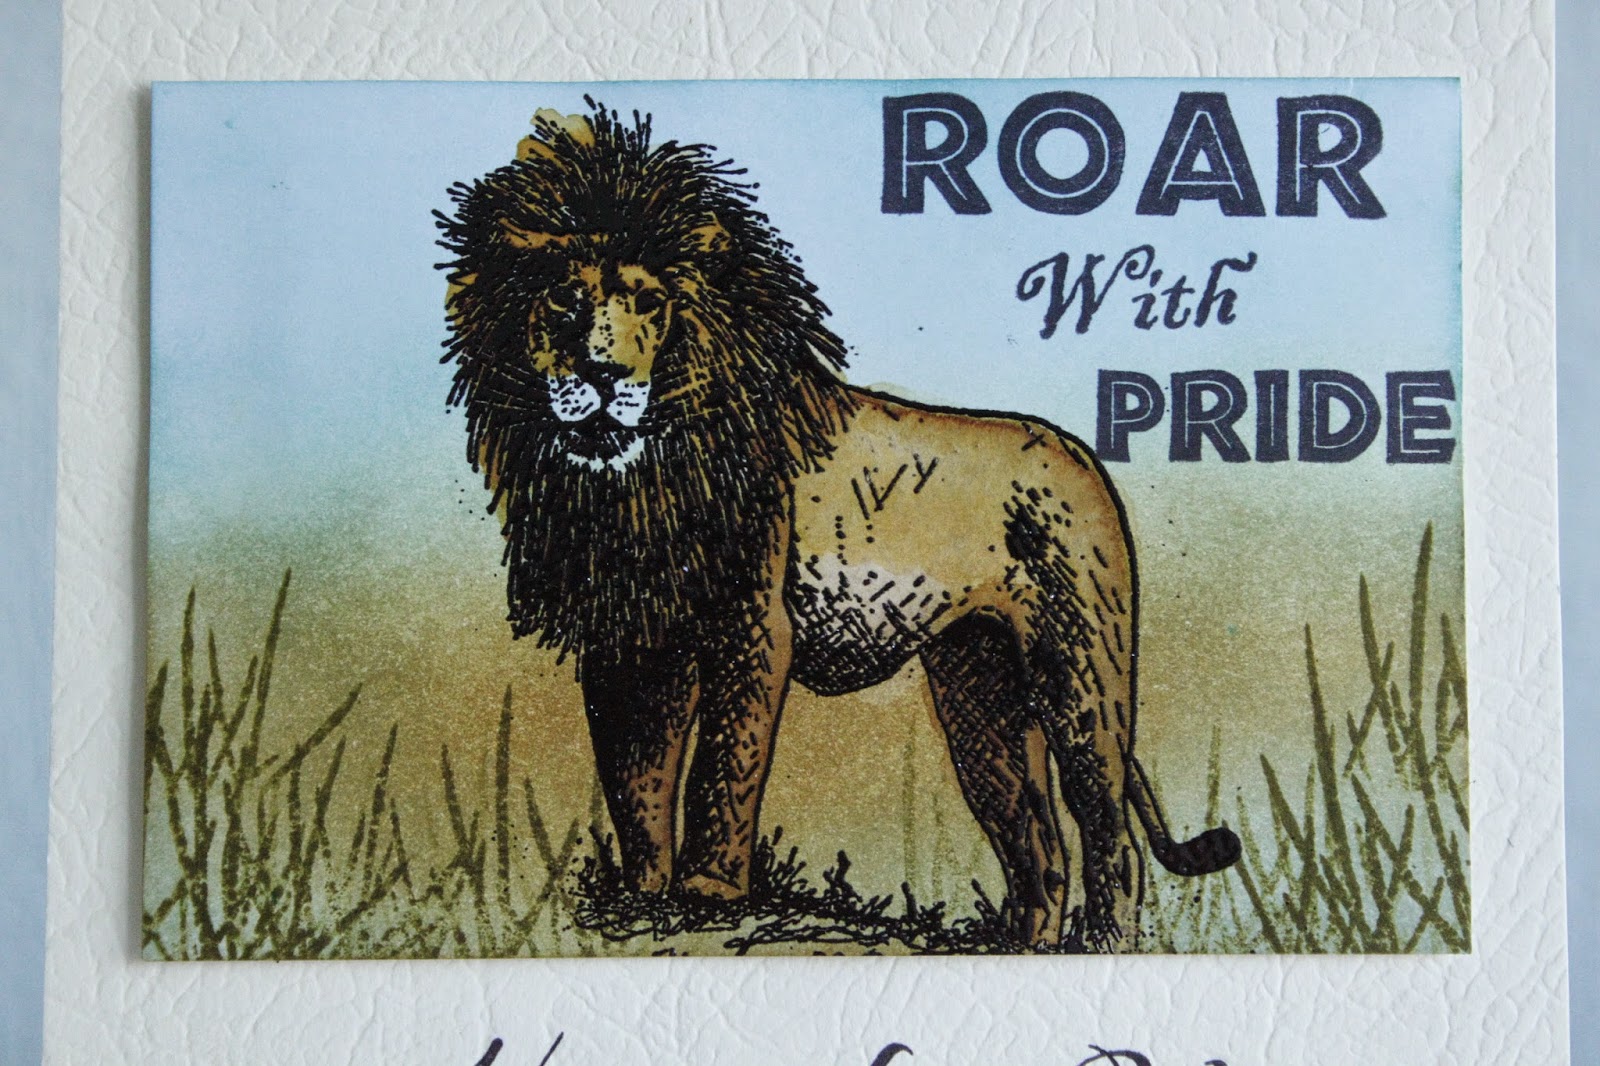
I decided to have a play yesterday and do a sort of CAS card, one layer. I have a few stamps I bought a while back that I have not used yet, this being one of them, and I thought they would do as a male card.

I got my card base ready and cut to size then measured a piece of White card to the size I wanted.

Using distress inks I started blending them together to form the background then stamped the grasses from John Lockwood's Daffodil  Elements stamps, these are so handy! Next I inked up my Lion stamp with my versamark ink pad and heat embossed it with Black embossing powder.

I got my Aquatints water colours and mixed the Orange and Browns together until I got a colour I was happy with and painted him in as seen. 

I stamped my sentiment at the bottom of the base card, attached my image with foam tape and there you have the finished card.

Items Used:

White card
Printable Heaven Leather card Cream
Tim Holtz Distress Inks Bundled Sage, Brushed Cordroy, Tumbled Glass and Peacock Feathers & Forest Moss
Spectrum Noir Aquatints 33, 35, 39 & 42
Sheena Douglass Little Bit Sketchy Stamps-Roar
Papermania Embossing Powder Black
Creative Expressions Unmounted Stamps Friends Sentiments
Creative Expressions John Lockwood Element Stamp Daffodil Elements ( Grass)
Ranger Archival Ink Black

Thank you for looking, Jacquie xxx

Saturday, 2 May 2015

Hello Marigold

Hello crafters, good to have you here with me today. Thank you for all your wonderful comments on my last post, I do appreciate them so much. I have not done anymore backgrounds like that yet but its on my list to do as are many things lol!

Well today is our 9th Challenge for http://lilpatchofcraftyfriendsdt.blogspot.co.uk/p/challenge-blog.html we have some wonderful sponsors as usual, so please do come along and join in the fun.

This challenge sponsors are:

 Prize - $12 Gift certificate
 Prize - 7 Images
Prize - 1 image


My card is using a beautiful image from Ching-Chou Luik called Hello Magnolia.


As soon as I received my image I knew I wanted to give her Blonde hair and a Navy dress so I proceeded to colour her in with Promarkers and Spectrum Noirs, I was never good at colouring hair so for this I used some You Tube videos for Blonde hair and I must say I am pleased with the results.

I wanted to frame the image and I thought this frame from Couture Creations was perfect. I die cut it twice, once with White card and once with Black card, I placed the Black die cut under the White to act as a shadow and to add some depth to the frame then attached this over the image.

For my base card I used 7"X7" base White card, I cut some Dark Blue card to size then inked up my embossing folder with a Versamark Ink Pad and ran the card through the E-Bosser, I then brushed Mica pigment powder over the top, this gave a lovely sheen to the background. 

I attached my image and frame in the center of the card then attached some flowers in the bottom right corner, similar colour to those I had coloured in the image, I added some faux quilled leaves around them. In the opposite corner I added a Blue Butterfly, again to match the one in the image, also to balance the card out.

To finish the card I added three gems in the two opposite corners to the flowers and butterfly and on the inside I added some more of the Blue card and attached the cut out from the frame die cut  on top in order to have somewhere to place a sentiment or verse. There you have the finished card. Doesn't she look lovely? Do pop over to http://lilpatchofcraftyfriendsdt.blogspot.co.uk/p/c7-team-april-5th.html to view the other wonderful creations from the DT.

Items used:

Ching-Chow Kuik Fantasy Art Digi Image-Hello Magnolia
7"X7" Base White Card
Spectrum Noir pens - GB1;GB3;TN3;TN4;CR4 & CG4
Promarkers - Ivory & Blush; Indigo Blue; Sky Blue; Cool Aqua; Artic Blue & Duck Egg Blue
Couture Creations Fancy Frame
Cosmic Shimmer Iridescent Mica Pigments Angel Gold
Buckwell Craft Supplies Flowers
Sue Wilson Finishing Touches Faux Quilled Leaves
Hunkydory Diamond Sparkle Gems Stones
Crafters Companion Kimono-Kimono Butterfly
Creative Expressions Foundation Card Dark Blue
Tattered Lace Embossing Folder Fretwork Lace
White Card

Thank you for looking, Jacquie xxx

Sunday, 12 April 2015

Splatter Happy!!!

Morning my crafting friends, hope today finds you all safe and well, lots of hugs are going to those of you who don't.
For those of you who went to Ally Pally yesterday I do hope you all had a fabulous time and spent every penny lol!!! If you're going today have a fab time too.

Todays post I actually did yesterday to enter in a competition over Less Is More,    
they are asking for one layer cards with splatters, I can do that I said to myself, easy peasy Well! Not in a million years is it easy, this was my third attempt as I did not like the other two, did not turn out as I hoped, more splodges than splatters lol! I decided this one was good enough!


I actually stamped the grasses on first then splattered over the top of them carefully not to cover the image, I added the butterflies to give it a bit of colour then added the sentiment last! 

Sorry for the quick post, it only consists of four stamps and lots of coloured paints/inks!Why don't you join in with the challenge?

Items Used:

Yellow DS Card (Own Stash)
Sheena Douglass Little Bit Scenic Stamps Silhouette Garden
Woodware Craft Collection Clear Magic Singles Grasses
Tim Holtz Distress Inks Crushed Olive & Peacock Feathers
Cosmic Shimmer Vintage Mist Egyptian Blue & Antique Rose
Spectrum Noir Aqua Tint Inks Bright & Beautiful

I would like to enter this in http://simplylessismoore.blogspot.co.uk/2015/04/one-layer-splatters-week-219.html 
 

Thank you for looking, Jacquie xxx

Friday, 10 April 2015

Daisy Birthday

Morning my crafting friends, I hope today finds you well and a BIG thank you for visiting my blog today, its always lovely to have you here, please have a browse round, it would be lovely if you could leave me a comment on what you think before you leave and I would love for you to visit me again.

I would like to give a very warm welcome to my newest follower Traci, great to have you on board. Traci has a wonderful blog of her own so please do go over and give it a look, you can find it HERE

Now todays post...


I bought these Daisy stamps designed by John Lockwood a while back, this is the first card I had made with them. Quite a simple card, I wanted the aperture on the front to show the beautiful stamp on the inside and I think it worked by framing the top aperture with a different colour. I had to cut the aperture out three times, the base card, second layer and top frame using two of the dies from Labels Twenty Six, thankfully I managed to match them all up, its hard to see the second layer as I used White hammer card and pierced round the edge.

I love the tiny bubbles around the Daisy, just right for adding little pearl drops as I have done here in White.

I coloured the Daisies in with Promarkers and Spectrum Noir pens using a lovely bright Yellow, Orange & Green, loved how this went with the Teal colour of the frame.

To finish the card I added some PVA Pearl drops on the front of the card as seen.

Items Used:

Creative Expressions John Lockwood Stamp Set- Daisy Corner
Basic 6"X6" White Base Card
Soho Creative Hammer Brilliant Card
Crafters Companion pearlescent Card- Teal
Spellbinders Nestabilities Labels Twenty Six
Cosmic Shimmer Pearl PVA- Cosmic Pearl
Promarkers
Spectrum Noir
Piercing Ruler

Thank you for looking, Jacquie xxx

Sunday, 24 August 2014

Christmas Ivy

Morning my crafting friends, hope you are all enjoying the Bank Holiday weekend, lets hope the weather holds just  a little longer.  

For todays post I thought I would try a Sheena Douglass idea that she showed recently on her TV shows, I often wonder whether I could make them look as good as she does lol!


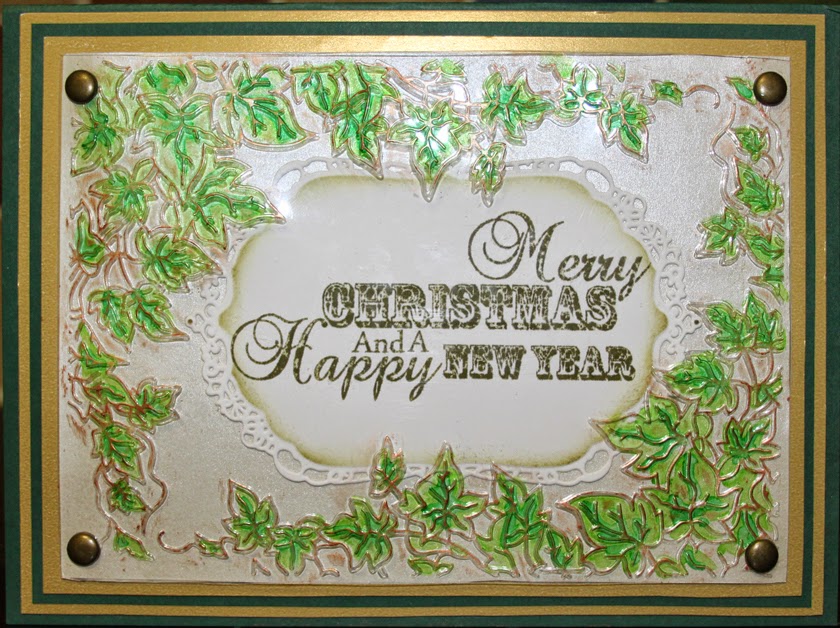
So, using the acetate packaging from her folder I embossed the Ivy Frame then rubbed Cast Bronze Gilding Wax over the embossed areas. turning the acetate over I coloured in the Ivy with Spectrum Noirs and put to one side.

Using some Black Soot I stamped my sentiment onto some White card, die cut it out and inked round the die with Forest moss. I placed this in the center of some White card and attached the acetate over the top with some brads.

I matted this up with Gold & Green Card. The dimensions are 7"X5".

I was quite pleased with how it turned out, not quite as good as Sheena's but good enough I think!

Items Used:

Sheena Douglass Festive Embossing Folder Ivy Frame
Sheena Douglass Little Bit festive Pinescape (Sentiment)
Acetate packaging.
White card
Creative Expressions Gilding Wax Cast Bronze
Creative Expressions Foundation Card Rich Green
Spellbinders Imperial Gold Gold Labels Four
Create & Craft Gold Card
Dovecraft Metallic Brads
Spectrum Noir Pens LG5 & JG2
Tim Holtz Distress Inks Black Soot & Forest Moss

Thank you for looking, Jacquie xxx