Followers

Total Pageviews

Showing posts with label Sheena Douglass. Show all posts

Sunday, 2 April 2017

Remember When Part One!

Hello my crafting friends, sorry for the long absence yet again! Did you see Sheena's Remember When collection, wasn't they amazing designs? Here I am going to show you some of my samples for the shows and a quick run down of what I used for each sample. I will show the rest another day.

The roof tops are one of my favourites and these along with the Chimney would make great 'New Home' cards I think, something different to what you can normally buy. For my sample I I first did the sky with Aquatints mixing some of the pastel colours and letting it dry. For the roof tops I ran the stencil through the e bosser to emboss it then painted it with Pebeo Creme Paints Cinnamon, Taupe & Mine colours and a little Black Acrylic. You can add some Black to make colours a little darker if you wish. I painted these.going from light to dark as if the chimneys were in shadow. I then heat embossed a little Black cat, cut it out and placed it on the roof. I added some smoke coming out of the Chimney using Pebeo Creme Paints Linen & Mine to finish the card off.


I put some Pebeo Concrete Paste through the stencil onto Black card and once dry painted it with Pebeo creme paints, I mixed the Red and Orange together until I got the shade of Red that I wanted for her hair. I left the text just as it was with the paste, meaning I did not paint it white at all.I distressed the edge of the card to make it look more like a tatty poster. For the Woman, I stamped her, painted her with the same paints and cut her out. For the background I ran some card through the Brick Wall embossing folder then painted it with Pebeo Creme Cinnamon. I put it all together as if the Woman is pondering over the poster. Adding a sentiment at the bottom to finish the card. This was A4 size card, quite a large card to accommodate the stencil.


I first coloured my card with distress inks using Rusty Hinge at the top and Pumice stone at the bottom I then ran it through the stencil to emboss and whilst in the stencil coloured the windows with Hickory smoke and the boys with Black Soot. I stamped the boy, painted him with Pebeo Creme Paints, putting some watered down Brown on him to make him look a little muddy, then cut him out and placed him in front of the boys then added the sentiment to finish.


I painted a piece of card with Pebeo Creme paints using two different Blues and adding some White Pearl, I painted a moon using the White Pearl up in the corner.Once dry I stamped my Santa and sleigh going across the moon and coloured using a Black marker pen. Using more card I embossed the stencil, cut it out and painted it with Pebeo Creme paints using Cinnamon, Black and Silver, I added the silver where the moon may have shone on the bricks, I also added two chimney pots on top. I placed this on top of my background, This could be made to look more Christmassy by adding snow on the roof tops and you have all that lovely brick work to add a sentiment of your choice.


If you want to know more please leave a message in the comment box and I will answer it there or email me. 

Thank you for looking, Jacquie xxx


Sunday, 26 February 2017

Sheenas creations Create a Flower

For my third and last post today I am showing my creations for this weekends wow on Hochanda showcasing Sheena Douglass amazing Create a Flower Mixed media dies, stamps and stencils using Pebeo Creme Paints and a range of different materials.

Once again if there are any you would like featured in a separate post with instructions on how it was made then please ask in the comments box below. I have already been asked about my Peacock so this will feature later this week.


Thank you for looking, Jacquie xxx

Sheenas creations WORDS

Hello again, I am like a bus none arrive for ages then all come at once lol! This is the second post of three today, yes I did say three, after these future posts will be on individual makes that you want info on.

Second up is WORDS these are all made using the wonderful Texture Embossing Folders from Crafters Companion, Spectrum Noir Sparkle Pens and Sheena Douglass amazing WORD stamps. If you require any further information on any of these samples please comment and ask on this post and I will post it over the next couple of weeks.


Next up will be Create a Flower

Thank you for looking, Jacquie xxx

Sorry! Sheenas creations homelife

Hello my crafting friends, well I have truly failed with my New Year resolution of blogging at least once a week, here we are almost at the end of the second month and I have not managed to blog at all. My sincere apologies. In my defense I have been extremely busy on Sheenas design team, we have not stopped, its all been very exciting and keeps us all on our toes. I do hope to be able to keep up with my blog as I hate to lose this contact with such good friends. So here I am going to show my creations I have made for Sheena over the last few months, these will be seperate blog posts for each collection to make it easier and then I hope to blog some tutorials over the next few weeks on certain creations, hope being the operative word!
I am sorry for the extremely long posts of photos but if there is any particular creation you would like info on then do comment below and I will get to it. Thank you.

Anyhow, here is what has kept me busy, busy, busy...


First off is HOMELIFE

 DISTRESS INKS & AQUATINTS

 DISTRESS INKS & AQUABLEND PENCILS WITH GLAZE OVER THE JARS

 DISTRESS INKS & AQUATINTS

AQUATINTS & PEBEO MARKERS


Thank you for looking, next post shows the WORDS STAMPS

Jacquie xxxx

Saturday, 17 December 2016

Sheena's new Rock shows and past Groovy 60's samples

Well a BIG HELLO  to my crafting friends, I have left it so long before blogging so my sincere apologies for those of you who keep looking in to find nothing changed!

Now may I first


WISH YOU ALL A VERY MERRY CHRISTMAS AND A HAPPY NEW YEAR!

Now I have been very busy doing samples and home decor for our lovely Sheena Douglass, I have even missed posting my Groovy 60's sample on here so I will post them at the bottom of this one!

Sheena has her wonderful Rock stamps on a One Day Special starting Monday at 8pm on Hochanda then  Tuesday at 9am, 12 noon, 4pm and finally 7pm. Not only are there the Rock stamps but also some great deals on the Sparkle pens and the metallic paint pens. Now these paint pens are great when you blend them with White Spirit or blending solution MAKE SURE YOUR ROOM IS WELL VENTILATED!

Here are my few samples that I made extra for the shows...


Aquatints background, guitars stamped Stamp the front one, (paint over with drawing gum then stamp the next one and keep repeating until you have the amount of guitars you want, remove the gum when dry and colour)I drew over with Pebeo Pens then coloured in with Spectrum Noir Sparkle Pens


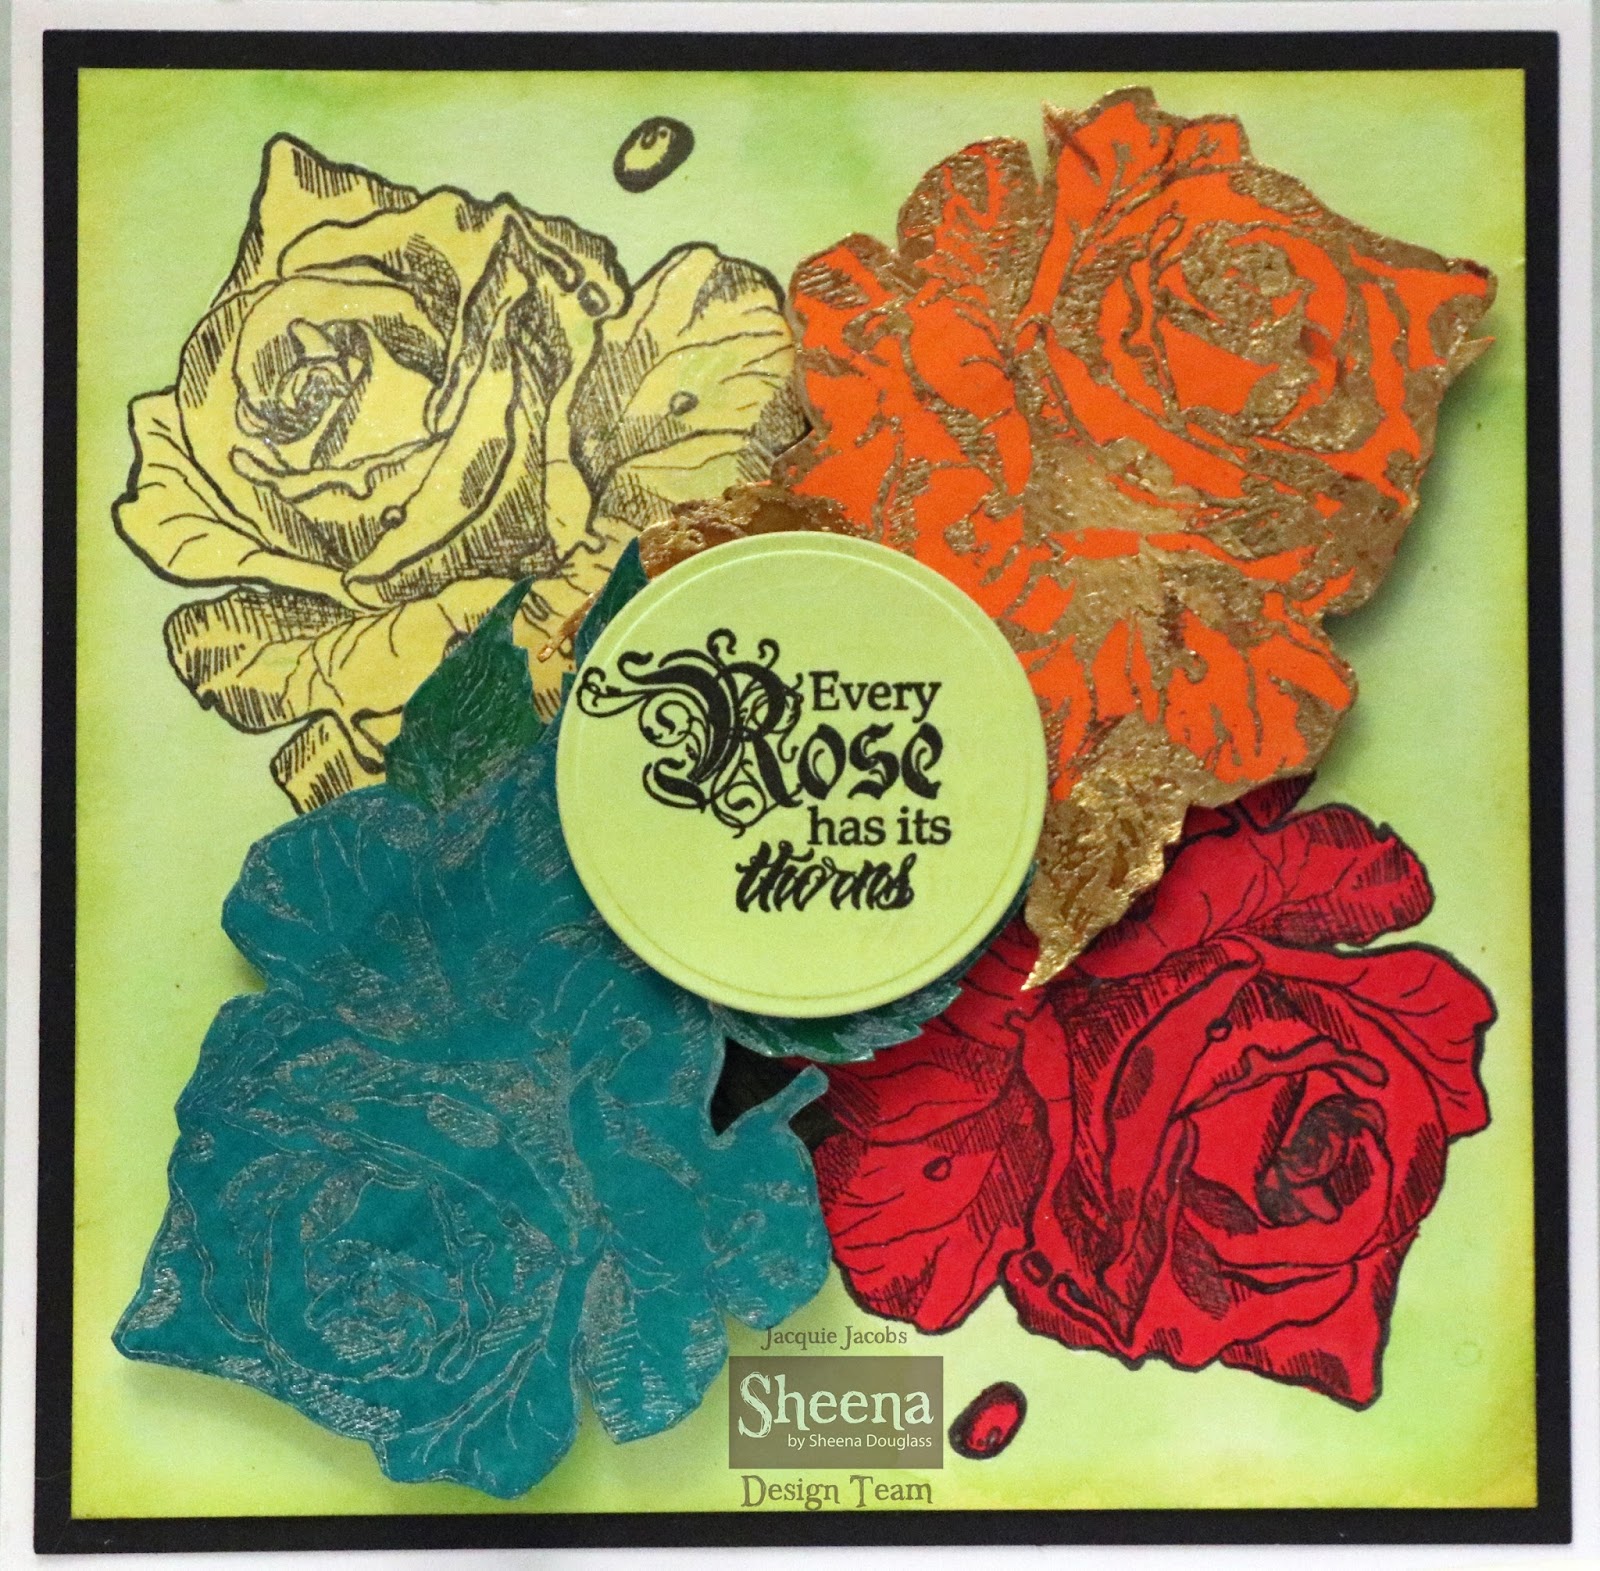
Background is Aquatints, the Yellow & Red roses were stamped and coloured in with Spectrum Noir Sparkle Pens. The Orange & Blue roses were stamped then foiled with Pebeo glue and foils then coloured using Aquatints, cut out and placed over the top of the other two to dimension. The sentiment was added on top.


The background was Gold & Silver Pebeo Pens blended with White Spirit then Distress Ink was added through a stencil (Sheena Douglass Groovy 60's 'Just Groovy') over the top. I stamped the Microphone onto a piece of White card and painted with Pebeo Drawing Gum, let it dry them added drops of Aquatints, Bright & Beautiful set, over the top letting them mix into one another and leave to dry. Once dry I rubbed off the drawing gum from the Microphone and painted the microphone with the Pebeo Silver Pen. I stamped the sentiment around the edge, rounded off the corners then matted it onto some Black card and placed it on top of the background as seen.


This background was made using Pebeo Silver & White Pens and blending them with White Spirit. I stamped the large circle stamp from the Sheena Douglass Little Bit Sketchy 'Grunge Band' using Black Versafine Ink in the four corners first then over laid the other circles in between so the middle circles were sitting just on the edge of the outer circles. Using the Gold Sparkle Pen I painted in the left side of the circles to add a bit of sparkle and left to dry. On a small piece of Black card I stamped the corner smaller circles using the Pebeo Mixtion Relief glue, left to dry for almost 1 hour, it needs to go clear, then added Pebeo Gold & Silver foils. On a piece of White card I stamped the Microphone using Black Versafine Ink then cut it out and painted over with Spectrum Noir Silver Pen, once dry I placed it on top of the foiled panel and placed it on the card as seem. I made two sentiments and placed them in the top and bottom corners.

So there are my four extras for the shows, I hope you like them. Now as promised here are the samples and home decor I made for the Groovy 60's shows that were on last week, I apologize for the abundance of photos, I wont give details of how I made them but if you require to know how something was made then do please email me or ask a question on the comments with your email address and I shall reply there.

DISTRESS INKS AND SPECTRUM NOIR PENCILS

DISTRESS INKS & BLACK EMBOSSING

SPECTRUM NOIR PENCILS & DISTRESS INKS

DISTRESS INKS & BLACK EMBOSSING

DISTRESS INKS & BLACK EMBOSSING

DISTRESS INKS & PEBEO ACRYLIC PAINTS

CANVAS-PEBEO IRIDESCENT & ACRYLIC PAINTS & DISTRESS INKS


AQUATINTS & DISTRESS INKS

DISTRESS INKS. BLACK EMBOSSING & YELLOW FLOCKING

SPECTRUM NOIR PENCILS & DISTRESS INKS

AQUATINTS & DISTRESS INKS

HOME DECOR- PEBEO ACRYLIC PAINTS

AQUATINTS SALT EFFECT & DISTRESS INKS


Thank you so much for looking, please do not forget Sheenas' shows starting on Monday at 8pm on Hochanda there will be some marvelous demos and great offers on the show.


I have decided as I have gone past the 100,000 views (THANK YOU) I will put everyone's name who comments on this post in a draw and the name pulled out will win a die or stamp set, so if you are interested in winning a new die or stamp set please comment and leave your email address, I will announce the winner on here and contact you via your email address as to where to send your gift, you will have a choice of which gift, this image shows the choices...remember everyone can enter so GOOD LUCK. Please note this will not be sent out until AFTER  Christmas because of the problems with the post at the moment.
TTFN Jacquie xxxx

Friday, 4 November 2016

HAPPY BIRTHDAY TO MY BEAUTIFUL DAUGHTER TOYAH

Hello my crafting friends, well its my beautiful daughters 35th birthday today, my where does the time go so here is the card I made for her, I loved doing all the Time Traveller creations with Sheena's Time Traveller Collection so decided to make one of these for her birthday card.


When I made my canvas for the Sheena Douglass Time Traveller shows on Hochanda I scanned in the background of my canvas and it is this background that I have used  as the base for this card. I had some cogs from Sheena Perfect Partners Time Traveller Geared Up already die cut from the rust technique card I made ( I will do a tutorial on this at a later date) so I placed these on the left hand side of the card in the two corners. 

I die cut more cogs out of Gold Miri card and also the watch and put these to one side. I die cut the big clock from Sheena Perfect Partners Time Traveller Make Time out of Black card then rubbed Pebeo Gilding Wax King Gold over the numerals and Vintage Gold round the rest of the clock, I wanted this in the top right corner of the card so I attached the gold cogs so they would be in the center of the clock then attached the clock over the top.

I die cut two of the propellers from Sheena Perfect Partners Time Traveller Voyage of Discovery out of White Card and stamped them with the matching stamp using Versamark then heat embossed with Black Embossing Powder. I then painted them with Aquatints Bright & Beautiful, using the Red & Green to make the rusty Brown colour and then painting the Teal over the top and finally rubbing some Vintage Gold Gilding Wax over the top. I put these together to form a flower and added this in the bottom right corner of the card and attached the chain from the Sheena Perfect Partners Time Traveller Timepieces watch so it came from under the flower.

I stamped the Woman from Sheena Perfect Partners Time Traveller Steampunk Woman onto White card and painted her with Aquablend Pencils, cut her out and attached her with Collall 3D Gel Glue so she was raised up slightly on the card as seen.

To finish the card I matted and layered up onto Gold Miri card and Black card.
This card is very similar to one I made for the shows only I omitted the sand gel but added more cogs. I only hope she like it lol!

If you have any questions please do not hesitate to comment and I will reply on here. 

Thank you for looking, Jacquie xxx


Thursday, 3 November 2016

Fly High

Hello my crafting friends, I am back with a card I made for Sara at Crafters Companion for some shows she was doing in the USA, this was quite a few months back and I don't think I have posted it before so here we go...


I first took a piece of card roughly to the size of 7x7" and inked it up with Tim Holtz Distress Inks Tumbled Glass and Squeezed Lemonade making sure I blended well where the two colours meet.

I lay over the top Sheena Douglass Decorative Stencil Shady Meadow and inked through the bottom half using Tim Holtz Distress Ink Brushed Corduroy and the top half with Forest Moss, omitting the tree leaves in the top right corner where possible, I then went over the top again lightly with the Brushed Corduroy. I removed this stencil and then took another stencil, this time the Floral Canopy and used just the Wisteria part of the stencil inking it all along the top with Tim Holtz D.I. Shaded Lilac then going over that again with Seedless Preserve to add depth. I then went round the edge of the card again with Brushed Corduroy D.I. to draw the eye to the center.

For the Butterfly and Dragon fly, even though Sheena has done both of these as a stamp and die the ones I have used were just the smaller stamp set that came with Crafters Companion Inspiration Magazine, I think it may have been No 9. I stamped both of these onto some Sheena White Stamping Card, coloured them in with Spectrum Noir Pens and cut them both out. 
I took a little baby peg and attached this to the Butterfly as its body for interest and painted over both the Butterfly and Dragonfly with a Clear Sparkle Pen, unfortunately it does not show up in these photographs. Once dry I attached them to the card as seen. To finish I stamped the sentiment just under the Dragonfly.

I matted and layered it up on Black card then a White base card to complete the finished card.

Thank you for looking, Jacquie xxx

Sunday, 30 October 2016

Christmas Embossing Folders

Hello to all my crafting friends out there, thank you for your wonderful comments on my last post with the Time Traveler collection, it was such a joy to work with. In fact I have realised I forgot to post you my samples from Sheena's Christmas Folder collection, these went with her previous collection of Christmas Create a Card. Anyhow I will just post them all on here for you to view at your pleasure, if any of you have any questions just put it into the comment box and I shall reply to it on here.

This was the snowflake folder embossed twice face to face showing the beautiful Snowflake as a whole one then gilding wax rubbed over the top.

The Snowflake folder again just painted over with Clear Sparkle Pen and a Blue ribbon added

I did the faux leather technique on this one to make it a masculine card

Using a mixture of Pebeo Dyna paints for the background before embossing then rubbing gilding wax over the embossed areas

I brayed Distress Inks over the folder before embossing so it left the embossed areas white but coloured the background, I then painted in the other bits adding the snowflake corner to the front of the card

Again a mixture of Pebeo Dyna paints on Black card then sanded back the embossed area to show the black through and just added the stag on the front

I stamped and embossed the background with some snowflakes, embossed onto Black card coloured in with the three colours of gilding wax and placed on top of a Gold panel adding Pink Ribbon on the side

Aquatints Background, lights coloured in with Pebeo markers then some die cut lights added on top

Eleven Distress Inks were used to colour this background  then I added the script stamp all over before I put it through the folder then coloured the wise men and star in with Pebeo Markers very carefully

I stamped up the background then embossed the folder, cut to size and added Pebeo relief glue over the lights, left to dry over night then added the foils on top. I coloured in the background lights with Aquablend pencils


I hope you enjoy these samples and if you bought any of the folders have enjoyed working with them.

Thank you for looking, Jacquie xxx