Followers

Total Pageviews

Sunday 29 March 2015

Easter Rose

Hi there my crafting friends, good to have you back again, this is a new release from Kith and Kin Stamp Company https://www.facebook.com/kithandkinstampco/app_150178545006427 they have been kind enough for us to have the image as a preview to create as we wish to show you the beautiful Easter Rose, so thank you kithandkin, you can purchase her here http://kithandkinstampco.bigcartel.com/product/easter-rose  so go on over to the link and buy it now!


I started by die cutting the image out with Oval Majesty die leaving in all the tiny die cuts, whilst it was still in the die I inked the bottom of the image with Crushed Olive and the top with Tumbled Glass being careful not to go over the image itself.

Being an Easter image I wanted her dress to be a vibrant colour we associate with Easter so it had to be Bright Yellow!!! I coloured her shoes to match and gave her a basket of colourful eggs, the little bunny I coloured in Tan adding a touch of Light Grey to his White fur!

I found this lovely paper in my stash, I wish I could remember where it came from but I thought it matched the image so well I cut it to size, matted and layered it up onto some Green Satin card and Custard card, then attached the image on top.

For the base card I folded a sheet of Custard card in half, cut some Green Satin card to size and embossed it with Grande Floral Embossing Folder then matted this onto the base card, on top of this I added the focal image at an angle.

I was going to gather a lot of flowers together to decorate around the image but these tiny flowers looked so lovely in a circle as a flower wreath, so I kept to the two colours, I have used Green & Yellow! I die cut a small circle out to attach the flowers to then added a couple of White leaves to break them up and I attached it to the card as seen.

Inside the card I added the rest of the beautiful patterned paper I had used under the image to match the front. Adding the Gold letters to make up 'Easter' in the bottom right corner finished the card.


Card dimensions 5"X7". Do go over to http://lilpatchofcraftyfriends.blogspot.co.uk/ to see what lovely creations the other DT members have come up with.

Items Used:

Kith and Kin Easter Rose
Creative Expressions Foundation Card Custard
Create and Craft Satin Card Green
Pretty Paper ( sorry cannot remember where this came from)
Promarkers
Spellbinders Oval Majesty
Spellbinders Standard Circles Large
Sheena Douglass Embossing Folder Grande Floral
Buckwell Craft Supplies Flowers
Sue Wilson Finishing Touches Faux Quilled Leaves
White Card
Tattered Lace Die Alphabet (free with Magazine)
Gold Card

I would like to enter this card into http://craftyourpassionchallenges.blogspot.co.uk/2015/03/challenge-255-always-anything-goes.html


Thank you for looking, Jacquie xxx


Just a Leaf

Morning my crafting friends, hope to day finds you all safe and well, plenty of hugs are going out to those who need them.

It would have been my friend Joy's 85th Birthday today so took some flowers up the cemetery yesterday, they have a Remembrance area where you can take flowers and cards to put on display, we are hoping to put her ashes on the March garden sometime over the next two weeks.

I am a bit late in posting, the time has just passed by so rushing to get this on tonight for tomorrow as I shall be taking my FIL to hospital tomorrow for an operation as hubbie will be at work, its only in the day ward but I have to wait and bring him home so could be there a while!

I have been making three cards this week and two of them are for the DT LPOCF so cannot show them till next week lol! That leaves (Leaves lol!) this one!!!


I recently bought some beautiful Leather Look card in Cream  so I thought I would use my leaf stencil over it to see what it would look like, well I love it, the leather look gives the look of the veins in the leaves so I have left it as a CAS card.

I cut a piece of card to size and taped the stencil on top, using my stencil brushes and three different shade of Green Distress Inks I built up the layers light to dark.  I was going to leave the surrounding area plain but then thought about spraying the background Brown but wish I hadn't as I did not do it very well, a bit heavy in places but its useable! 

I then matted this onto the base layer which was the same card but just the other side which is plain, so I have the leather look on the inside!

It was originally going to be Portrait but I preferred it Landscape so I just stamped my sentiment in the bottom right corner before I changed my mind lol! I feel this could be used for a number of occasions which is why I chose this particular sentiment.

Items Used:

Printed Heaven 'Leather Look' Card Cream
Clarity Stamps Stencil Leaf
Tim Holtz Distress Inks Bundled Sage, Crushed Olives and Forest Moss
Promarkers Cinnamon
Perfect Paper Crafting Perfect Airbrush
Justright Craft Large Fancy Sentiments


Thank you for looking, Jacquie xxx

Wednesday 25 March 2015

Mixed Media

Morning my crafting friends, hope today finds you all safe and well, lots of hugs to those who are not.

Now todays post is a bit of mixed media hence the title lol! Nothing was planned I just went with it and tried adding different things to see whether they worked or looked right, overall I am pleased with the end result.


I started with a piece of Kraft card and using a stencil I pasted over part of the stencil in the middle with modelling paste.

Once this was dry I used another stencil called 'textured scraped paint' to brush through some distress inks I then ran it through the embossing folder Harlequin. Using distress inks Weathered Wood, Iced Spruce and Forest Moss I inked around the card but not over the paste part. I rubbed some Cast Bronze gilding wax over the embossed part of the card and buffed this up to a shine.
I wanted to add a stamp to the background and I found this lovely swirl like  grasses so I stamped this up the top left corner with archival ink.

I die cut Medallion Eight out of Rich Green card and used it as a pocket in the bottom right corner after I had threaded some twine through it. 

In my stash I had these parcel tags so decided to us this as the sentiment to go into the pocket. I inked the tag up with Vintage Photo then stamped my sentiment on top.

Using a little more of the Rich Green card I stamped the clock face and hands then die cut out with a circle die, I inked round the edge of this with Vintage Photo.

On some White card I inked up a section with distress inks until I got the desired colour then die cut the frameworks out, this gave a nice two tone look to the frame work. I stuck half of this down across the middle of the card then placed the stamped clock behind it as seen.

In my stash I had two Victorian Metal corners left so I heat embossed these with some Shabby Green embossing enamel and glued these in the opposite corners, by which time I wished I had left them in their original bronze metal state as they stood out far too much.

I cut some Pearlescent Chocolate brown card and embossed it, again using the harlequin embossing folder, I had to extend the pattern once. I had hope to be able to emboss the pattern 'portrait' way like the top card but the piece of card I had was too big for this so I embossed it 'landscape'. I then proceeded to distress around the edges using the edge of some scissors. Once this was done I wrapped around the card some White cord and attached it to my base card, for this I had folded in half an A4 sheet of 'Leather look' cream card. 

This just left the top piece to be attached to the Chocolate coloured card, the White cords matched up with the two metal corners so now they did not stand out as much and it all blended in together. I attached a small key in the bottom left and placed a piece of the Chocolate card inside, this finished off the card.

Items used:

Create and Craft Kraft card
Create and Craft Cream Cord
Dreamweaver Stencil Diamond
Maimen Modelling Paste
Memory box Stencil Textured Scraped Paint
Spellbinders M-Bossibilities Embossing Folder Harlequin
Spellbinders Nestabilities Standard Circles Large
Spellbinders Shapeabilities Die-lites medallion Eight
Tim Holtz Distress Inks Weathered Wood, Iced Spruce, Forest Moss, Peacock Feathers, Rusty Hinge and Vintage Photo
Tim Holtz Sizzix Alterations Frameworks
Creative Expressions Gilding Wax Cast Bronze
Creative Expressions Foundation card Rich Green
Creative Expressions Metal Corner Embellishments Victorian
Sheena Douglass Stamping card White
Sheena Douglass Little Bit Scenic Stamps Silhouette Grasses
Ranger Archival Ink Black
Sam Poole Unmounted Stamps Time Flies
Stix Alteration Tags
Twine
Stampendous Frantage Embossing Enamel Shabby Green
Crafters Companion Pearlescent card Chocolate Brown 
Printable Heaven 'Leather Look' Card Cream 

I am entering this into http://ttcrd.blogspot.co.uk/2015/03/ttcrd-challenge-week-of-march-24th.html
http://lovetoscrapchallengeblog.blogspot.co.uk/2015/03/ltscb-50-anything-goes.html 
http://mmmchallengeblog.blogspot.co.uk/2015/03/the-color-green.html 
http://aurorawingschallenge.blogspot.co.uk/2015/03/challenge-13-anything-goes.html 

Thank you for looking, Jacquie xxx


Sunday 22 March 2015

Distress Ink Holder

Hello my crafting friends, a good Sunday morning to you all and I hope today finds you all well, big hugs to those who don't.

Thank you for all the wonderful wishes for my hubbies 50th, he says Thank you too, he had a wonderful time I don't think I could have done anything better so well worth all the hastle with the travel lol!

May I give a very warm WELCOME to my newest followers Karen Hasheck & Cheryl Brown, its lovely to have you on board ladies, Karen has a lovely blog which you can find here http://karenskreativekards.blogspot.co.uk/ Cheryl if you have a blog of your own then please do send me the link so I can return the favour, the more the merrier that's what I say.

I am afraid today's post is full of images so I hope it does not bore you too much. I bought one of the Distress Ink holders from John Lockwood's Creative Expressions show on Create and Craft last month, it took me a few weekends to finish it as I did not have time in the week to do it, I am pleased with the result.

First pictures, actually I almost forgot to photograph it before I started painting that's why two of the slots are painted and the rest are not lol!


This was extremely easy to put together even without instructions (it does come with instructions !!!) and I have not glued it but it is solid. I started by giving it a coat of White Gesso followed by a coat of White Acrylic.


I gave it a second coat of White Acrylic, each time I left it to dry over night which is why it has taken me so long to complete!!!

I then gave it two coats of a Pale Green colour before rubbing the edges with a sanding pad to give it a slight distressed look.


I then stamped over the top and sides with some Ivy stamps using two different colours of Green using the lightest colour first, I could have added more i.e. flowers, birds or butterflies but decided I liked it as it was. This is the finished result as seen on Create and Craft (John Lockwood's show)last week lol!
So a quick spray of Matt Varnish and it is complete. As I have 23 colours of distress ink and it holds 24 I shall have to buy another one soon!!!

Items Used:

Creative Expressions Distress Ink Holder
Dina Wakley MEDIA White Gesso
Reeves Acrylic Paint White
Windsor & Newton Galeria Acrylic Paint Pale Olive
Sheena Douglass Little Bit oriental Stamps Lanterns (Ivy stamps)
Tim Holtz Distress Inks Crushed olive & Forest Moss

Thank you for looking, Jacquie xxx

Friday 20 March 2015

Oldie's Friday Again!

Morning my crafting friends, hope this finds you all safe and well, lots of hugs to those who are not well.
A very quick post for you today, as its 'Oldie's Friday' I am showcasing a very old card I made quite a few years ago, I cannot even remember the occasion or who it was for lol!!!


Its that old I cannot even remember what I had used, I can make out an embossing folder and a mask (Leaves) and stamps in each of the corners.

I think the die cut in the middle may well have been Adorning Squares, I am sure one of you crafters out there will be able to say whether it is or not, if it is then this was the only time I used it as it broke whilst going through the machine, I sent it back and never replaced it!!!

As you can see I added a ribbon with the colour to match the stamped flowers with a little MDF flower on top.

Sorry to be so vague in this post but it is Oldies Friday and this oldie is losing her memory lol!

Hope everyone will have a fabulous weekend, its count down time for me again as only one week till Easter hols then I can play whoooppeee!!!

I am entering this into the http://stampingwithbibiana.blogspot.co.uk/2015/03/throwback-thursday-challenge-7.html

See you all on Sunday (I Hope).

Thank you for looking, Jacquie xxx

Wednesday 18 March 2015

Cogs & Keys

Morning my crafting friends, hope this finds you all safe and well? I really appreciate you coming to visit me and I do hope you like my creations enough to come back and visit again.

Now todays creation was a card I made by experimenting with different things, my inspiration for this one was from Pamellia of http://mylittlecraftthings.blogspot.co.uk/ Pamellia always manages to make her creations look amazing, what do I mean 'look' lol! THEY ARE AMAZING!!! Please do go over to her blog and take a look. Anyway, my Son loved it so much he took it as his card for his Step-Fathers' 50th Birthday!


I started with some Kraft card, I placed my Diamond stencil over it and spread some modelling paste over it, I left this to dry overnight. Using a stamp of a clock face from Time Flies I covered it with some of the modelling paste quite thickly and also left that to dry overnight.

With more Kraft card I embossed just the front with 'Stitch in Time' embossing folder then inked this up with Rusty Hinge, Vintage Photo followed by Archival Black.

With the Kraft card that I had spread the modelling paste through the stencil I inked all over with Rusty Hinge and Vintage Photo then patted over the top randomly with my Versamark Glue pad, on this I sprinkled two embossing enamels, Shabby Green & Aged Aqua and heat embossed from underneath.

On top of the embossed enamel I stamped some cogs using Black Archival ink. I added a strip of Film Strip Ribbon on the bottom twisting it over slightly, I adhered this to the card with tiny bits of foam pads at either end.

Onto some White card I stamped the man with the umbrella from Vintage Photography stamps using Vintage Photo and fussy cut him out. I placed him over one end of the film ribbon to hide the foam pad. Over the other end of the film ribbon I added a large key and added a smaller key towards the top.

Once the pasted clock stamp had dried I carefully peeled it back off the stamp and trimmed the rough edge away, the stamp was fine and no residue was left behind I am glad to say! I inked over the clock with Pumice Stone, Rusty Hinge and Vintage Photo, inked it with my Versamark Pad and heat embossed with Clear embossing powder. I then attached this to the card over the cogs with gel glue. I was quite pleased with how the clock face had turned out and although I did put the paste on a bit thick the finished product is very thin but with all the detail intact.

In my stash I found this small piece of Blue textured paper so I attached my topper on using Chronology Brads in each corner. I then matted this onto my embossed base card and there you have the finished card. This does take a couple of days to make but only because of waiting for items to dry.

Items Used:

Create & Craft Kraft Card
Dreamweaver Stencil Diamond & Cogs
Maimen Acrylico Modelling paste
Tim Holtz Distress Inks Rusty Hinge, Vintage Photo, Pumice Stone
Tim Holtz Idea-ology Film Strip Ribbon
Tim Holtz Chronology Brads
Ranger Archival Ink Black
Stampendous Frantage Embossing Enamels Shabby Green & Aged Aqua
Sam Poole Stamps Time Flies
Creative Expressions Assorted Key Charms
Creative Expressions Unmounted Stamps Vintage Photography
Embossilicious Desire Embossing Folder Stitch in Time
Versamark Glue pad
Pinflare Gel Glue

Thank you for looking, Jacquie xxx


Monday 16 March 2015

Hubbie's 50th!!!

Monday morning to you all, I hope you had a fabulous weekend and a wonderful Mother's day, I certainly did!
Firstly I would like to apologize for all my crafty friends out there for not commenting on your posts over the weekend, its been a very hectic one and I just did not get a chance to get on the computer until 9pm last night to do this post! I have looked at your wonderful creations but just have not had time to comment.

As I mentioned before it was my hubbies 50th on Saturday, I took him to London to the Faulty Towers Experience, well we have not laughed so much in ages, it was a most amazing show, I fully recommend it to anyone, if you are a fan of Fawlty Towers believe me you will not be disappointed, it was well worth all the travel and the actors do really look and sound like Basil, Sybil & Manuel. They kindly gave my hubby a mention for his birthday, he was so worried in case they were going to embarrass him lol!


Basil                                           Manuel                                                   Sybil


This was my Hubbies card, I actually made this a year ago so apologies if I have already shown it in the past lol! He is Motorbike mad so I felt this was fitting.

I made a fold out card by putting to A4 sheet together, the papers and images I got from a CD Rom which I think was a Debbie Moore one, I basically matted and layered them with Teal card as seen. 

The outside of the card I embossed Black card with the Tyre tread embossing folder and matted and layered with Silver Miri card, I placed the numbers '50' on either side of the 'doors' and there was the finished card. The back of the card measures 8"X8" and both doors are just under 4"X4" to fit the front.

Items used:

Basic White card
Black card
Debbie Moore CD Rom Cards For men Vintage Transport
Creative Expressions Foundation Card Teal
Silver Miri Card
Self Adhesive Numbers
Spellbinders M-Bossibilities Embossing Folder Kickin' Rubber


I had a lovely surprise for my Son & Daughter for Mother's Day, as I always tell them not to bother with it as it is always just after my birthday and their Step-Father's birthday but did they listen...they presented me with a beautiful Photo Album that they had put together with their favourite photos of themselves. Now my two do not like having photos taken anymore so its very hard to get a photo of them and I drive them up the wall trying, they had raided through all my photos and made their choice and put them in the album leaving room for me to add more, they could not have given me a better present, on top of that neither of them ever bother with cards but they had both bought me one so that was extra special too.

I hope you all had as special day as I did.

Thank you for looking, Jacquie xxx

Saturday 14 March 2015

Candi Tree

Morning my crafting friends, hope this finds you all safe and well.

Today is my hubbies 50th Birthday so I am taking him out for the day to London but I won't reveal anymore in case he reads this lol! I shall post his card on here on Monday.Its going to be a long haul today as the trains are not running all the way to London so part of our journey is gong to be on the bus!!! This puts an extra hour on our journey, its most annoying but as what I had planned has been booked up since well before Christmas I could not change it and apparently there is no other route to London via anywhere!!!

Anyway today's post was a quicky card, in fact very quick!

I got the members gift off Create and Craft which was a Craftwork cards paper pad, some candi and foam pads.

I attached some paper on to my base card then chose one of the papers from the pad, most of these are done so there are spaces to adhere the candi too, you don't have to put them on but it adds dimension.

I inked round the edges of the paper with Weathered Wood before attaching it to my card then chose the candi to match the spaces underneath, I glued them in place and added a little glaze on top to make them stand out a bit more, then I stamped my little bird on one of the branches, there is your finished card.

I did say it was very quick lol!


Items Used:

Basic White 6" X 6" card
Tattered Lace Blue Textured Paper
Craftwork 6" X 6" Paper Pad
Craftwork Candi
Pinflare Glaze
TCP Studio Rubber Cling Stamps Vintage Birdcage
Tim Holtz Distress Inks Weathered Wood


Thank you for looking, Jacquie xxx

Wednesday 11 March 2015

Dragonflies & Poppies

Hi there my crafting friends, sorry did not have the time last night or this morning to put up my post so its a little late!

May I welcome my newest followers BridgetCG, Cara Gregory, American Kuhn, Annie 4 memories, Jan Sharp and Tracy, thank you so much for following/joining me its very much appreciated and great to have such lovely people on board. Sorry I have not linked up your blogs for those who have them but please feel free to leave them in my comments box for all to see so they can view your beautiful creations too.

Thank you for all your birthday wishes, had a lovely evening despite Joy's funeral and Ang I was 55!!! Thanks for asking lol! I had some lovely cards, in fact I have had more today but I only have the photo of the others I got yesterday 


This is the card I have done for my Sister-in-Law for her birthday at the end of this month, I hope she does not look at my blog lol!!! It's the second version I have done of it as I kept making mistakes and ruining the first one! I shall put a picture of that on at the bottom.


 I have a stencil titled Dragonfly & Poppies which I thought was fitting as my SIL loves Poppies, so I set about doing a background first by using the field masks and sponging over with distress inks of various Greens followed by a Blue for the sky, I then dropped little drops of water over the sky half which gave this effect that I liked. 

I placed my stencil over the background and taped it down with masking tape then I rubbed over the stencil with my modelling paste and left to dry overnight. Once dry I coloured in the Poppies & Dragonflies with Promarkers, with the middle butterfly I rubbed on some Patina Gilding Wax and the two outer butterflies I inked with my Versamark Ink pad and added some glitter.

I mounted it up onto some Centura Pearl Turquoise card then onto some Red card I had pierced then more of the Turquoise card for the base. 

I have left a sentiment off as I did  not wish to ruin the front in case my SIL wanted to put it in a frame

Another image from the side.

Items Used:
Imagination Crafts Stencils Dragons & Butterflies
Maineri Modelling paste
Tim Holtz Distress Inks Crushed Olive, Bundled Sage and Forest Moss
Promarkers
Clarity Masks Fabric Fields Two
Creative Expressions Gilding Wax Patina
Creative Expressions rich Red Card
                                    Crafters Companion Centura Pearl Turquoise Card
                                    Glitter

I would like to enter this in the following challenges:
http://craftycardmakers.blogspot.ca/2015/03/134-for-special-woman.html
http://sweetstampsblog.blogspot.co.uk/2015/03/challenge-212-anything-goes.html
http://happylittlestampers.blogspot.ca/2015/03/hls-march-cas-challenge.html (Though I am not sure whether this would pass as a CAS card)
http://promarkerchallenge.blogspot.co.uk/2015/03/week-287for-special-lady.html
http://www.simonsaysstampblog.com/wednesdaychallenge/


This the image of the first card, I made the mistake of doing the paste through the stencil first then the background as the Blue went into the petals, then the petals cracked, then I had decided, very stupidly, to die cut the bottom of the card, well I did not think as obviously putting it through the e-bosser squashed the modelling paste lol! I was ready to dump it but my son persuaded me to keep it and as it is I coated the Poppies with some glaze, the butterflies had been embossed with embossing enamel and I put a ribbon across the bottom. It is useable even with Blue cracks through the petals!!!

Thank you for looking, I do hope you visit me again, Jacquie xxx


Tuesday 10 March 2015

No Post Today...

Hello to all my crafting friends out there, now you may be wondering where is her card today? Well wonder no more as there isn't one lol! Seriously, I am in the middle of four projects,(when will I learn to finish one at a time!!!) and not only is it my birthday today but I also have the funeral of my dear friend Joy today so I have decided not to post a card, I do hope you all understand and maybe tomorrow I can post a picture of my Birthday cards, a bit presumptuous that I will have any but hey?!!!

Just added the title and it reminded me of No Milk Today, who remembers Hermins Hermits lol! I shall be humming it all day now!!!

I hope this finds you all safe and well and enjoying some crafting moments. Till tomorrow...

Love & hugs

Jacquie J xxx

Sunday 8 March 2015

Especially for You

Morning my crafting friends, Sunday already, these weekends go by far too quickly lol! I hope you have all had a wonderful weekend and I know its not quite over yet!!! 

May I welcome Tracy, thank you so much for coming over to my corner and commenting on my post, I do hope you come again. 
Ang thank you for the constant giggles you give me every time you leave a comment, I loved your last one and I must say I agree with you, I sat here at the computer giggling away for quite some time lol! You bring sunshine into my life.

Now todays post was another little quicky card I made, I am finding I'm doing more of these as I have somewhat lost my organization of time lately, it may have something to do with spending too much time on the computer, Five hours yesterday when I should have been crafting, shame on me!!!


I had this paper that I downloaded from Crafters Companion, I loved the pattern on it. 
To start I cut a piece of Centura Pearl Pastel card and matted it up with some dotted patterned paper, then using some satin card I embossed the bottom and matted this onto my card. With my paper I shaped the bottom edge with a curved die. Using more of the dotted patterned paper I die cut a boarder and die cut the tag twice, I wrapped the boarder strip round the paper, with the tags I stamped my sentiment then attached them in opposite directions on top of the card.

I added a paper bow at the bottom, decorated the inside of the card and there is the finished card.

Items Used:

Crafters Companion Centura Pearl Pastel card Taupe
Crafters Companion Paper Download
Creative Expression Teresa Collins Paper Pad
Creative Expressions Sue Wilson Scandinavian Collection Corner Boarder & Tag
Create and Craft Satin card Sand
Creative Expressions Unmounted Stamps Kind Thoughts
Craftwork cards Paper Bows Botanical
Spellbinders Curved Boarders Two
Ranger Archival Ink Black


Thank you for looking, Jacquie xxx

Friday 6 March 2015

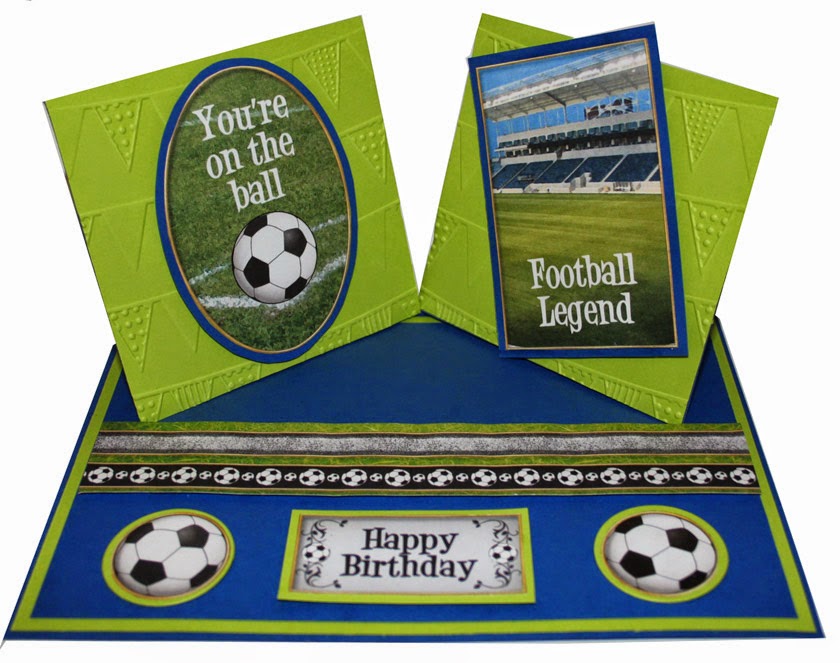
You're on the Ball

Morning crafting friends and a very warm welcome to my newest followers, good to have you on board, I would also like to welcome anyone who comes just to browse it would be lovely if you left a comment to let me know what you think of my creations and of course if you have a link back to any of your work then do please leave the details.

Now this card is one I have not made in a while, its for my Hubby Ian's Nephew who is 20 today, I sorted a card out for him but then Ian said haven't you got anything a bit younger!!! No I said but I'll make one, this was the day it had to go into the post for him to receive it today! Anyway, it was a bit of a rush job and at the time I did not know whether he liked football, thankfully he does.


I decided on a double easel card and I kept the colours to two simple ones, basically to go with the football images.

I folded in half a sheet of Cobalt Blue card landscape, then cut up the middle of one side and folded each side back to make the two easel sides. Using Spring Green card I matted the bottom and embossed some with Beautiful Bunting embossing folder before attaching them on to the two folded sides. Hope all this makes sense lol!

I attached another piece of Cobalt Blue card on top of the Green at the bottom then placed the ribbon strip across the middle with foam pads to raise it up.  Underneath that I added the sentiment with foam pads and two footballs either side, all had been matted onto Spring Green card.

On the two easel sides I attached two football images that I had mounted onto Cobalt Blue Card, the rectangle one I put on at an angle and the oval I put on straight. 

I stamped a small verse on the back.

There you have the finished card, hopefully he will like it?

Items Used:

Creative Expressions Foundation card Spring Green & Cobalt Blue
Embossilicous Desire Embossing Folder Beautiful Bunting
Debbie Moore Designs Cards For Men Volume Three CD Rom (Images)
Foam Pads

Thank you for looking, Jacquie xxx

Tuesday 3 March 2015

For Someone So Special

Morning my crafting friends, hope this finds you all safe and well. Many, many thanks for all your wonderful comments on my posts they are really appreciated so do keep leaving them lol!!!  I am full of cold at the moment so have not done much crafting and with going up the hospital  all weekend I have not had the time either, excuses I hear you say lol!

This is one I did have scheduled for Sunday but then realised it was my turn as DT for Lil Patch of Crafty Friends so delayed it a couple of days, so apologies for those of you who may have noticed it briefly on Sunday (Hazel lol!) What am I like????


For todays post I reluctantly used the last sheet of Teal card until I get round to purchasing more lol! I love the look of Teal & White together.

I cut my Teal card to size and pierced round the edge then put it to one side.

Using Sheena Douglass White Stamping card I die cut the Austrian background, cut this in half, trimmed it then attached to the front of the card as a square. To cover the join I die cut the Scandinavian Corners, Boarders and Tags and using the boarder across the middle to hide the join. I die cut another Tag and joined the two tags together in opposite directions, this made a beautiful little square but I attached it as a Diamond. I then attached this to my base card.

I stamped my sentiment onto White card, die cut with the  Standard Circle, inked through with Peacock Feathers and placed on top of the decorative tag die cuts.

To finish the card I added some self adhesive pearls on the boarder and tags as seen and placed some pretty Blue paper on the inside with the Salzburg die cut out of White card and left blank for a message.

Items Used:

Basic White 6" X 6" Scalloped Card
Sheena Douglass White Stamping Card
Creative Expressions Foundation Card Teal
Creative Expressions Unmounted Stamps Classic Sentiments
Sue Wilson Austrian Collection Background
Sue Wilson Austrian Collection Salzburg
Sue Wilson Scandinavian Collection Corners, Boarders and Tags
Spellbinders Nestabilities Standard Large Circles 
Paper (own stash)
Ranger Archival Ink Black


Thank you for looking, Jacquie xxx


Sunday 1 March 2015

She Who Paints the Forest

Morning my crafting friends, today's post is my third for http://lilpatchofcraftyfriends.blogspot.co.uk
so do please go over and have a look at what the design team have created and join in the fun.
My image is called She Who Paints the Forest  and comes from www.thestampingboutique.com/


Our lovely sponsors for this challenge are:

  The Stamping Boutique,   

  Prize ~ 2 images or 3 images if you enter with their image         


Flat Friends Boutique 

Prize ~ 5 images


Concetta Kilmer


Prize ~ 3 images 


I started with my base card using a lovely Rich Green card, I matted this up with some paper that I had distressed around the edge and coloured with Vintage Photo, onto this I glued strips of thin wood. I inked round the edge of these with Vintage Photo to make the wood look darker and old then I pasted over certain areas before adding glitter for that bit of bling!
I coloured in my digi image using Promarkers and then decided to colour in the leaves with gilding flakes so I used Flake and Glitter glue on these to adhere the flakes to the image. I inked around the edge of the image with distress inks the die cut it out using the outer die of the Vienna. I attached this to my card in the center.

Out of more of the Rich Green card I die cut some Ivy and placed this on the card so it was hanging down over the edge of the image as if like tree branches. 

Over the top of the card in places I painted dots with Acrylic paint through a piece of metal with holes in that I had got from work! Just to add a bit of interest!

There you have the finished card, I have left off a sentiment until I come to use it. Dimensions are 5" X 7".

Items Used:

Stamping Boutique Digi Image
Creative Expressions Foundation Card Rich Green
Patterned Paper (own stash)
Promarkers
Creative Expressions Gilding Flakes Autumn Leaves
Sue Wilson Finishing Touches Trailing Ivy
Sue Wilson Austrian Collection Vienna
Strip of wood (Bought from Create and craft some years ago)
Tim Holtz Distress Inks Vintage Photo, Forest Moss, Crushed Olive 
Glitter ( own stash)
Modelling Paste

Thank you for looking, do come and join in the fun, Jacquie xxx