Followers

Total Pageviews

Showing posts with label Spellbinders. Show all posts

Sunday, 17 July 2016

Wedding Card

Hello again my crafting friends, bet you are thinking 'blimey don't see her for ages then two almost together' lol! A bit like buses I hear you say ha! ha! 


Well I did say I had been doing some cards for work colleagues this past week as two are getting married, one turned 50 and the other is having a baby! There are so many staff leaving that I have not done any leaving cards this year!


This is one of the wedding cards, I wanted it a bit different to the norm! 

I inked and distressed the bottom layer which I wrapped some vintage lace ribbon round the bottom. I added a rectangle panel then two ribbon panels on the left and placed the Sizzix Thinlits Royal Paradise die on top, I coloured this with Peacock Blue DI. On the right I added a Spellbinders Nestabilities Splendid Circles die but I cut the outer ring away, on top of this was two hearts cut out of a beautiful patterned paper with Sara Davies Signiture Collection Love & Romance Elongated Heart dies, I added their initials on top of these along with several flourish die cuts around the edge. I placed a Sara Davies Signature Collection Together Forever Wings of Love Bird die in the top right. I made two little rolls of paper and stuck then under either side of the circle top and bottom for support.


To finish it off I added Paper flowers around the circle and in the two diagonal corners of the rectangle panel. I also added two hat pins behind the larger flowers as you can see in this smaller image.


The papers I used were from a 12"X 12" paper pad from The Range, sadly I cannot remember what it was called but they are all neutral colours with beautiful subtle patterns on them.

Thank you for looking, I hope you visit me again, Jacquie xxx

Friday, 1 April 2016

Beautiful!

Hello and welcome to my little bit of craft corner, I hope you like what you see and pop back again.

Today I am showing what I made in my little play time I had yesterday, I was quite pleased with how it turned out. This is only a tiny card, quite unusual for me as I love my 8 X 8's but this is a 6 X 4 so quite small!

I apologize now for all the images, I got a bit carried away lol!


I started with my White base card and measured up two other pieces of card. The first piece of card I inked up with Tim Holtz Distress Inks Antique Linen, Gathered Twigs and Ground Espresso then splashed a little water over the top. I scored some lines to make it look a bit like wood.
I then stamped on top in places with one of the stamps from Crafters Companion Texture Elements Splats & Accessories Set 1 with Ground Espresso.


On the second piece of card I inked it up with Distress Inks Peacock Feathers, Crushed Olive and Forest Moss, I love these colours together. I then proceeded to stamp up the crackle stamp from Crafters Companion Texture Elements Splats & Accessories Set 2 using Black Stazon. It actually reminded me a little of  a spiders web! Really must get some new glasses lol!


Also in Set 2 of these stamps was a long edge stamp of dots and lines so I stamped this using Chipped Sapphire Distress Ink followed by Aquatints essentials in Gold over the top, unfortunately the photos do not show this up much.

Next I ran it through a new embossing folder I had from Spellbinders, part of the Seth Apter the Altered Page called Maze, how exciting it is to have some folders with different patterns and designs just fitting with mixed media.

Once I had ran it through the folder I inked up the embossed areas with Victorian Velvet, Forest Moss and Peacock Feathers. I then inked round the edge with Peacock Feathers.

 Using a little piece of White card I stamped the word Beautiful with Black Stazon from the Crafters Companion Texture Elements Words to Inspire Set 1 then inked over it with Crushed Olive Distress Ink.

I mounted the wood effect background onto my base card using Foam tape, after attaching some Light Blue Crochet Adhesive Ribbon across the bottom half of the embossed card I attached this on top of the wood effect background.
I attached the sentiment to the top of my card then looked through my stash of die cuts to find this small spray of leaves, a partial cut die and some leaves. I also came across some frames I had made out of air dry clay a while back so I inked the edge of this with Ground Espresso and Pebeo Renaissance Gold Gilding Wax. I had some free papers from a magazine and among these was this picture of a Lady so I cut it out and placed it in the frame.

I arranged the leaf spray and die cuts across the card, placed the frame over the ribbon and arranged some little Pink & White flowers either side as seen.

There you have the finished card, I hope you like it.

I have decided to enter this into http://anythingbutcutechallenge.blogspot.co.uk/2016/03/challenge-11-crazy-for-colour.html

Thank you for looking,  Jacquie xxx


Tuesday, 22 March 2016

Thinking of You Floral

Hello my fellow crafters, hope today finds you all well, thank you for visiting me today I do appreciate it very much and I love reading any comments which you may wish to leave.

Today's post is a card I made for a friend who is not well just to let her know I am thinking of her, so I wanted it bright and cheerful.


I started by die cutting a piece of Sheena's White Stamping Card with the Creative Expressions Striplets Die Rococo three times and attached this over the top of some Dark Blue Miri card, I then attached this to my base card.

Out of Sheena's Black card I made a frame using Square Nesting Dies from Presscut and placed this over the top of the card.

To brighten the card up I die cut some flowers from Sheena Douglass Day of the Dead Floral Fantasy using copy paper and painted them with Aquatints Bright and Beautiful, these are such vibrant colours that stay true and do not fade. I stamped them using darker Distress Inks Dried Marmalade & Fired Brick to match the colours. To finish the flowers I shaped them with a embossing tool and added a Kaisercraft Sparlet Gem in the center of each one.

I also die cut some Ivy using Creative Expressions Sue Wilson Finishing Touches Trailing Ivy and coloured this with Tim Holtz Distress Ink Crushed Olive then painted over the top with Green Aquatint from the Landscape set leaving the edge to show the colour underneath. I attached this on the card as seen.

Using more White card I stamped my sentiment with Tim Holtz Distress Ink Crushed Olive and Justrite Large Fancy Sentiments then die cut with Spellbinders Nestabilities Decorative Curved Square, whilst still in the die I inked through the die with more  Crushed Olive Distress Ink. I then placed this on the card.

There you have the finished card. I am glad to say the recipient loved it.

Thank you for looking, Jacquie xxx

Wednesday, 3 February 2016

Elegant Reindeer

Hello my crafting friends, I hope this finds you all well? Well here we are now in the second month of the year already, doesn't time fly?

Maureen  it's lovely to hear from you as it is from everyone, you are missed. Don't worry if you missed posts they will still be there lol! I love hearing from everyone, sadly I don't have much time to comment on others posts anymore. So do please keep commenting whenever you can.


I am back with more Christmas cards, I have managed to make more so far this year than I ever did last year lol! 


For this card I actually started by cutting out the Bauble from a piece of card I had painted with Aquatints landscape using the Darkest Blue, I then ran it through the reindeer forest embossing folder.

I already had the reindeer die cut in my stash, I had cut it out with double sided adhesive then coated it in glamour dust.

I cut a piece of card big enough to fit the bauble onto, placed more double sided adhesive on it and ran it through a snowflake embossing folder, I removed the outer sheet and again covered in glamour dust, sadly this lost all the detail of the snowflake embossing. I matted this onto some Dark Blue hammer card and put it to one side.

I made an 8x8 square card out of two sheets of Dark Blue hammer card, cut to size some White card to fit on top then ran this through the Christmas time embossing folder, I attached this on top of the Blue card then placed my reindeer bauble on top in the center. 

To finish the card I made a little sentiment and placed this at the bottom of the card as seen.

Items Used:

Dark Blue Hammer Card
White Card
Cottage Cutz Elegant Reindeer
Spellbinders 2011 Heirloom Ornaments
Aquatints Landscape
Deco Art Glamour Dust
Crafters Companion Nordic Christmas 8X8 Embossing Folder Reindeer Forest
Crafters Companion Nordic Christmas 8X8 Embossing Folder Christmas Time
Double Sided Adhesive Sheets


Thank you for looking, Jacquie xxx

Thursday, 28 January 2016

Christmas Wishes for You

Hello my crafting friends, hope this finds you all safe and well. Not long to go and the first month is over my 'o' my!

Now for todays post  I have another Christmas card for you.


I started by folding a sheet of Centura Pearl Pastel Blue card in half to make and A5 size card then cut a piece of White card and Periwinkle Blue card to size for matting and layering. I distressed the edges on both of these using a pair of scissors.

In the middle of the Blue card I die cut a circle out then stamped my Christmas Wishes sentiment using Stazon Jet Black onto the White card underneath so it showed through the aperture.

On the Blue card I stamped a musical melody across the top with my Versamark ink pad then heat embossed with White embossing powder. I then ran the Blue card  through a snowflake embossing folder to give it some texture.

I die cut the Peace sentiment twice out of Silver miri card and cut it down so I trimmed off the 'Peace' word  and placed the decorative edges around the circle aperture. 

In my stash I already had some Poinsettias, snowflakes,  a sleigh and reindeer, the sleigh and reindeer I had inked with my Versamark then covered with Glamour dust to add some sparkle.  All these I placed on to the card as seen.

I had some beads on wire in my stash that were recycled from some old Christmas crackers so I placed them on the card randomly. To finish the card I added some snow writer all around the edges and on the Poinsettias.

There may be a lot going on in this card but I think it works, its different anyhow lol!

Items used:

Inkylicious Clear Polymer Stamps Musical Melody & Christmas Wishes
Spellbinders Snowflakes
Spellbinders Layered Poinsettia
Spellbinders Peace Sentiment
Tattered Lace Embossing Folder Snowflake
Cottage Cutz Elegant Sleigh
Memory Box Leaping Deer
Deco Art Glamour Dust
Deco Art Snow Writer
Papermania Embossing Powder Seafoam White
White Hammer Card
Crafters Companion Centura Pearl Pastel Card Blue
Creative Expressions Foundation Card Periwinkle
Create and Craft Silver Miri Card
Beads - Recycled from Christmas Crackers 
Stazon Jet Black
Versamark Ink Pad

Thank you for looking, Jacquie xxx

Monday, 25 January 2016

Winter Robin

Hello my crafting friends good to have you visit me today I do appreciate it and look forward to reading your comments.

Now my PC has died on me so I am having to manage with an old laptop at the moment that we cannot load windows onto, so my son has managed to get some old service on here, at least it works until we get the PC sorted, actually I am hoping we don;t get it sorted then maybe hubby will buy a new one tee hee! Am I naughty lol! I can get the internet thankfully other wise there would be no blog at all, not sure if I could live without that!!!


Today I am back with a Christmas card.


I folded a sheet of Gold card in half to form an A5 size base card then matted this with a piece of Winter themed paper from a 12X12 pad I bought a while back from The Range, I distressed the edges and turned the corners before taping it onto my base card.

I cut this image of a little Robin sitting on a fence in the snow from one of my Christmas cards so I placed this onto my card at an angle then added some Fir branches and Red Poinsettia in the bottom left corner, some Ivy in the top right corner and a Red bow in the top left corner. I found some beads I had stashed away that came from some Christmas crackers a couple of years ago so keeping them on the wire I added them to my card by wrapping them round the bow, Ivy and corner of the paper.

To finish the card I added some snow writer all around the edges of the paper, the Robin image, the Poinsettia and fir branches and the beads.

I quite like the look of this fairly quick and easy card I hope you do too.

Items Used:

Gold Card
Winter Themed 12X12 Paper Pad
Image of a Robin (Christmas card recycled)
Sheena Douglass Ivy Perfect Partners  Christmas Ivy
Sheena Douglass Perfect Partners  Yuletide Greetings
Spellbinders Perfect Poinsettia
Red Card
Red Ribbon
Deco Art Snow Writer
Beads (Recycled from Christmas Crackers)

Thank you for looking, Jacquie xxx

Thursday, 14 January 2016

Musical Songbird

Hello my  crafting friends good to have you visit me today, I hope this finds you all safe and well. Well we have not had any snow here yet but its getting colder so I don't think it will be long.

I have something a little different for you today as I decided to play yesterday putting odd bits together and hoping to create something a little vintage looking.


I have had these papers in my stash for quite some time so thought it was about time I started to used them as they are really pretty, you know how it is you buy something really nice and then you don't want to use it lol! 

The base layer is from the Aster collection and I loved the image of the bird in the bird house down in the bottom corner so I decided to make a feature of him but bringing him in as a songbird! I know he's not but all birds sing right?! Which reminds me, we have had a beautiful Robin coming in our garden the past few weeks and he sings away merrily, so beautiful.

Right back to my card! The other papers I used are from a Winter's theme collection and I chose a very subtle Cream with a hint of White on it, you can't see it now I have altered it but it is pretty. I cut this to size and ripped it diagonally, I placed it in a  musical notes embossing folder then inked the embossed areas and edges with Black Soot to make them stand out a bit more, I placed this up the top corner so my bird image showed in the bottom.

I looked through my many die cuts to see what I could add and found this gate and fence, I thought it would be nice to open the gate to see the bird so I added this across the bottom of my card.

I found a curved flourish die cut so I trimmed this down and placed it along the top right corner.

I had in my stash a brass metal bird on a perch that looked very similar to the bird in my image so I thought it would go well with my card, I tied a piece of Garden twine on it and attached it to my card over the musical notes.

Among my Aster papers there was a sheet with different sentiments, I chose 'Life is Good', I inked round the edge with Brushed Cordroy and put a foam pad either end then placed it over the twine holding the brass bird in the top left corner, I curled this corner over a little just for added interest and it showed the purple on the other side of my paper so it brought out the Purple Aster that is behind the bird box.

I wanted something to go along the edge of the music paper and found some little swirls that I had die cut out of some card I had coloured with different inks, all neutral shades so I placed these along the edge.

I wanted to add some flowers so I added some garden twine that I had made a bow out of then placed three small paper flowers over the top, this finished my card.

Items Used:

Heartfelt Creations Aster Collection 12X12 Paper Pad
Winter Themed 12X12 Paper Pad (The Range)
Crafters Companion Embossilicious Embossing Folder Musical Notes
Spellbinders Shapeabilities Dies Gilded Gate
Spellbinders Shapeabilities Dies Wrought Iron (Fence)
Garden Twine
Craft Paper Flowers
Brass Bird on Perch (bought from a Craft Fair)
Tattered Lace Floral Edge (Free with Magazine)
Tim Holtz Distress Inks Black Soot & Brushed Cordroy


Thank you for looking, Jacquie xxx

Saturday, 19 December 2015

Wishing you all a Very Merry Christmas and Dazzle Snowflake

Hello my crafting friends, I do hope you are all safe and well and ready for the big day. I have decided to make this my last post of 2015 so I can concentrate on last minute preparations before we go to my Daughters for Christmas so may I take this opportunity to WISH YOU ALL A VERY MERRY CHRISTMAS and a  HAPPY NEW YEAR.

I hope to be more organized next year and my new year resolution will be to start making my Christmas cards all year, that way by next Christmas they may be all done lol! Watch this space!!!

Today's post is of one of the few Christmas cards I have managed to make, this one was for my dear friend, I liked it so much I have made a few more like it for my Family members!!!

This was inspired by Sue Wilson's design which you can view HERE, it is very similar but not exact but I loved the design so I went with it.


I matted up my base card with some Blue hammer card. Using the shaving foam technique, which you can find HERE  I made the background, I used two different Blues from my Aquatints paints ( I also made some using two Purples) in my shaving foam, I cut to size and stuck a piece of Double Sided Adhesive sheet over the top and coated it with Micro beads then matted this onto my card. I matted up a small rectangle of Blue card onto a piece of White card and placed this in the centre of the card.

I die cut  some snowflakes out of White card and some Dazzle miri card, mounted them together and attached it in the center of the card. In the middle of the snowflake I added a Blue crystal gem. This finished the card.

Items Used:

White Base card
Blue Hammer Card
Aquatints Bright & Beautiful & Pastel sets
Shaving Foam
Spellbinders Create a Flake die
Spellbinders Snowflakes die
Hunkydory Dazzle Miri Card
White card
HobbyHouse Blue Ocean Gem 
Double Sided Adhesive Sheet
Creative Expressions Micro Beads


Tuesday, 8 December 2015

Wishing you a wonderful joy filled Christmas

Hello my crafting friends, I cannot believe it has been a week since my last post, I am so sorry, where does the time go!

I am afraid this will have to be a quick post as just about to leave for work, whoops!!! 
May I take this opportunity to wish each and everyone of you who came to visit my blog through out the year and those who will come to visit my blog a VERY MERRY CHRISTMAS and a  HAPPY NEW YEAR.


This is another Christmas card showing the lovely Poinsettias but not in their usual colour, I wanted to try them in Purple so off I went lol! These were made using two different colour distress inks then adding a little pearl in the center of each flower. I really liked this colour combination.

The background was Gold, glittered Miri card matted onto the base card then the top layer was Lilac card that had been embossed with a snowflake embossing folder then the aperture die cut out, the sentiment was also die cut from the same set of dies, the sentiment was stamped in Seedless Preserve DI to match the flowers and the leaves were also stamped through the die with the same DI to match.

Items Used:

Spellbinders Poinsettia die
Spellbinders Oval Majesty
Tim Holtz Distress Inks Seedless Preserve and Shaded Lilac
Tattered Lace Snowflake Embossing Folder
Dreamees Pearls
Papermania Silent Night Clear Stamps


Thank you for looking, Jacquie xxx

Tuesday, 1 December 2015

White Poinsettias

Morning my Crafting friends, well December is finally here, still cannot believe how quickly this year has gone. have you done all your Christmas shopping yet? I still have a few items to get but those will have to wait till next pay day lol!

On Saturdays post I showed you a card inspired by Pamellia, well I loved the background so much I made two cards so today I am showing you the second one.


I made the background the same way by splodging Aquatints pastels onto the card using the Blue & Green, mixing them round till you get your desired effect. I distressed the edge of the card with scissors.

Through a metal grid I added some modelling paste and let it dry before adding embossing powder, now as I did this the same time as the other one I obviously made the same mistake, you should put the embossing powder on top of the wet paste then let dry before heat embossing that way you wont get the embossing in between the circles like I did! I matted this onto some card I had coloured with just the Blue Aquatint then splattered a mixture of Acrylic White paint and water over the whole card.

I die cut some Poinsettias out of some canvas and added a crystal gem in the center of each one then placed them in the bottom right corner along with some Christmas foliage, the branches were just painted green, the Holly leaves were cut out of Rich Green card then Silver gilding wax was applied on top to give a frosty appearance.

I added a little sentiment at the top and a little swirl behind the branches and there you have the finished card. As I said on Saturday's post I shall try this again but put the embossing powder on the paste before it dries lol!

Items Used:

White Card
Spellbinders Poinsettia
Spellbinders Holly Leaves
Sheena Douglass Perfect Partners Christmas Foliage  
Aquatints Pastels
Galleria Modelling Paste
Hobbyhouse Sparkly Gems 
Embossing Enamel
Canvas Material 
Gilding Wax Silver


Thank you for looking, Jacquie xxx

Saturday, 28 November 2015

Mixed Media Christmas card

Hello my crafting friends, so good of you to come and visit me today. This is going to be a quick post as I am off to Norwich today for a bit of Christmas shopping, can't wait!

I have started my Christmas cards, very late for me but had not time at all before, so I have been playing. This card was inspired by the lovely Pamellia, I saw her beautiful creation and just had to try my own as I loved it so much, you can find Pamellia's HERE its not quite exactly the same but close, thank you Pamellia for your inspiration.


I started by colouring in a piece of card with Pastel Aquatints using the Blue & Green and once dry applied some modelling paste through a metal grid and let that dry overnight, this is where I went wrong as I wished I had sprinkled the embossing powder on top of the wet paste then left to dry before heat embossing it that way it may have stayed only on the circles and not the places in between which I think look a bit messy. I am going to do it again that way so at some time I shall show you the results lol!

I heat embossed it with enamel embossing powder then I distressed the edges of the card a little. I took another piece of card and painted that with Aquatints but using just the Green, once dry I distressed the edge of this too. I matted this onto my base card with Foam tape and attached the top piece too.

I die cut some Christmas Fir branches, Holly leaves, Circles and Reindeer  out of various colour card, the reindeer I inked up and covered with Deco art Glamour dust, the circles I inked with Distress inks Forest Moss and Tumbled Glass, the Holly leaves I rubbed Silver gilding wax all over to add a frost look, I may have over done it a little lol!!! I attached all these on to the card as seen adding a white swirl I found in my stash just under the fir branches.

I coloured some White seam binding with Crushed Olives Distress Ink and made a bow, I did try crushing this by wetting it but this seam binding is so thick it was having none of it so I left it as it was, I placed it over the Branches and Holly leaves then added another bow out of garden twine, which I separated the four strands and used just one. On top of the bow I added a round bead, this was part of some beads I had friends save from their Christmas crackers, you know how sometimes they wrap beads and wire over the ends of these fancy ones, so in past years when we have had our Christmas meal I have claimed the beads lol!!! I attached this with some 3D glue. 

I went round the edge of the card and die cuts with a snow writer but this was a glitter one so it dried clear!!! So I went over it again adding some Deco art glamour dust so it showed up a little. I then watered down some White Acrylic paint and splashed this all over the card using a paint brush, I loved the effect this gave to the card, just like snow. The picture doe pick it up a little if you look close enough.

There you have the finished card.

Items used:

White hammer card
White card
Aquatints pastel set
Tim Holtz Distress Inks Forest Moss, Tumbled Glass and Crushed Olive
Sue Wilson dies Holly leaves
Sheena Douglass Christmas Foliage
Spellbinders Nestabilities Standard Circles Large
Memory Box Leaping Deer
Deco Art Glamour Dust
Galleria Modelling Paste
White Seam Binding
Gilding wax Silver
Acrylic paint, White and Water

Thank you for looking, Jacquie xxx

Monday, 17 August 2015

Seasons Greetings 2015

Hello my crafting friends, good to have you here today, I am back from my little holiday it was fabulous to see my beautiful Daughter again, even if it was for only a few days, it was last Christmas the last time I saw her, such a long time.

Now as I said on my last post I have been making smaller cards with coloured backgrounds, this one is slightly different as after spraying the background I added a leaf stencil then sprayed over that in White so this gives it a bit of a focal point.


I attached my background using Foam Tape towards the top of the card, leaving the space at the bottom for my sentiment.

I die cut the bauble from 2011 Heirloom Ornament and painted it Red, then die cut the smaller bauble from Christmas Baubles and painted that Gold, I stuck them together with PVA Glue, added two foam pads on the back and placed them on the card, I drew in the hanging cord with a Gold pen.

I added my sentiment at the bottom using Forest Moss DI and there you have the finished card. Dimensions 4"X 6".

Items Used;

Sheena Douglass White Stamping Card
Aquatints
Spellbinders 2011 Heirloom Ornaments Dies
Spellbinders Christmas Baubles Dies ( These came with the GC along with the Christmas Tree)
Justrite Large Fancy Christmas Sentiments
Tim Holtz Distress Inks Forest Moss

Thank you for looking, Jacquie xxx

Saturday, 15 August 2015

A Very Merry Christmas

Hello my crafting friends, good of you to join me today, this post is scheduled as I will still be in Cornwall so I hope its come up okay? I have left hubby at home looking after the pets, my time away lol!

My last two posts have been made from the backgrounds I made and these next two are no exception, they are nice easy and small cards to make in batch for Christmas, I have decided, due to costs, to keep my cards small this year apart from close Family members, they are quicker to make too!!!


I loved how the background to this one turned out and wish I had done it bigger lol! That's the beauty of these backgrounds you never get two looking the same. Needless to say I used Yellow & Red on this one, starting with the lightest colour first, keep alternating the colours until you get the desired effect you want. I have to give credit to Loll for this one as she posted a similar one to this on her blog HERE and I just loved the simplicity of the one bauble which is why I did this particular one.

My base card was an A4 sheet of White card, folded in half then cut down the middle, so basically A6 size cards. 

I attached the coloured square with Foam Tape towards the top of the card.

Using more White card I die cut and embossed four different baubles, these two are Spellbinders Nestabilities 2010 Heirloom Ornaments and Spellbinders Christmas Baubles, I painted the larger one Blue and the smaller one Gold, attached them together then placed them on the card as seen, drew in the cord with Gold pen then stamped the sentiment at the bottom of the card using Gold ink, this did not show up as much as I would have liked but there was no way I was going to try and go over it lol!

I just stamped a very simple Christmas message inside and there you have the finished card, dimensions are 4" X 6".

Items Used:

Aquatints-Bright & Essentials
Sheena Douglass White Stamping Card
Spellbinders Nestabilities 2010 Heirloom Ornaments
Spellbinders Christmas Baubles (These came free with the first GC)
Crafty Impressions Clear Stamps Christmas Snowflake Sentiments


Thank you for looking, Jacquie xxx

Tuesday, 11 August 2015

Decorative Ivy

Hello my crafting friends, a bit late in posting but better late than never right? I hope you are all well and busy crafting away, I managed a little play time yesterday which is why I am posting this lol!

I had been playing with spraying some backgrounds of various colours with diluted Aquatints and this was one of them.


I die cut and embossed my card base using Spellbinders Decorative Curved Square out of White Card and used this as the whole card.

Using one of the coloured panels I die cut the middle piece of the decorative square to fit in the center of the card.

I die cut some Ivy again using White card, painted it with Aquatints, Stamped it with Crushed Olive, trimmed to fit and lay across the top. The bit I trimmed off I placed on the inside.

A very simple and quick card, I have left a sentiment off until I use it.

Items Used:

Sheena Douglass White Stamping Card
Sheena Douglass Perfect Partners Festive Ivy
Aquatints
Spellbinders Decorative Curved Square
Tim Holtz Distress Ink Crushed Olive
Spray bottles.


Thank you for looking, Jacquie xxx


Monday, 27 July 2015

Happy Retirement

Hello my crafting friends, another weekend has been and gone, hope you all had plenty of time to craft? I was away visiting my family in Birmingham so we had a fabulous weekend, now I am itching to get crafting lol!

The card I have for you today is one I made for a work colleague who retired last week, I had held it back as I gave it to the gals to sign before adding the flowers, its hard to sign on the back otherwise lol! However, silly me, after adding the flowers I forgot to photograph it so I am afraid you only have the none flower version!!! I had put little Camellia flowers and leaves on the bottom left corner using Blush & White card so I am afraid you will just have to imagine them there!


I had these gorgeous papers from the Flights of Fantasy Collection with Roses all over so I used this as the background. To add some definition and decoration on the front I used Tonics Art Nouveau dies and cut the pieces out of Blush card, layered these on the card as seen.

Out of more of the paper I die cut the background for the sentiment using Oval Majesty, using a smaller die I cut out the sentiment that I had done on the computer, I inked round the die with Victorian Velvet then added a self adhesive pearl at each point. I placed both of these in the center of the card.

Then as I said earlier I added the flowers in the bottom left corner. The inside was left blank for everyone to write their own messages.

The dimension od the card was 7"X7".

Items Used;

White base card
Crafters Companion Flights of fantasy Papers 
Creative Expressions Foundation Card Blush
Tonic Art Nouveau Collectable Die Set
Spellbinders Oval Majesty Die Set
Self Adhesive Pearls
Tim Holtz Distress Ink Victorian Velvet


Thank you for looking, Jacquie xxx

Saturday, 16 May 2015

Brown & Cream

Hello my crafting friends, things are going as well as  can be expected, everything is arranged and the funeral will be over in a couple of weeks. I have managed to comment on some posts so I do apologize for any I may have missed, not intentional just did not have the time. Thank you to each and everyone of you for your kind comments, patience and understanding.

I hope you are all well on this fine weekend? I do wish this weather would pick up a bit its back to rain down here lol!


 I decided to make a card in colours that I do not usually choose but I thought it would make a change!

I got some Brown Pearlescent card and my favourite Cream 'leather look' card and cut out the base easel and toppers with Sue Wilson Austrian Collection Innsbruck & Saltzburg.

I turned the base card into an easel card matting and layering as I went with the Cream & White card making sure all layers were equal.

On the top Cream card I stamped a sentiment from Unmounted stamps 'Friends Sentiments'

For the stopper on the base I used my Versamark ink pad and stamped the symbol from Sheena's Little Bit Sketchy stamps 'Be Strong' then heat embossed it three times using embossing Tinsel Copper then die cut it out with Standard Circles Large.


For the inside of the card I die cut using the same dies but in Cream and attached this to the inside of the card as seen.


I made sure when making this that it all closed up tight so nothing was showing on the outside.

There you have the finished card.

Items Used;


Crafters Companion Pearlescent Card Brown
Printable Heaven 'Leather look' Card Cream
Creative Expressions Unmounted Stamps Friends Sentiments
Sheena Douglass Little Bit Sketchy Be Strong
Stamps & Stuff Embossing Tinsel Copper
Creative Expressions Sue Wilson Austrian Collection Innsbruck & Saltzburg
Spellbinders Standard Circles Large
Tim Holtz Distress Ink Vintage Photo
Versamark Ink Pad

I would like to enter this card into  http://allsortschallenge.blogspot.co.uk/2015/05/week-311-no-squares-allowed.html
 

Thank you for looking, Jacquie xxx

Friday, 15 May 2015

Oldies Friday

Hello my crafting friends, good to have you visit me today, I do appreciate it.

Now its 'Oldies Friday' again and at the moment this is the last 'Oldie' card I can find, unless I start all over again from when I started my blog lol! Don't worry, only joking!


This was made for one of the teachers where I work. I have to say I cringe when I look at some of these Old cards including this one!!!

A few Spellbinders dies used on this one and lots of Yellow!!!

Hope you all have a great day and plenty of crafting over the weekend.

Love & hugs

Thank you for looking, Jacquie  xxx

Wednesday, 6 May 2015

DREAM

Morning my crafting friends, hope today finds you all safe and well. Did you all have a good Bank Holiday? We had a lovely one, it was my hubbies school reunion, he has been going to these every year for about 30 years now and last year they did a lot of fundraising to get enough money together to have a plaque made for where the school was. It was a boarding school for ill children who could not go into mainstream school, my husband had epilepsy others had asthma and the likes, the group my husband was with have all stayed close and meet up every year if not more. The school ran from late 50s until 1981 when is closed. There are now these beautiful large houses (4-5 bedrooms) built on the site and one of the residents gracefully agreed to have the plaque positioned on the outside of their wall and she and the other residents put on a garden party for us all, it was a joy, the weather was beautiful and we had the Daughter-in-Law of an old headmaster open the plaque. The EDP newspaper was there too so it was quite an event. As usual we always make a day of it, drinks down the pub and a meal, lots of chatter and laughter with them reminiscing the old days. Some of the old teachers were there too. Of course because of the presentation of the plaque there were many there who had never turned up before, some who are now in their 60's. I will add a couple of pictures at the end of this post.

May I welcome my latest follower 'cardsarus', good to have you on board, please send us details of your blog if you have one so I can return the favour.

Now todays card I made especially for a new blog that is starting by our lovely Pamellia of http://mylittlecraftthings.blogspot.co.uk/, some of you may be familiar with her stunning creations, Pamellia has started a new blog that you can find HERE entitled 'Anything but Cute', its a mixed media blog that would love you to create Anything But Cute! If you are not into mixed media go and check out the rules and give it a go its not as hard as you think, the hardest part is your imagination!!!


I cut my base card to the size I wanted,this was using one of my favourite card the Leather Look Cream card. Using a piece of White card I embossed it with a Wood-grain mask then placing a Scraped paint stencil over that I inked through with Weathered Wood and Vintage Photo Distress Ink.

I spread some modelling paste down the ink lines on the card to add some depth and interest and left this to dry naturally. 

Using more White card I inked up  the Dream word, Frame and the Bird and heat embossed with Aged Aqua Embossing Enamel and Black embossing powder then fussy cut them out. i love this embossing enamel as not only is it a lovely colour but it has specks of Gold in it too.

I got some Lace, inked it up with Vintage Photo and wrapped it round the bottom of the card. I placed the Dream frame on top of the Lace to the left of the card.

I die cut some Cherry Blossom out with various scraps of card and added a touch of glitter to the ends of the petals. I placed the branch behind the Lace under the Frame, added the flowers as seen then placed the bird as if it was perched on the branch.

There you have the finished card. Dimensions are 6"X4".

Items Used:

Printable Heaven Cream Leather card
Creative Expressions That Special Touch mask Wood-Grain
Creative Expressions Layered Scalloped Lace Cream
Memory Box Stencil Scraped Paint
7 Gypsies Papercrafter 5pc Cling Stamps
Tim Holtz Distress Inks Weathered Wood & Vintage Photo
Stampendous Embossing Enamel Aged Aqua
Papermania Embossing Powder Black
Spellbinders Cherry Blossom
Dovecraft Glitter Glue Crystal


Pupils & Plaque to mark
Eden School, Bacton, Norfolk


Thank you for looking, Jacquie xxx

Monday, 4 May 2015

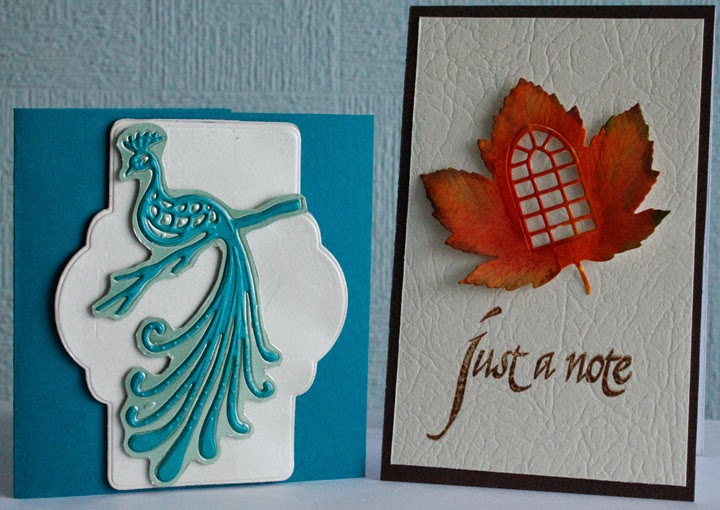
Just a note!

Hello my crafting friends and a good Bank Holiday Monday to you all, as I have today off work I am hoping to play...mmm lets keep our fingers crossed lol! Anyhow, I hope you are all having a good weekend with plenty of craft time?

I have two little cards for you today that I made  just to send my personal contact details to two of my cousins, we have always kept in touch over the years but through their parents, now they have gone we decided it was about time we had each others details.


They are only tiny cards made out of scrap card that I had  left over from other projects. With the Peacock die I cut it out using Pearlescent Teal card then embossed some Green Miri card, cut round that and matted the Teal peacock on top, I attached it to a piece of cream leather look card (actually the reverse of it as its plain) I had die cut with the outer die from  SW French Collection Auvergne I then matted this onto a Teal card base. On the inside I added a piece of White card to write my details on.

The 'Maple Leaf' card a had a piece of Pearlescent Chocolate Brown card for the base and matted that up with a piece of Cream leather Look card. I die cut the Leaf Window out of the leather look Cream card and inked it with Squeezed Lemonade, Dried Marmalade, Fired Brick, Crushed Olive and Vintage Photo to give it a Autumn look. I attached this to my base card then stamped underneath with  stamps using Vintage photo. The inside of the Pearlescent Chocolate Brown card is White so I did not have to line this in order to write on it.


There you have two small but useful little cards.

Items Used:

Crafters Companion Pearlescent Card Teal & Chocolate Brown
Crafters Companion Kimono Dies Peacock
Sue Wilson Dies French Collection Auvergne
Spellbinders Maple leaf Open window
Printable Heaven Cream leather look Card
Tim Holtz Distress Inks Squeezed lemonade, Dried Marmalade, Fired brick, Crushed Olive & Vintage Photo

Thank you for looking, Jacquie xxx

Saturday, 25 April 2015

Feathers

Hello my crafting friends, good to have you here with me today and I hope you are all having a good weekend.

May I give a warm welcome to my newest follower Jenny L. great to have you on board Jenny. Jenny has a wonderful blog of her own so please do take a look you can view it HERE

Tomorrow would have been my parents 69th wedding Anniversary had they lived to celebrate it, I often wonder what they would look like now, its also coming up to my 10th wedding Anniversary on the 7th May so I had better get my thinking hat on for a card for Hubby lol! Don't know where those 10 years went!


Now I had this small piece of card, that I had stenciled through with modelling paste, that I wanted to use as well as some feathers I had die cut, one being from the coloured background I made for my friends birthday card a few weeks ago, you can view it HERE. I did cut the edge of the feathers down to the spine so they did have the effect of real feathers and once cut they did seem to find there own shape which was rather nice.

I coloured the card with the paste on in Chipped Sapphire, Iced Spruce and Peacock Feathers, matted and layered it onto some embossed card and Teal card.

I added a banner with the sentiment then arranged the Feathers on top so the ends went under the banner and stuck these down.

Inside I added a piece of Teal card followed by a piece of White card to write on.

A tiny card made up of odd bits in my stash box of left overs, I quite like the feathers and may make up a stash for future use.

Items Used;

Crafters Companion Pearlescent Card Teal
White Card
Sue Wilson Embossing Folder Eternity
Clarity Stencils Tangle
Maimer Modelling Paste
Tim Holtz Distress Inks Chipped Sapphire, Iced spruce and Peacock Feathers
Spellbinders Shapeabilities Feathers
Creative Expressions Foundation Card Teal
Creative Expression Unmounted Stamps Classic Sentiments


Thank you for looking, Jacquie xxx