Followers

Total Pageviews

Showing posts with label Justrite Stamps. Show all posts

Saturday, 24 September 2016

AMOR ETERNO

Morning my crafting friends, hope this finds you all safe and well. I had a request from my daughter last week to make a DOTD wedding card as her friends were having a Mexican themed wedding so here is what I made, it was originally A4 size as we wanted the skeletons on the side but it seemed to big for a wedding card so made it into an Gatefold card. My apologies got to Ang lol! ...


This was the front, I did not want it too fussy so kept to the corner and edge stamps with sentiments and just added a few flowers.


For the inside I chose Creative Expressions Foundation card Rich Plum and Silver Miri card for the layering, although the main colours had to be Pink & Blue I chose these as contrasts.


So I got my Rich Plum card and embossed it with the Sheena Douglass Indian Lattice Embossing Folder so it had some texture. 

I made each skeleton from Sheena Douglass day of the Dead Range of Perfect Partners up in a certain pose, the man with his top hat and cane the woman with her veil and flowers. I even coloured their boots to go with the colour scheme lol!


For the main feature inside I chose the Sheena Douglass DOTD Union of Souls stamp, I got a piece of White card and stamped the couple on then painted Pebeo Drawing Gum over the top, let it dry before I coloured the background with Aquatints Pastels to get the light Blue & Pink then I removed the Drawing Gum.


Using Aquablend pencils I coloured in the couple keeping to the colour theme but adding a little Purple in certain places. Once coloured I ran it through the Sheena Douglass DOTD Frame Embossing Folder, this just fitted round the couple perfectly, I decided not to colour over the embossed area as I did not want the focus lost from the couple and the beautiful deep embossing you get from these folders made it stand out anyway. I matted this onto some Silver Miri card. 

For the inside I matted with the Silver Miri card and Rich Plum  Embossed card but before I stuck down the Rich Plum card I wrapped some Vintage Lace Ribbon round the bottom, not only did this give it a slight vintage look and filled up the empty space but I think the pattern of the lace went well with the DOTD theme. I glued this down in place then added the couple so the bottom of the card just covered the top edge of the Lace.

There you have the finished card. I am happy to say the recipients absolutely loved it and are getting it framed.

If you have any questions please do not hesitate to contact me.

Thank you for looking, Jacquie xxx

Sunday, 29 March 2015

Just a Leaf

Morning my crafting friends, hope to day finds you all safe and well, plenty of hugs are going out to those who need them.

It would have been my friend Joy's 85th Birthday today so took some flowers up the cemetery yesterday, they have a Remembrance area where you can take flowers and cards to put on display, we are hoping to put her ashes on the March garden sometime over the next two weeks.

I am a bit late in posting, the time has just passed by so rushing to get this on tonight for tomorrow as I shall be taking my FIL to hospital tomorrow for an operation as hubbie will be at work, its only in the day ward but I have to wait and bring him home so could be there a while!

I have been making three cards this week and two of them are for the DT LPOCF so cannot show them till next week lol! That leaves (Leaves lol!) this one!!!


I recently bought some beautiful Leather Look card in Cream  so I thought I would use my leaf stencil over it to see what it would look like, well I love it, the leather look gives the look of the veins in the leaves so I have left it as a CAS card.

I cut a piece of card to size and taped the stencil on top, using my stencil brushes and three different shade of Green Distress Inks I built up the layers light to dark.  I was going to leave the surrounding area plain but then thought about spraying the background Brown but wish I hadn't as I did not do it very well, a bit heavy in places but its useable! 

I then matted this onto the base layer which was the same card but just the other side which is plain, so I have the leather look on the inside!

It was originally going to be Portrait but I preferred it Landscape so I just stamped my sentiment in the bottom right corner before I changed my mind lol! I feel this could be used for a number of occasions which is why I chose this particular sentiment.

Items Used:

Printed Heaven 'Leather Look' Card Cream
Clarity Stamps Stencil Leaf
Tim Holtz Distress Inks Bundled Sage, Crushed Olives and Forest Moss
Promarkers Cinnamon
Perfect Paper Crafting Perfect Airbrush
Justright Craft Large Fancy Sentiments


Thank you for looking, Jacquie xxx

Thursday, 19 June 2014

Rose Garden

Morning my crafting friends, so nice to be here and I look forward to your visits even though mine seem few and far between lately!!!

So sorry for the absence on some of your posts I have been trying to catch up we were so busy at the weekend I don't even know where the time went! We have had a lot to sort out down the allotment as we have a committee member who wants us off purely because he gave permission for other plot holders to help themselves to our belongings when we were not there saying we had left, by getting rid of us hes covering his own back, one thing led to another which resulted in him threatening to burn our shed down so sadly the police have had to get involved, it all happens down allotments I can tell you lol!  At least its being dealt with, he has admitted it to the police but did not want the rest of the committee to know so we have let them know now we are just waiting to see whether they let him stay or not! Watch this space lol! Gosh this IS  supposed to be a craft site what am I doing rambling on about allotments, my apologies.
Sincere thanks to Suzie & Ang for wondering why I had gone quite lol! I spend so much time rambling on I never get time to craft to get more cards on here lol!!! I do appreciate your concerns so thank you but I am fine just trying to cut back on all the waffle lol! Here I am posting an essay ha ha!!! As for my pets well, I think I mentioned I lost another rabbit a couple of weeks ago bless her but the dog is fine spreading tufts of her fur coat around the place I am sure I could make a few jumpers out of all the hair lol! The cats are still not sure of her, its ok if she doesn't move lol! My female cat will walk past her now but only if she can give the dog a little snarl along the way just to let her know whose boss!!!

Well that's enough rabble now for my card...


Items used are:

Basic 6X6 White card
Lidls Cream Card
Crafters Companion Centura Pearl Pastel Blue Card
Justrite Secret Garden Background Stamp
Papermania Embossing Powder Seafoam White
Tattered Lace Free Rose Die with Magazine
Spellbinders Curved Boarders Two
Spellbinders Splendid Circles
Creative Expressions Adhesive Pearls
Tim Holtz Distress Ink Tumbled Glass

I was going to colour the Rose die but then decided to leave it Cream as it may have been too much!
If anyone wants any further information on how I made the card please do not hesitate to get in touch.

Thank you for looking, Jacquie xxx

Saturday, 22 March 2014

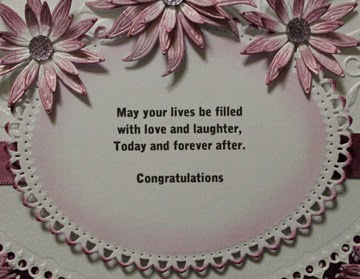
May your Lives be filled with Love & Laughter...


Morning crafters, hope this finds you all well? Another weekend is upon us so lets hope we have a bit of sunshine.

Today's post is one of the wedding cards I have been doing for the girls at work, the recipient of this one is having Dark Purple dresses for the Bridesmaids, she loves Purple so that was an easy colour scheme to do. Sorry about the wonky photo, don't know what came over me!!!

I started with Crafters Companion Centura Pearl card and put two sheets together to form an 8" X 8" card. Using more of the Centura Pearl card I stamped the back with Justrite Elegant Fronds Background Stamp  using Tim Holtz Distress Inks Seedless Preserves, I extended the design then inked around the edge also with TH Seedless Preserves and matted this onto my base card.

Using a sheet of Dark Purple card from Hunkydory Purple Butterfly Collection I die cut the bottom with Spellbinders Curved Boarders Two, cut it to size and matted this onto the card. With another piece of Centura Pearl Card I cut to size and popped it through the center of the second smallest die from SB Grand Decorative Ovals so it would just cut the bottom part of the card, I then ran the top half through the Crafters Companion Regency Swirls 8in X 8in Embossilicious Embossing Folder, this I left White, I cut a piece of pale Lilac Ribbon, enough to fit across the embossed card and inked it up with Seedless Preserve so it would be a dark Purple, placed it across the card at the bottom of the embossing and stuck it on the back, I then matted it onto the Purple card as seen.
 
Using some White card I typed my sentiment on the PC, printed it off and die cut with the smallest SB Grand Decorative Ovals die, inked round the edge in the die with Seedless Preserve then inked the very edge of the oval once out of the die, I attached it to the card over the ribbon.

Using Centura Pearl Card and SB Shapeabilities Die-lite Blooms Four die I cut out several of the flowers, inked the edges with Seedless Preserve and arranged them together as seen. In the center of each flower I added a Kaisercraft Sparklet Gem Princess. I arranged these onto the card and once happy where they were going I stuck them down.

I decided to cover part of the inside with some paper from Hunkydory Purple Butterfly Collection for the background and printed a verse on the PC which, after I cut to size, die cut the top and bottom with SB Curved Boarders Two and attached this on top of the backing paper. I had a little boarder left from the stamped Elegant Fronds card so I trimmed this and attached it to the edge of the card to match the front.

There you have the finished card. I now have another wedding card to make with the colour theme of Royal Blue and Silver that is the colour of the Brides dress! Intriguing I know but the design she showed me (her own) is gorgeous.
Luckily I have not told anyone at work about my blog so the Brides to be will not see their cards.

Thank you for looking, Jacquie xxx