
Products used; White card stock, Spectrum Noir Harmony Water Reactive Ink Pads, Spectrum Noir Aquablend Watercolour Pencils, Versafine Ink Pad Back, Gel Glue, PVA glue, Heartfelt Creations Blazing Poppy Die & Stamp, Heartfelt Creations Blazing Poppy Stems Stamp, Creative Expressions French Collection Burgundy Die, Black Sparkly Gems, Red Mirri Card.
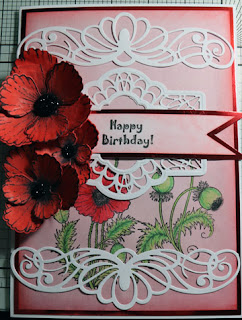
 Instructions; Card base, white card stock A4 size folded in half to form A5 base card (6" x 8.5") with side fold. Cut a piece of Red Mirri card 5.5" x 8" adhere to base card. Cut a piece of red paper 5" x 7.5" and ink round the edge with Harmony Water reactive ink pad Chinese Red. On this paper stamp the Heartfelt Creations Blazing Poppy Stems using Black Versafine Ink and colour in using Spectrum Noir Aquablend Watercolour Pencils. Adhere this to the mirri card using red liner tape.
 Stamp the Heartfelt Creations Blazing Poppy Stamp onto white card stock and colour with Harmony Water Reactive inks Chinese Red & Bordeaux. Then place the die Heartfelt Creations Blazing Poppy in position over the top and die cut.
Shape the flowers using a flower shape tool, adhere the smaller petals on top of the larger ones with gel glue to make the flowers and put to one side to dry.
Die cut two Heartfelt Creations Regal Boarders & Pockets with the straight edge and die cut one Creative Expressions French Collection Burgundy omitting the center piece, put these to one side.
Make a banner out of Red Mirri card and cut more of the Red paper to fit inside the banner, ink the edge of the red paper as before, stamp onto this the Heartfelt Creations Heartfelt Wishes sentiment 'Happy Birthday' then adhere the red paper to the mirri card banner using gel glue, adhere the flat end of this inside the Burgundy die so the banner comes up and over the edge of the die. Adhere the two Regal Boarders & Pockets dies to the top and bottom of the card as seen using PVA glue then adhere the burgundy die with banner under the top die cut so you can still see the stamped Blazing Poppy Stems underneath.
Place a Black sparkly gem in the center of your poppies, arrange and adhere them with gel glue to the side of the card so they cover the edge of the Burgundy die and banner.
Thank you for looking Jacquie xxx


