Followers

Total Pageviews

Sunday 31 May 2015

No posts for a while...

Hello my crafting friends, just to let you know I won't have any posts for a while as I woke up Saturday morning and my back has gone. To cut a long story short I suffer with disintegrating  discs amongst other problems with my spine and I have had two more going for a while, I am hoping I have not lost another but the signs say otherwise, I am hoping to get to see a doctor tomorrow to be referred to a back specialist again, we all know how long these things can take, however, because of the amount of pain etc I am unable to craft, I have tried but just can't at the moment, it takes me a while to just come on here and view your wonderful creations and comment, which is why my comments have been quite short of late lol! So I apologize for the absence, I am sure I have a couple of cards that have not been put up yet so I will schedule them asap. My LPoCF DT card is scheduled already. I am spending most of my time in bed resting, its the only way I can get comfortable at the moment, sorry to be the bearer of more bad news but I look forward to viewing your beautiful creations whenever possible.

Until then keep crafting,

Love & Hugs

Jacquie xxx

Saturday 30 May 2015

Thank you for being my Friend

Hello my crafting friends, hope today finds you all safe and well, BIG HUGS to those who are not. I do appreciate you popping by today and I hope you like what you see. If you have any questions please do not hesitate to e-mail me.

I am pleased to say I am back after a rather hectic week, thankfully we were on half term so I did not have to go to work as well!!! Thank you all so very much for the lovely comments, I do appreciate them. The funeral went well, was quite a nice service and my friend is recovering in hospital although she is in quite a bit of pain but is staying strong, she is worried about becoming depressed as she is always on the go, never sits down, always active and now she cant move so she is worried she will never be the same again but things look positive, I have told her to keep the exercises up to get her leg moving lol! Her wonderful Daughter takes her mobile with her so we can have a 5 minute chat every night when she visits which has been lovely, I am hoping to visit her again in the next few weeks.
I would like to wish Ang a speedy recovery too, hope you are feeling better my friend.


I started todays card by using up a scrap piece of Spring Green card I had left over from another project, it was big enough to fold in half to make a small card. I also found a piece of White card that had been embossed so I added that as a second layer.

Using more Spring Green Card I die cut the Dainty Oval frame and cut the center piece out of White card to which I stamped my sentiment. 

Out of more White card I die cut the Elegant Laced Edger and Corner twice and attached these to the top of my card then attached the oval frame on top of these (The corners I trimmed and attached to the oval frame on each end).

I made a bow out of some floral ribbon and attached this in the bottom corner of the frame, on top I added two Camellia petals to make a flower, I added a sparkly gem in the center then placed this on top of the bow. Two beautiful stick pins made by http://spanishcrafter.blogspot.co.uk/ were placed under the bow and there you have the finished card.

Items Used:

Creative Expressions Foundation Card Spring Green
Creative Expressions Sue Wilson Embossing Folder Eternity
Creative Expressions Sue Wilson Configurations Elegant lace Edger
Creative Expressions Sue Wilson Finishing Touches Camellia Complete Petals
Creative Expressions Sue Wilson Frames & Tags Dainty Oval Frame
Creative Expressions John Lockwood Element Stamps Daisy Chain Element
Kaisercraft Sparklet Gems Fern
Floral Ribbon (own stash)
White card


Thank you for looking, Jacquie xxx

Thursday 28 May 2015

Amber Camellia

Hello my crafting friends, good to have you visit me again, I hope its a Happy Thursday for you all, if not BIG HUGS are sent your way.

This is a scheduled post but i am adding this...I apologize for the lack of comments on peoples blogs, with my MIL funeral and now a very close friend of mine, who has always been like a second mother to me, has fallen and broken her hip, she has just had a hip replacement so I have been up Norfolk visiting her, its all happening this week!!! Take care everyone. xxx

I am hoping we will have some decent weather this week, this May has got to be one of the worse Mays  for weather, I am convinced the seasons are changing and getting later lol!


Remember my card from the other Monday when I did two quick cards? Well this is the second one.

I painted the background using Aquatints again but this time using the Pastel colours, I used the Blue and Purple blending them together then spraying with water and dabbing dry.

I matted this up onto a White Base card that I had previously stamped with my sentiment.

I die cut some Complete Petals from the Camellia dies and inked them with Fossilized Amber, beautiful colour, I quite liked how I got the two toned look by using less or more of the ink. I glued three layers  together to form a substantial flower, pinched the ends of the petals together and added a pearl in the center of each finished flower.

In the center of the card I placed a couple of Faux Quilled Leaves and added the flowers on top. There you have the finished card. Dimension 6"X4".

Items Used:

White Card
Sheena Douglass Spectrum Noir Aquatints Pastels
Creative Expressions Sue Wilson Finishing Touches Faux Quilled Leaves
Creative Expressions Sue Wilson Finishing Touches Camellia Complete Petals
Creative Expressions John Lockwood Elements Stamps Daisy Chain Elements
Creative Expressions Self Adhesive Pearls
Tim Holtz Distress Ink Fossilized Amber

Thank you for looking, Jacquie xxx

Tuesday 26 May 2015

Picket Fence

Hello my friends, hope today finds you all safe and well, hugs to those who need them today.


I wanted to do another mixed media card so started by putting papers together, I distressed the edges and wrapped some scalloped lace round before attaching the first layer to my base card, on top of this I added half a doily to the top right corner.

With my second layer I distressed the edges and inked them with Vintage Photo. I inked up some Funky Floral stamps with my versamark ink pad and heat embossed the leaves with Bronze embossing powder and the flowers with Artic lake Lustre followed by Tropic Yellow Lustre, these are a Pale Lilac and Yellow but together they look Green!!!

I made the picket fence out of an alteration tag and painted it with White Gesso, I attached this to the bottom of the card then stamped over the top with a grass stamp using Forest Moss.

On a piece of White card I stamped the Bird using my versamark pad again and heat embossed it with Black embossing powder, I  fussy cut it out ad attached it to my card as seen.

I felt the fence looked too plain so I added a Blue Butterfly that I had stamped and cut onto one of the posts then for the sentiment I die cut a tag, inked with Fossilized Amber and tied some twine through the hole to hand it over another post. I hand wrote the sentiment on the tag as I did not have any sentiment stamps small enough!

I do keep looking at it and thinking I should add something else but as I am not sure what I have decided to leave it be lol!

Items Used:

Crafters Companion Pearlescent Card Chocolate Brown
12 X 12 papers, sorry cannot remember the name of these
Creative Expressions Unmounted Stamps Funky Floral
Creative Expressions Layered Scalloped  Lace
Creative Expressions John Lockwood Elements Clear Stamps-Daffodil Elements (Grass)
Creative Expressions Cosmic Shimmer Embossing Powders Artic Lake Lustre & Tropic Yellow Lustre
Artemio Clear Stamps-Bird
Stix Alteration Tags-Fence
Ranger Dina Wakely Gesso White
Spellbinders basic Tags
Kanban Clear Stamps-Oriental Butterfly
Papermania Embossing Powder Black & Copper
Dovecraft Paper Lace Doily
Tim Holtz Distress Inks Vintage Photo, Peacock Feathers & Fossilized Amber
Versamark Ink Pad 
Twine


Thank you for looking, Jacquie xxx

Sunday 24 May 2015

Roar with Pride

Morning my crafting friends, hope you are having an enjoyable weekend, there are plenty of hugs going round to those who need them right now.


I decided to have a play yesterday and do a sort of CAS card, one layer. I have a few stamps I bought a while back that I have not used yet, this being one of them, and I thought they would do as a male card.

I got my card base ready and cut to size then measured a piece of White card to the size I wanted.

Using distress inks I started blending them together to form the background then stamped the grasses from John Lockwood's Daffodil  Elements stamps, these are so handy! Next I inked up my Lion stamp with my versamark ink pad and heat embossed it with Black embossing powder.

I got my Aquatints water colours and mixed the Orange and Browns together until I got a colour I was happy with and painted him in as seen. 

I stamped my sentiment at the bottom of the base card, attached my image with foam tape and there you have the finished card.

Items Used:

White card
Printable Heaven Leather card Cream
Tim Holtz Distress Inks Bundled Sage, Brushed Cordroy, Tumbled Glass and Peacock Feathers & Forest Moss
Spectrum Noir Aquatints 33, 35, 39 & 42
Sheena Douglass Little Bit Sketchy Stamps-Roar
Papermania Embossing Powder Black
Creative Expressions Unmounted Stamps Friends Sentiments
Creative Expressions John Lockwood Element Stamp Daffodil Elements ( Grass)
Ranger Archival Ink Black

Thank you for looking, Jacquie xxx

Friday 22 May 2015

Stenciled Tree

Hello my crafting friends, good to have you back here with me today, I hope you are all well and looking forward to your Bank Holiday weekend. I am off for a week, Hooray!!! Though I wont have much time for crafting as it is MIL funeral soon and with Family down no doubt time will be spent with them, so apologies if I am absent next week.

Now as we all know today is Friday so that means 'Oldies Friday', now I have searched through my files to find this one lol! I don't think I have ever showed it on my blog as I was not pleased with it!!!


I started with my base card which was a sheet of A4 card  folded in half, sorry cannot remember what colour or who the supplier of the card was, in the center of this I matted and layered with embossed card, (not very straight either lol!) Green card & Kraft card. On some White card I stenciled my Tree and fallen leaves then over the top I lay another stencil and used my Versamark Ink Pad over the top, removed the stencil then heat embossed with Clear embossing powder, this did leave a nice shine but not visible in this photo.

For the sentiment I added this onto a tag in the bottom right corner, some self adhesive pearls finished the card.

Items used (That I remember lol!)

White card
Green Linen Card
Kraft Card
Sweet Poppies Stencils - Tree & Diamond Grid
Justrite Large Fancy Sentiments
Papermania Embossing Powder Clear
Tim Holtz Distress Inks Vintage Photo, Fired Brick
Habico Self Adhesive Pearls
There was an embossing folder used but cannot remember which one!

Thank you for looking, Jacquie xxx

Wednesday 20 May 2015

It Takes a Long Time...

Hello there my crafting friends, I do hope today finds you all safe and well, BIG HUGS to those who are not.

I have in my stash some pretty Japanese style papers and wanted to use some but not to cover it up so I went with this...


The papers are beautiful, like gold foiled but not quite! Unfortunately the photos do not pick this up but the Gold round the flowers and lines along the edge of the patterns are sparkly Gold.

I started with my base card an A4 sheet of Centura Pearl White with Gold and folded it in half to form an A5 card.

I matted and layered this up with the Japanese paper and more Centura Pearl card.

For the top layer I die cut the California background and placed this in the center.

I made a fan out of an Oriental die using another Oriental paper, Black & Gold  and placed that in the bottom right corner,  using more of the same paper and some White card I die cut four of the tags from Scandinavian Corners Boarders & Tags, layered them up with the Black & Gold paper behind the White card then on one of them I stamped my sentiment and placed the two tags together turning them in opposite directions as seen. I hope that makes sense? This gave what would be one rectangle shape into a square, I placed this onto the card on the left side as a diamond shape.

To finish the card I added self adhesive pearls over the background, on each corner of the square and  three different size of pearls in the top & bottom opposite corners of the card.

Items Used:

Crafters Companion centura Pearl White with hint of Gold Card
Japanese Papers (own stash)
White Card
Creative Expressions Sue Wilson California Collection Background
Creative Expressions Sue Wilson Scandinavian Collection Corners, Boarders & Tags
Creative Expressions Unmounted Stamps Friends Sentiments
Tattered Lace Oriental Die Fan
Oriental papers (own stash)
Archival Ink Black
Dreamees Pearls 4mm, 5mm, & 6mm.


Thank you for looking, Jacquie xxx


Monday 18 May 2015

Remember...

Morning my crafting friends, hope today finds you all safe and well, have you had a good crafting weekend? I managed to make two small cards on Saturday but my time is limited at the moment.

IF ANYONE WOULD LIKE TO JOIN THE DESIGN TEAM ON LITTLE PATCH OF CRAFTY FRIENDS THERE IS A PLACE VACANT. JUST E-MAIL DENISE AT  lilpatchofcraftyfriends@gmail.com             you only have to do a card once a month, there are two teams and the challenges go out every fortnight, its always Anything Goes so not anything difficult and we have a load of fabulous sponsors.

This was one of the two I made...


I started of with a piece of White card and painted over the top with the Blue & Green Aquatints, I then sprayed water over the top and blotted dry, I was quite pleased with the result so did not wish to cover it all up. 

I decided just to stamp a couple of John Lockwood's design stamps so I stamped the grass at the bottom in two different shades of Green distress inks, Forest Moss & Crushed Olive, then using my versamark ink pad I stamped the square daisy chain and heat embossed with White embossing powder.

In the center of the Daisy Chain I added the sentiment using Forest Moss distress ink.

I matted this onto a plain White base card and there you have the finished card. Dimensions 4"X6".

Items Used.

White Card
Sheena Douglass Spectrum Noir Aquatints Bright & Beautiful
Creative Expressions John Lockwood Clear Stamps Daisy Elements
Creative Expressions John Lockwood Clear Stamps Daffodil Elements
Versamark Ink Pad
Papermania Embossing Powder Seafoam White
Tim Holtz Distress Inks Forest Moss & Crushed Olive


Thank you for looking, Jacquie xxx

Saturday 16 May 2015

Brown & Cream

Hello my crafting friends, things are going as well as  can be expected, everything is arranged and the funeral will be over in a couple of weeks. I have managed to comment on some posts so I do apologize for any I may have missed, not intentional just did not have the time. Thank you to each and everyone of you for your kind comments, patience and understanding.

I hope you are all well on this fine weekend? I do wish this weather would pick up a bit its back to rain down here lol!


 I decided to make a card in colours that I do not usually choose but I thought it would make a change!

I got some Brown Pearlescent card and my favourite Cream 'leather look' card and cut out the base easel and toppers with Sue Wilson Austrian Collection Innsbruck & Saltzburg.

I turned the base card into an easel card matting and layering as I went with the Cream & White card making sure all layers were equal.

On the top Cream card I stamped a sentiment from Unmounted stamps 'Friends Sentiments'

For the stopper on the base I used my Versamark ink pad and stamped the symbol from Sheena's Little Bit Sketchy stamps 'Be Strong' then heat embossed it three times using embossing Tinsel Copper then die cut it out with Standard Circles Large.


For the inside of the card I die cut using the same dies but in Cream and attached this to the inside of the card as seen.


I made sure when making this that it all closed up tight so nothing was showing on the outside.

There you have the finished card.

Items Used;


Crafters Companion Pearlescent Card Brown
Printable Heaven 'Leather look' Card Cream
Creative Expressions Unmounted Stamps Friends Sentiments
Sheena Douglass Little Bit Sketchy Be Strong
Stamps & Stuff Embossing Tinsel Copper
Creative Expressions Sue Wilson Austrian Collection Innsbruck & Saltzburg
Spellbinders Standard Circles Large
Tim Holtz Distress Ink Vintage Photo
Versamark Ink Pad

I would like to enter this card into  http://allsortschallenge.blogspot.co.uk/2015/05/week-311-no-squares-allowed.html
 

Thank you for looking, Jacquie xxx

Friday 15 May 2015

Oldies Friday

Hello my crafting friends, good to have you visit me today, I do appreciate it.

Now its 'Oldies Friday' again and at the moment this is the last 'Oldie' card I can find, unless I start all over again from when I started my blog lol! Don't worry, only joking!


This was made for one of the teachers where I work. I have to say I cringe when I look at some of these Old cards including this one!!!

A few Spellbinders dies used on this one and lots of Yellow!!!

Hope you all have a great day and plenty of crafting over the weekend.

Love & hugs

Thank you for looking, Jacquie  xxx

Thursday 14 May 2015

With Love...

Hello my crafting friends, a Good Thursday morning to you all. I hope today finds you all well and enjoying your craft whatever that may be.


Most people who know me will know I adore anything Oriental so when Crafters Companion bought out their Kimono range I was a very happy Bunny! I do have quite a lot of Oriental craft products but do not tend to make much with them as I don't like using them lol! I want to keep them, this range I adored because it was more Contemporary, something I had not seen before in Oriental design. I did stop myself from buying the whole range and settled on the stamps, CD Rom and three dies.  One of the dies, the Peacock I had used HERE

For today's post I used one of the stamps along with one of the papers from the CD.

I started with my base card a 6"X6" scalloped card and matted and layered this with Rich Plum card and the patterned paper off the CD. Onto White card I stamped my image, the Bird Cage and the sentiment and coloured in the Woman with Promarkers.


Using the Auvergne die I cut the image out and using the same die to emboss some Rich Plum card then cut round the edge of that to form a base for the topper to sit on. I attached both of these to the top of my card.

To finish the card I added three Black gems in two opposite corners and lined the inside with the same paper adding a panel for writing on out of the Rich Plum and White card.

Items Used:

White Base 6"X6" Scalloped Card
Crafters Companion Kimono CD Rom
Crafters Companion Kimono  Stamp Porcelain
Sue Wilson French Collection Auvergne
Tim Holtz Distress Ink Black Soot
Promarkers
White Card
Kanban Bling Self Adhesive Gems Black

Thank you for looking, Jacquie xxx


Tuesday 12 May 2015

Peacock Feathers

Morning my crafting friends, hope to day finds you all safe and well and enjoying some crafting time.

May I give a very warm welcome to my newest follower  Asmah, welcome Asmah do let us know if you have a blog of your own and thank you for following me. I would also like to send my apologies to foxyg, so sorry did not see you as a new follower so I do apologize and welcome.

Today's card is one I made a few weeks back, I loved the colours of this set from Heartfelt Creations, I don't have a lot of their items but loved this Peacock set.


I started with my White base card 7"X7" and matted it up with some Pearlescent Teal card and more White card.

Using one of the squares in the Peacock Paisley Collection 12 X 12 Paper Pad I placed a Self Adhesive sheet over the top then covered it in Micro-beads. I attached this to the top of my card.

On some White card I stamped  the Peacock Paisley stamp and coloured it in with Distress Inks, then I fussy cut it out and coated it twice with a craft glaze. Once dry I attached it to the front of my card.

In the top right corner I added one of the sentiments from the paper pad, I glued this onto a piece of White card first.

To finish the card I added a small butterfly that I had made using modelling clay and a mold, I coloured it in with Promarkers.

I lined the inside with matching paper from the pad and there you have the finished card.


Items Used:

White 7"X7" Base Card
Crafters Companion Pearlescent Card Teal
White Card
Heartfelt Creations Peacock Paisley Stamp
Heartfelt Creations Peacock Paisley Collection 12"X12" Paper Pad
Tim Holtz Distress Inks-Peacock Feathers, Forest Moss, Crushed Olive, Shaded Lilac, Bundled Sage, Cracked Pistachio, Tattered Rose and Victorian Velvet.
Creative Expressions Cosmic Shimmer Micro-beads
Pinflair Craft Glaze
Hearty Air Dry Modelling Clay
Butterfly Mold (free with Magazine)
Promarkers

Thank you for looking, Jacquie xxx

Sunday 10 May 2015

Sad News!

Hello my crafting friends, sadly my Mother-in-Law passed away this morning quite suddenly so I may not be posting/commenting for a while although I do have some posts scheduled for this week. If I get the chance to comment on peoples posts then I will do but the next few days are going to be horrendous sorting everything out, needless to say my hubby is in pieces as is his Brother & Dad. 

I will keep looking in on posts but may not be able to comment.

Love & hugs

Jacquie J xxx

Daisy Weave

Hello my crafting friends, hope you are all having a great weekend. Haven't we had some strong winds of late, the beautiful blossom on my Cherry Blossom tree has been blown away, only had the beautiful flowers a few days this year, mind you the drive and cars look pretty!!!

May I give a very warm welcome to my newest follower Lynn (aka LynnPenguin), thank you for joining us its lovely to have you on board.

Yesterday I had my delivery of John Lockwood stamps so I had to play, I have to admit I cheated a bit, watching John's shows Nigel May commented on the Daisy striplet and that he would cut it up and weave it, well sorry Nigel I had to give it a go so I decided on using Custard & White card.


I started with my base card, 6"x6" White scalloped card and cut a piece of Custard card to size.

On some White card and more Custard card I stamped the Daisy Quilt Striplet twice on each card using Black Archival ink then cut it into strips. Now I have never tried to do weaving before so was not sure how I was going to do this!!! I decided to start by gluing the tops of the Custard strips onto the piece of Custard card I had cut to size but leaving a gap round the edge of the card as I wanted to put a frame on top of the weave. I then took each of the White strips and weaved them one at a time in between the Custard strips pushing them up as far as I could, it was a bit fiddly but I got there in the end.  I trimmed the excess from the edges and taped them down with double sided adhesive. 

I then made a frame out of White card so it was just a tiny bit smaller than the Custard card, I cut out the middle using a craft knife and embossed the frame with Knotted Trellis, I now wished I had left it plain or just embossed a line inside it as I think the pattern is too much for the weaving and maybe being plain would have showed the weaving up more.


With the excess bits I had cut of from the weave strips I managed to cut 12 squares so these I coloured, the White in Yellow and the Custard ones in Orange, I then attached these with Foam pads on top of parts of the weave in random places so they protruded out of the card, I felt this added some depth and interest.

I did not wish to add a sentiment as I felt it may spoil the look but just added a Yellow & Orange bow, keeping to the colour scheme, in the bottom left corner and then added two of WENDY'S beautiful stick pins to finish it off.

Thank you Nigel for the idea and John for the inspiration and wonderful stamps. Now its your turn John, I know you can make a better job of it than me lol!

Items Used:

6"X6" White Scalloped Edge Base Card
Creative Expressions Foundation Card Custard
Creative Expressions John Lockwood Stamps to Die For Daisy Quilt Striplet
Creative Expressions Sue Wilson Embossing Folder Knotted Trellis
Spectrum Noir Pens
Foam Pads
Yellow & Orange Ribbon
Ranger Archival Ink Black
White Card
Wendy's Stick Pins


Thank you for looking, Jacquie xxx

Friday 8 May 2015

Christmas Wishes

Morning my crafting friends, almost another week over. I hope you have all had plenty of time to craft, life seems to take over quite a bit lately.

I am starting my Christmas cards, yes I did say Christmas lol! I have been inspired by the new Happy Little Stampers Christmas CAS blog that is starting soon, just up my street for quick but very effective cards. I am hoping to get all my cards done by the end of the summer!!!


For my base card I folded a sheet of A4 Chocolate Brown Pearlescent card in half then cut down the middle to make two A6 card blanks.

On top of the base card I matted a piece of White card that I had stamped with my sentiment using Archival Ink.

Using some Tan coloured Pearlescent card I found in my stash along with more of the Chocolate Brown I die cut my Deer.   The die includes the little dots for the speckles on the Deers hump and a wreath to put round its neck, which I have decided to leave off on this occasion, eyes and hooves. These are all separate parts of the die you cut and stick on, obviously I coloured the eyes, nose and hooves Black but left the speckles White.

A very simple card to make and a lovely little Christmas card quite cheap for posting. 

Items Used:

Crafters Companion Chocolate Brown Pearlescent card
Crafters Companion Tan Pearlescent Card
White Card
Creative Expressions Unmounted Stamps Winter Greetings
Cottage Cutz Deer with Wreath
Sharpie Pen Black
Archival Ink Black


Thank you for looking, Jacquie xxx

Wednesday 6 May 2015

DREAM

Morning my crafting friends, hope today finds you all safe and well. Did you all have a good Bank Holiday? We had a lovely one, it was my hubbies school reunion, he has been going to these every year for about 30 years now and last year they did a lot of fundraising to get enough money together to have a plaque made for where the school was. It was a boarding school for ill children who could not go into mainstream school, my husband had epilepsy others had asthma and the likes, the group my husband was with have all stayed close and meet up every year if not more. The school ran from late 50s until 1981 when is closed. There are now these beautiful large houses (4-5 bedrooms) built on the site and one of the residents gracefully agreed to have the plaque positioned on the outside of their wall and she and the other residents put on a garden party for us all, it was a joy, the weather was beautiful and we had the Daughter-in-Law of an old headmaster open the plaque. The EDP newspaper was there too so it was quite an event. As usual we always make a day of it, drinks down the pub and a meal, lots of chatter and laughter with them reminiscing the old days. Some of the old teachers were there too. Of course because of the presentation of the plaque there were many there who had never turned up before, some who are now in their 60's. I will add a couple of pictures at the end of this post.

May I welcome my latest follower 'cardsarus', good to have you on board, please send us details of your blog if you have one so I can return the favour.

Now todays card I made especially for a new blog that is starting by our lovely Pamellia of http://mylittlecraftthings.blogspot.co.uk/, some of you may be familiar with her stunning creations, Pamellia has started a new blog that you can find HERE entitled 'Anything but Cute', its a mixed media blog that would love you to create Anything But Cute! If you are not into mixed media go and check out the rules and give it a go its not as hard as you think, the hardest part is your imagination!!!


I cut my base card to the size I wanted,this was using one of my favourite card the Leather Look Cream card. Using a piece of White card I embossed it with a Wood-grain mask then placing a Scraped paint stencil over that I inked through with Weathered Wood and Vintage Photo Distress Ink.

I spread some modelling paste down the ink lines on the card to add some depth and interest and left this to dry naturally. 

Using more White card I inked up  the Dream word, Frame and the Bird and heat embossed with Aged Aqua Embossing Enamel and Black embossing powder then fussy cut them out. i love this embossing enamel as not only is it a lovely colour but it has specks of Gold in it too.

I got some Lace, inked it up with Vintage Photo and wrapped it round the bottom of the card. I placed the Dream frame on top of the Lace to the left of the card.

I die cut some Cherry Blossom out with various scraps of card and added a touch of glitter to the ends of the petals. I placed the branch behind the Lace under the Frame, added the flowers as seen then placed the bird as if it was perched on the branch.

There you have the finished card. Dimensions are 6"X4".

Items Used:

Printable Heaven Cream Leather card
Creative Expressions That Special Touch mask Wood-Grain
Creative Expressions Layered Scalloped Lace Cream
Memory Box Stencil Scraped Paint
7 Gypsies Papercrafter 5pc Cling Stamps
Tim Holtz Distress Inks Weathered Wood & Vintage Photo
Stampendous Embossing Enamel Aged Aqua
Papermania Embossing Powder Black
Spellbinders Cherry Blossom
Dovecraft Glitter Glue Crystal


Pupils & Plaque to mark
Eden School, Bacton, Norfolk


Thank you for looking, Jacquie xxx

Monday 4 May 2015

Just a note!

Hello my crafting friends and a good Bank Holiday Monday to you all, as I have today off work I am hoping to play...mmm lets keep our fingers crossed lol! Anyhow, I hope you are all having a good weekend with plenty of craft time?

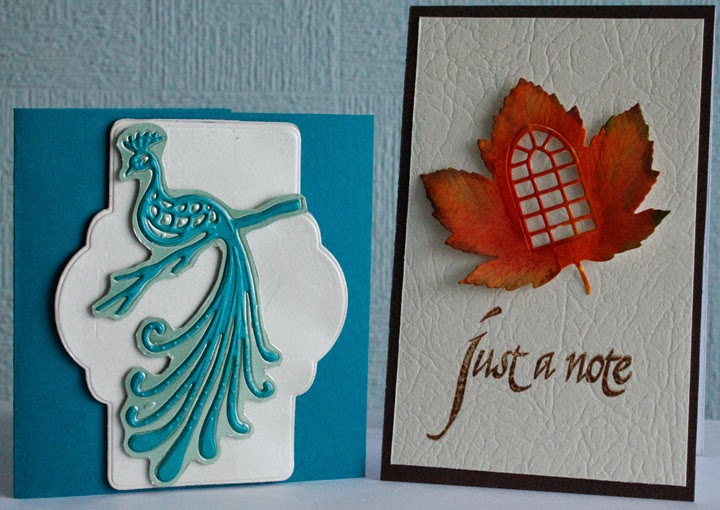
I have two little cards for you today that I made  just to send my personal contact details to two of my cousins, we have always kept in touch over the years but through their parents, now they have gone we decided it was about time we had each others details.


They are only tiny cards made out of scrap card that I had  left over from other projects. With the Peacock die I cut it out using Pearlescent Teal card then embossed some Green Miri card, cut round that and matted the Teal peacock on top, I attached it to a piece of cream leather look card (actually the reverse of it as its plain) I had die cut with the outer die from  SW French Collection Auvergne I then matted this onto a Teal card base. On the inside I added a piece of White card to write my details on.

The 'Maple Leaf' card a had a piece of Pearlescent Chocolate Brown card for the base and matted that up with a piece of Cream leather Look card. I die cut the Leaf Window out of the leather look Cream card and inked it with Squeezed Lemonade, Dried Marmalade, Fired Brick, Crushed Olive and Vintage Photo to give it a Autumn look. I attached this to my base card then stamped underneath with  stamps using Vintage photo. The inside of the Pearlescent Chocolate Brown card is White so I did not have to line this in order to write on it.


There you have two small but useful little cards.

Items Used:

Crafters Companion Pearlescent Card Teal & Chocolate Brown
Crafters Companion Kimono Dies Peacock
Sue Wilson Dies French Collection Auvergne
Spellbinders Maple leaf Open window
Printable Heaven Cream leather look Card
Tim Holtz Distress Inks Squeezed lemonade, Dried Marmalade, Fired brick, Crushed Olive & Vintage Photo

Thank you for looking, Jacquie xxx

Saturday 2 May 2015

Hello Marigold

Hello crafters, good to have you here with me today. Thank you for all your wonderful comments on my last post, I do appreciate them so much. I have not done anymore backgrounds like that yet but its on my list to do as are many things lol!

Well today is our 9th Challenge for http://lilpatchofcraftyfriendsdt.blogspot.co.uk/p/challenge-blog.html we have some wonderful sponsors as usual, so please do come along and join in the fun.

This challenge sponsors are:

 Prize - $12 Gift certificate
 Prize - 7 Images
Prize - 1 image


My card is using a beautiful image from Ching-Chou Luik called Hello Magnolia.


As soon as I received my image I knew I wanted to give her Blonde hair and a Navy dress so I proceeded to colour her in with Promarkers and Spectrum Noirs, I was never good at colouring hair so for this I used some You Tube videos for Blonde hair and I must say I am pleased with the results.

I wanted to frame the image and I thought this frame from Couture Creations was perfect. I die cut it twice, once with White card and once with Black card, I placed the Black die cut under the White to act as a shadow and to add some depth to the frame then attached this over the image.

For my base card I used 7"X7" base White card, I cut some Dark Blue card to size then inked up my embossing folder with a Versamark Ink Pad and ran the card through the E-Bosser, I then brushed Mica pigment powder over the top, this gave a lovely sheen to the background. 

I attached my image and frame in the center of the card then attached some flowers in the bottom right corner, similar colour to those I had coloured in the image, I added some faux quilled leaves around them. In the opposite corner I added a Blue Butterfly, again to match the one in the image, also to balance the card out.

To finish the card I added three gems in the two opposite corners to the flowers and butterfly and on the inside I added some more of the Blue card and attached the cut out from the frame die cut  on top in order to have somewhere to place a sentiment or verse. There you have the finished card. Doesn't she look lovely? Do pop over to http://lilpatchofcraftyfriendsdt.blogspot.co.uk/p/c7-team-april-5th.html to view the other wonderful creations from the DT.

Items used:

Ching-Chow Kuik Fantasy Art Digi Image-Hello Magnolia
7"X7" Base White Card
Spectrum Noir pens - GB1;GB3;TN3;TN4;CR4 & CG4
Promarkers - Ivory & Blush; Indigo Blue; Sky Blue; Cool Aqua; Artic Blue & Duck Egg Blue
Couture Creations Fancy Frame
Cosmic Shimmer Iridescent Mica Pigments Angel Gold
Buckwell Craft Supplies Flowers
Sue Wilson Finishing Touches Faux Quilled Leaves
Hunkydory Diamond Sparkle Gems Stones
Crafters Companion Kimono-Kimono Butterfly
Creative Expressions Foundation Card Dark Blue
Tattered Lace Embossing Folder Fretwork Lace
White Card

Thank you for looking, Jacquie xxx