Followers

Total Pageviews

Thursday, 31 July 2014

White Floral

Morning my crafting friends, good of you all to come and visit me again, I hope you are all well?

My cleaning of the house is going extremely slowly, in fact its at a stand still as I keep playing lol! Must get myself going as over a week has gone by already tut! tut! I blame the weather lol!

I would like to say Hello to my visitor Julieanne thank you for your nice comment on my post. Julieanne has a couple of nice blogs so go and take a visit, they are: http://pinkjools.blogspot.co.uk/   and http://thegloryofchristmaschallenge.blogspot.co.uk/   Please do go and take a look they are well worth a visit.


Today I have posted a floral card for you, I hope you like it? I did intend to cut a lace panel boarder out of the card but the panel isn't long enough for this size card so I cut it twice, trimmed it and stuck it on. I will have to try with a 6X6 card sometime! Can you see the join?

Items Used:

Teresa Collins 8X8 Paper Pad
Creative Expressions Coconut White Card
Textured White Card
Tattered Lace Floral Panel (Free with Magazine)
Tattered Lace Lavish Blooms Poppy
Tattered Lace lavish Blooms Leaves
Creative Expressions Unmounted Stamps Kind Thoughts
Tim Holtz Distress Ink Bundled Sage
Spellbinders Grand Decorative Ovals
Kaisercraft Sparklets Fern


Finished dimensions 7 1/2 X 7 1/2 inches. 

I would like to enter this into http://www.simonsaysstampblog.com/wednesdaychallenge/simon-says-anything-goes-6/   and http://addictedtostamps-challenge.blogspot.ca/2014/07/challenge-106-anything-goes.html

Thank you for looking, Jacquie xxx


Tuesday, 29 July 2014

Feliz Navidad

Morning my crafting friends, good of you to pop by and visit me once again, it is much appreciated and I love for you to leave a comment, good or bad.

Well yesterday it was a bit cooler so I started work on clearing hubby's office, no mean feat I can tell you, that will take a few days I think! He came home and told me to leave all his papers until he does his books ha! ha!. I don't think so I said, I intend to do the whole house this summer not wait till Sept/Oct for him to do his books! I am actually going to change it all round and swop the desks round, his desk and the computer desk so everything has got to come out! Why do I get the feeling I may regret this?

Needless to say there may be times when I won't post anything, depends whether I have time to play lol! Never fear I shall find time to check your posts even if its every other day! At least I have done the next two posts for Hobbycutz!

Now today's post is similar to yesterdays as I used the same die but with Cobalt Blue card rather than Red, this is one of the cards I have done for one of the Teachers at work, she teaches Spanish and has friends in Spain and America.

I have tried to keep it fairly simple as I think the die says it all, just adding the snowflake stamps and die onto the bow.

I love this colour Blue with White, it really sets the die cut off.

Items Used:

Creative Expressions Foundation Card Coconut White & Cobalt Blue
Justrite Large Fancy Holiday Stamps
Sue Wilson California Collection Background Die
Spellbinders Radiant Rectangles
Spellbinders Snowflakes
Creative Expressions American Seam Binding Ribbon Blue
Creative Expressions Self Adhesive Pearls
Papermania Ink Royal Blue


Thank you for looking, Jacquie xxx

Sunday, 27 July 2014

Poinsettia Merry Christmas

Morning my crafting friends, I'm a bit late with my post so sorry but yesterday afternoon was the first chance I have had to play!

I am sticking with the Christmas theme for the moment, gotta get these cards done lol!

May I thank each and everyone of you for all the wonderful comments I have been receiving, they are very much appreciated. May I welcome my latest follower Desire Fourie she has a lovely blog showing her beautiful creations so please do go and have a look http://desiref.blogspot.co.uk/

Boy hasn't it been hot, not complaining as we have waited long enough for it but I wish we had a lovely breeze with it, I have had to move the dog & cats to the front of the house as its cooler there, our living room is our conservatory so you can imagine how hot it is in there especially South facing! Too hot to sit in that's for sure.


I had some beautiful Red Velvet card that I had bought from Joanna Sheen and I wanted to use that for some Poinsettias but I also wanted to use the Sue Wilson California Background Die as I had not used it yet lol! Its a fantastic die but my its fiddly, need your pokey tool for this one!

Rather than leave the Red card plain in the background I stamped on some poinsettias using my Versamark ink pad, this made the matte part of the card look like miri card so it gave it some affect but its not a very good photo as I was in a rush to get it posted!

Items used:

Joanna Sheen Red Velvet Card
White Textured card (own stash)
Creative Expressions Coconut White & Green card 
Creative Expressions Sue Wilson California Collection Background
Spellbinders Imperial Gold Gold Labels Four
Spellbinders Layered Poinsettia
Sheena Douglas Little Bit Scenic Pinescape Sentiment
Papermania Dew Drops Gold
Sam Poole Silhouette Poinsettia
Versamark Ink Pad


I would like to enter this for CraftyCatz Challenge Anything Goes http://craftycatzweeklychallenge.blogspot.co.uk/2014/07/challenge-241-anything-goes.html

Thank you for looking, Jacquie xxx


Thursday, 24 July 2014

Christmas Baubles CAS card today!

Morning crafters, hope this finds you all safe and well? Thank you for visiting me today, its gonna be  a quick post today I'm afraid as got to catch a train!


A very simple card to make, I got a basic slimline card and stamped several baubles on to it with my Versamark pad then heat embossed  with Silver embossing powder and coloured them in as seen. 

I stamped my sentiment then drew in the lines for the baubles so they were not floating in mid air. There you have the finished card!


Items Used:

Basic White Card
Stamps to Die For...Sue Wilson Mini Floral, Mini Lattice & Beaded Bauble
Papermania Embossing Powder Silver
Spectrum Noir Pens
Tim Holtz Distress Ink Black Soot
Justrite Large Fancy Holiday Sentiment Stamps


Thank you for looking, Jacquie xxx

Tuesday, 22 July 2014

Leaving card & Clay Head!

Morning my crafting friends, hope this finds you all safe & well, the weather is scorching hot down here so I do feel for those of you who have had floods recently. We constantly moan about the weather don't we but we don't realise how lucky we are compared to some countries.

Now today's post is a little different, the first item is a card I made for the class of Children at my school for their form teacher from them. Being as the front contains a photo of the whole class I have had to cut it out for safeguarding reasons so I hope you don't mind, it was a photo of them all sitting on the stairs, they wanted it put into a card so this is what I did for their Male Teacher Mr Chung, he is a lovely young man who is moving on to another school so he will be missed by us all.


I used Kraft card, embossed it with Sheena Douglass Trailing Ivy Embossing Folder and rubbed over the embossing with Creative Expressions Gilding Wax Green. I added the leaves from Tattered Lace (part of my prize from Lydia a short time back) as the photo they gave me had a couple of bright areas so I covered them up with leaves! Now I did not want to put a flower on to hide the stems of the leaves so I added these Metal Victorian Corners I had in my stash. Adding a label & sentiment at the bottom finished the card. I did line it with copy paper so they could all sign it, glad to say they were all pleased with it. There will be a few tearful farewells today as we say goodbye to a lot of Teachers and staff, some retiring and some moving on, then our holidays begin!


Now my other bit of craft is not a card but a clay model I made at school in the Art lessons lol! Occasionally when they do use clay we are asked if we want to join in so on this occasion I did. They were making clay model heads of famous artists so I chose Van Gogh! You make the head with newspaper first to get the shape then once that has set (a week later) you add the clay on top forming it into shape to represent your chosen artist, all the children had pictures to copy from. Its at this stage you have to add the features like the hair, nose etc, you have to leave a hole at the bottom, this is then left to dry before finally being put into the kiln, ( second week) it is whilst in the kiln the newspaper burns away leaving just the clay head, which is why you need a hole at the bottom for the ashes to drop out of. The third week the children are able to paint their heads like the artist.


We painted them with water colour paints and being Art you are expected to paint all the skin tones that are in the skin including Blue, Yellow & Green.  I only had two weeks to complete mine so would have liked more time to get the eyes right, I did only put on one ear though lol!

I am quite pleased with my first attempt at a clay head and the teacher thought it was good!

Back to cards on Thursday.

Thank you for looking, Jacquie xxx

Sunday, 20 July 2014

Hobbycutz Challenge 57 Anything Goes

Morning my crafting friends, hope today finds you all well and enjoying the summer?!

Today's post is my first for the Hobbycutz Challenge 57 Anything Goes as decided by Kobie. Our sponsor this week is Hobbycutz.

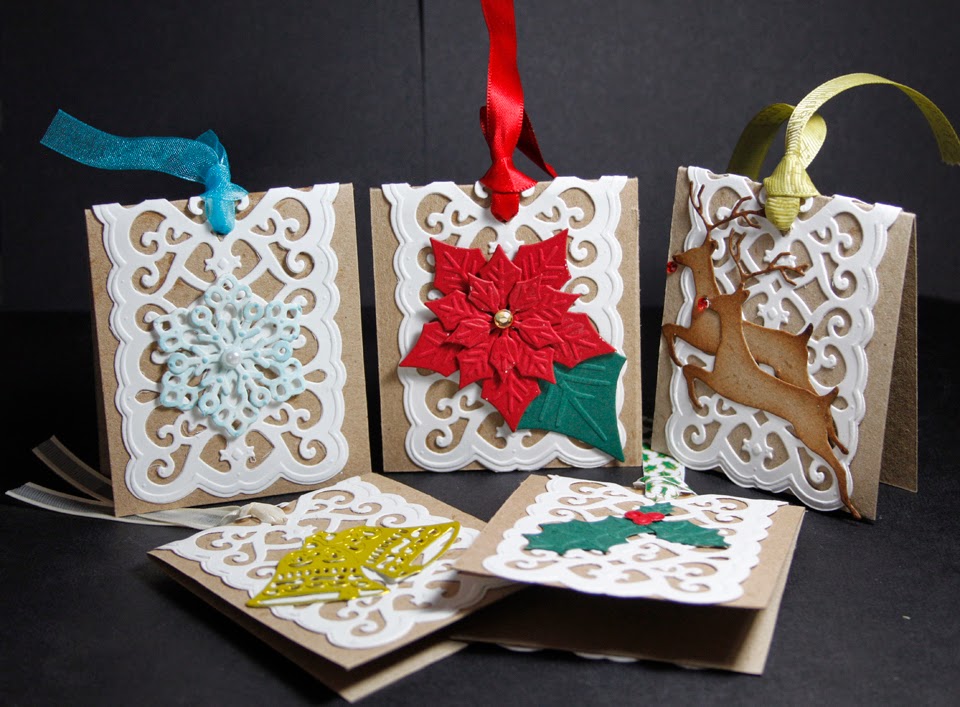
I decided I would do some Christmas tags using the Sue Wilson Striplet, as I thought White on Kraft card looks so good this is what I used, I did not wish to leave the tags with just the striplet so I die cut certain Christmas elements to go on the front but leaving the back with just the striplet.


I used a whole striplet on each tag  folding it over the Kraft card then looked to see what dies I had with a Christmas theme and ended up with a Reindeer, Christmas Bells, Poinsettia, Snowflake and Holly. I have made several of these but just thought I would show one of each. I added some contrasting ribbon to each of the tags to give the finished look. Hope you like them?


Items Used:

Kraft card
Creative Expressions Coconut White Card
Creative Expressions Sue Wilson Embroidered Striplet Die
Various Ribbons
Spellbinders Poinsettia
Spellbinders Holly Twigs & Leaves
Spellbinders Snowflakes
Cottage Cutz Leaping Reindeer
Tattered Lace Bells
Tim Holtz Distress Inks Vintage Photo (Reindeer) & Tumbled Glass (Snowflake)
Kanban little gems Red & Yellow
Creative Expression Self Adhesive Pearls


Pop on over to the http://hobbycutzchallenges.blogspot.co.uk/ and take a look at all the other wonderful creations by the Design Team


Thank you for looking, Jacquie xxx


Friday, 18 July 2014

Before I melt...

Good day my crafting friends, its so good of you to visit me today, I do hope you like what you see and come back again. If you have a blog of your own then please leave a comment and blog address I I will return the favour.

What lovely weather we have been having lately, though I am dreading today as it has been forecast to be about 29 degrees, still they also forecast thunderstorms at the weekend lol!

Only three more days then we break up for the summer hols, got so much to do I hope I don't repeat my previous summers when hardly anything gets done lol! I am going to spend a week in France though at my Sisters so I am looking forward to that.


Welcome to Julie, she has a fabulous blog so please do go and look at her beautiful creations, its http://julieprice3.wordpress.com/


Now for todays post I made the card to fit the sentiment/verse! I started with the periwinkle card as I love this colour and thought it would go well with White.  I decided to use the little Christmas stamps rather than do a whole scene so I carefully chose my colours to go as near to the Periwinkle card as I could.

I wrapped a lilac ribbon round the bottom, layered it up and added some snowflakes to finish it off. I hope you like it?

Items used:


Creative Expressions Foundation Card Periwinkle & Coconut White
White Textured Card (Own stash)
Joanna Sheen Christmas Patchwork Stamps
Tim Holtz Distress Inks Shaded Lilac, Tumbled Glass &Antique Linen
Verse from Clarity Stamps
Papermania Clear Embossing Powder
Habico Self Adhesive Pearls
Fantastic Ribbons Lilac Ribbon
Hobby House Pearls
Spellbinders Snowflakes


I would like to enter this into the http://christmasblogchallenge.blogspot.co.uk/2014/07/blue-christmas.html


Thank you for looking, Jacquie xxx

Wednesday, 16 July 2014

Holly Wreath & Reindeer

Morning my crafting friends, hope today finds you all safe and well? We are having some glorious weather down here in the South East at present so lets hope we all have a good summer.

Thank you all for your kind remarks about my back, its getting a little better, unfortunately I do have a lot of spinal problems for life which I wont bore you with but this is the first time its played me up since my op last year, I think it was through doing some filing at work on Friday, the bending & twisting must have put it out! I have been resting it as much as possible so it is feeling better, thank you all again. I will be resting plenty over the next six weeks of school holidays lol!


Another Christmas card for you today, this set was from Clarity Stamps which consisted of the Holly Stencil and the Reindeer Stamp, I stamped the reindeer image using TH Vintage Photo then painted in the reindeers roughly, painting between the antlers with TH Forest Moss.
For the Holly Stencil I used Luminarte Radiant Rain, this dried to give a lovely sheen on the leaves, then I die cut out all the Berries and Holly leaves for the corners and put all these into place. I added some Red Gems for the Reindeer's noses and for the Berries in each corner before matting it onto hand made 7" X 7" Card.


Items Used:

Clarity Stamps Holly Wreath & Reindeer
Luminarte Radiant Rain Shimmering Mist Green
Creative Expressions Card Ruby & Coconut White
Spellbinders Holly Twigs & Leaves
Tim Holtz Distress Inks Vintage Photo & Forest Moss
Red Gems (Own stash)


Thank you for looking, Jacquie xxx


Monday, 14 July 2014

Stained Glass Window

Morning my crafting friends, just a quick post today as I am in a lot of pain with my back at the moment so unable to stay seated for too long.

When Sue Wilson bought out The Italian Collection I just love the Calabria and the stained glass window she created so here is my take on the stained glass window, I have also added the Calabria frame on the outside as well as a thin Red frame around the 'window'. To cover the window I used an old Acrylic packaging that the dies come in and just die cut a circle.

I have kept it to the traditional colours of Christmas so it would go for a Christmas card, yes folks, sorry I am now on my Christmas cards so you will be probably be seeing one or two over the next few weeks.


I have also decorated the inside with some red vellum and the Calabria frame cut out again for the center to add a verse or sentiment on.


Items Used are;

Creative expressions Coconut White Card                                                   
Creative Expressions Sue Wilson Italian Collection Calabria Die
Creative Expressions Foundation Ruby Card
Kaiser Craft Sparklets Rouge
Tattered Lace Die Winter Wishes
Glitter in Red, Gold & Green
Acrylic Packaging from Dies 


Thank you for looking, Jacquie xxx


Saturday, 12 July 2014

White Winter Wishes


Hello crafters, good of you to come and pay me a visit today, I hope you are all well?  

I wanted to have another go at creating a White on White card and after delivery of my new embossing folder there was no stopping me, I had the backing and boarder sorted as well as the sentiment, just needed a focal point so back to my box of goodies where in my little bag of White die cuts I found this bauble and a poinsettia which called out for a Christmas card to be made.


Seeing as I already had the things needed cut out it did not take long to put together. Hope you like it?

Items Used;

Creative Expressions Coconut White card
White Textured card (own stash)
Tattered Lace Embossing Folder, Boarder & Corner Fretwork Lace
Creative Expressions Cosmic Shimmer Glitter Jewels Diamond Sprinkles
Crafters Companion Centura Pearl Silver card
Tattered Lace Die Winter Wishes
Habico Self Adhesive Pearls
SB 2010 Heirloom Ornaments
SB Poinsettia


Thank you for looking, Jacquie xxx

Thursday, 10 July 2014

Plum & White

Hi there my crafting buddies, hope this finds you all safe and well? Thank you for visiting me today I do appreciate it, I do try and get round to visiting all your blogs too and commenting on your wonderful creations, there is so much inspiration out there it is good to see.


Now todays post was not supposed to be as large as it is, I usually start from the base and work up so everything is cut to fit! This time I started with the top lol! I wont make that mistake again.

I recently bought the Sue Wilson Embroidered Striplet so was dying to make a card with it, I had a lot to live up to with our Mrs Duck and John Next Door lol! I don't think I have come anywhere near their creations but this die does make a statement all of its own.

I die cut the middle of a piece of White card, as I liked it that size I started to mat & layer up so of course several layers later you start to realise this is no longer a small card lol! Of course there is nothing you can do about it and it is nice to have a larger card in stock for a special occasion. My only disappointment was the PVA Pearls around the edge, it wasn't until I had finished that I saw how uneven they were and once again there is nothing you can do, so I do apologize! I have left any sentiment/tag off until it is needed.

On the inside I have just lined it with more of the Plum card and a White Oval ready for any verse/sentiment.

Items used:                                                                                 
White Textured card (own stash)                                                        
Creative Expression Deep Plum Card
Creative Expressions Sue Wilson Die Embroidered Striplet
Creative Expressions Cosmic Shimmer Pearlescent PVA Vintage Plum
SB Grand decorative Ovals (to decorate the inside)
Celebration Ribbon

The finished dimensions are 11" X 7"

Thank you for looking, Jacquie xxx


Tuesday, 8 July 2014

Teal & Purple

Morning my crafting friends, so good of you to visit me today, I do appreciate it and hope you will visit again. may I give a BIG Thank You for all your lovely comments recently whether you are known to me or not, new or old I thank you. I have not had much time to get round to everyone to thank them personally so I hope this will suffice?

Just two more weeks to go then we break up for the summer during which time I hope to get most of my Christmas cards done, ha ha she says, I said that last year!!!

More bits and pieces out of the box I am afraid but this time I got a bit daring with the colours, I hope you like them but whether you do or don't I would love to hear from you.


Items used:

Creative Expressions Foundation Card Teal
Crafters Companion Centura Pearl Pastel Lilac
Kanban Purple Card
Cuttlebug Anna Griffin Embossing Folder Pirouette
Creative Expressions Gilding Wax Patina
Spellbinders Venetian Accents & Motifs
Creative Expressions Unmounted Stamps Treasured Memories
Habico Pearls
Heartfelt Creations Delicate Asters Collection 12" X 12" Paper Pad
Cream Silk Edged Organza Ribbon

I wasn't sure at first whether to put the two colours together but the more I looked at them the more I liked them, it may be a bit bold for some. I had the two boarders in different colour Purples so placed the darker one on the Lilac card and the lighter one over the Teal card.

I could have added the Purple Gilding Wax but felt the Patina colour would enhance the Teal card rather than take the colour away.

I have lined the inside of the card with a sheet of paper from the Delicate Asters Collection as most of these are Purple it went with the card adding some slight decoration inside.

Thank you for looking, Jacquie xxx

Sunday, 6 July 2014

The Garden Gate

Morning my crafting friends, hope you are all well and enjoying the weekend?

May I give a very warm welcome to my newest follower Laurigami,  great to have you on board.

Bibiana is giving away lots of new goodies over the next two weeks so join her blog and good luck.

 http://stampingwithbibiana.blogspot.co.uk/2014/07/giveaway-new-release-holiday-collection.html

Among my little box of die cuts and bits of card were some little images that I had printed so I have decided to use one for today's card.


I wanted to do a strip of my favourite backing stamp so I started with this then worked from there seeing what would look good together. The doilies were an after thought as I felt it looked a bit plain and I did not have any die that cut doileys to give a lace effect so these had to do!

Items used:

White 6" X 6" base card
First Edition Up, Up and Away Premium Paper Pad
Justrite Background Stamp Secret Garden
Creative Expressions Cosmic Shimmer Embossing Powder Burnt Red Lustre
Celebrate White Ribbon
Dovecraft tea Party Paper lace Doileys
Joanna Sheen Thomas Kinkade CD Rom

I am not sure whether the White Ribbon was necessary now as I don't think it does anything for the card except cover up the beautiful background stamp lol! Perhaps a narrower ribbon would have looked better or none at all!

I have decorated the inside of the card with the same backing paper as on the front with another doiley stuck in the center for a sentiment or wording.

Thank you for looking, Jacquie xxx


Friday, 4 July 2014

Truly, Madly, Deeply

Morning my crafting friends, its Oldies Friday again so thought I would add another cross stitch I did many moons ago.


The reason for this one was through a verse that was spoken in one of my favourite films starring Alan Rickman and Juliet Stephenson. The film is entitled Truly, Madly, Deeply, its also the title of one of my favourite songs by Savage Garden but neither are linked as far as I know!

In the film Juliet character recites the poem to Alan's character (who is the ghost of her lover) in Spanish and he recites it back in English, I adored the poem from when I first heard it and spent ages re-watching the scene over and over until I had all the poem written down! I just had to put it into cross stitch along with a little pattern I found of some trees and fallen leaves.
Its not what a lot of people will like and I am sure that now I could do it a lot more decorative but I'm not going to lol! 

Sorry about the poor photograph, I could not get it without it showing some reflection, hence why its taken at an angle to avoid you seeing my ugly mug in the picture lol!

The beautiful flower next to it is a favourite of mine, an Hibiscus, this is a beautiful Orange colour, so far it only seems to give me one flower at a time although there are plenty of buds on it but it does need re-potting which I intend to do soon and this has been about the third or fourth flower I have had from it.

I shall now have to see what I can find for next Friday lol!

Thank you for looking, Jacquie xxx

Wednesday, 2 July 2014

Butterflies & Flowers

Welcome to my blog, lovely of you to visit me today, I do hope you like what you see, if so please leave a comment along with your blog link so I can return the favour.

I was raiding my old stash box again and came across this piece of Purple Card that I had embossed but had done nothing with, shock, horror!!! Well I had to put that to rights so there was my base lol! After looking to see what else I could find and with a bit of ribbon I had a card made up!


I started from the top with my matting & layering then added the ribbon, die cuts and flowers followed last but not least the butterfly.

Items used:

Crafters Companion centura Pearl Card Lilac & Ivory
Celebrate Ribbon 
Spellbinders Delicate Asters
Spellbinders Nestabilities Captivating Squares
Creative Expressions Foundation Card Lilac
Lidls Card Purple
Tattered Lace Butterfly
M Bossibilities 3D Embossing Folder labels Thirty Four Medallion
Purple Gems


Thank you for looking, Jacquie xxx