
Followers

Total Pageviews

Monday, 27 July 2015

Happy Retirement

Hello my crafting friends, another weekend has been and gone, hope you all had plenty of time to craft? I was away visiting my family in Birmingham so we had a fabulous weekend, now I am itching to get crafting lol!

The card I have for you today is one I made for a work colleague who retired last week, I had held it back as I gave it to the gals to sign before adding the flowers, its hard to sign on the back otherwise lol! However, silly me, after adding the flowers I forgot to photograph it so I am afraid you only have the none flower version!!! I had put little Camellia flowers and leaves on the bottom left corner using Blush & White card so I am afraid you will just have to imagine them there!


I had these gorgeous papers from the Flights of Fantasy Collection with Roses all over so I used this as the background. To add some definition and decoration on the front I used Tonics Art Nouveau dies and cut the pieces out of Blush card, layered these on the card as seen.

Out of more of the paper I die cut the background for the sentiment using Oval Majesty, using a smaller die I cut out the sentiment that I had done on the computer, I inked round the die with Victorian Velvet then added a self adhesive pearl at each point. I placed both of these in the center of the card.

Then as I said earlier I added the flowers in the bottom left corner. The inside was left blank for everyone to write their own messages.

The dimension od the card was 7"X7".

Items Used;

White base card
Crafters Companion Flights of fantasy Papers 
Creative Expressions Foundation Card Blush
Tonic Art Nouveau Collectable Die Set
Spellbinders Oval Majesty Die Set
Self Adhesive Pearls
Tim Holtz Distress Ink Victorian Velvet


Thank you for looking, Jacquie xxx

Friday, 24 July 2015

Little Elf & Ele Notebook

Hello my crafting friends, I really must apologize for not commenting on your blogs of late, I have been so busy I have not had time to get on here much, I do look at your beautiful creations but just don't have the time to comment at the moment so please forgive me.

I am now hoping to catch up with some craftiness now that I have broken up from work, although I do have a busy August I hope to get some posts on here lol!

Yesterday I made this notebook for a dear friend who has left our team and is becoming an English Teacher in September, next week she goes on holiday to India so I thought this was appropriate lol! Had to add a cheeky little Elf!!!


I started with some Black card and scored down the middle twice to make the 'spine' of the notebook. I then stamped and heat embossed the corner scrolls with Black embossing powder.

I stamped my Elephant with Versamark and heat embossed that too with Black embossing powder then painted him in with Pebeo Iridescent paints, I do love these paints, you only need the smallest amount and the shine they give is gorgeous, I painted his body with Silver but added a bit of Blue Black to make it a little darker for the shadows. The blanket I painted using Green Yellow; Orange Yellow and Violet Blue. Now the Violet Blue colour looks Pink but turns Purple when applied to Black card which is why the flowers are purple lol! I used White Acrylic paint mixed with a tiny bit of Yellow Aquatints to create the off White for his tusks and toes.

I painted the Elf using Blue Green and Orange Yellow. I cut a slit in the card and poked him through leaving him dangling on the inside lol! I stamped my sentiment on the scroll and placed that under his arms.

For the inside I folded several pieces of copy paper until I felt it was thick enough, I trimmed the edges to fit, though some not as straight as I would have liked!!! I halved them and stitched each half inside the book, threading each half section to the spine three times, sorry did not photograph this so I do hope it makes sense?

There the notebook was complete, it measures about 7"X5". I am quite pleased with the end result so I am hoping my friend will be too.


Items Used:

Sheena Douglass Black Card
Sheena Douglass A Taste of India Marching Elephants
Sheena Douglass Little Elf
Sheena Douglass Little Bit Magical Knowledge (Sentiment stamps) 
Sheena Douglass Little Bit Scenic Silhouette Grasses
Pebeo Iridescent Paints (Great deal at Pullingers)
Versamark Glue pad
Papermania Embossing Powder Black
Copy Paper
Black Thread 
Reeves Acrylic Paint White 
Aquatints Bright & Beautiful Yellow

Thank you for looking, Jacquie xxx


Thursday, 23 July 2015

Last day for Sheena Douglass 4 Day Deal

Morning my crafting friends, hope this finds you all safe and well, lots of hugs to those who don't. Today is your last chance to get any of Sheena's goodies that may be left, hasn't she done well? I am not surprised that the Holly & Ivy were the first to sell out.

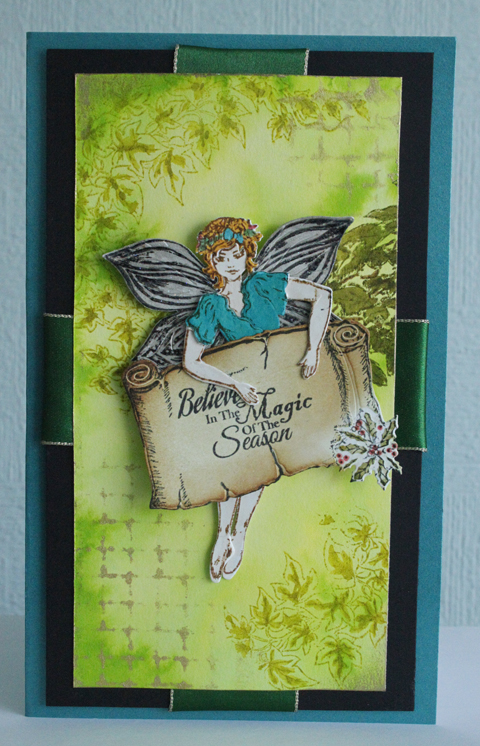
So today I am showcasing three more card that I have done with the Fairy & Elf.


The first one is the fairy, I love the background on this one, it was painted with Aquatints and stamped with some stamps from some of Sheena's previous stamps. I also added the Distress stencil in two of the corners for interest using Gold paint.
Underneath the top card I wrapped some ribbon around Black card and matted this onto Teal Pearlescent card, painting the Fairy in Teal Blue kept the two colours co-ordination.

Items Used:

Sheena Douglass Little Fairy
Sheena Douglass Ivy Boarder
Sheena Douglass Distress Stencil
Sheena Douglass White Stamping Card & Black Card
Aquatints Bright & Beautiful, Pastel & Essentials
Fantastic Ribbons Green Ribbon
Crafters Companion Pearlescent card Teal


The base of this was Silver Miri Card matted with Blue Glitter card. I used the packaging from one of Sheena's embossing folders, embossed it with the Icicle embossing folder and rubbed Silver gilding wax over the embossed area then inked over with Peacock Feathers. I matted this onto more Silver miri card and placed it over the glitter card.

I coloured the elf with Pebeo Iridescent paints Blue Green & Copper.

Using Black card I ran it through the Christmas words embossing folder and cut out a stocking to the shape of the Elfs boot, I rubbed Silver gilding wax over the top then added a piece of Aqua crushed ribbon to the top. I placed the elf so to make him look as if he was peeping over the top of the stocking. A little sentiment and the card was complete.

Items Used:

Sheena Douglass Little Elf
Sheena Douglass Santa's Little Helper
Sheena Douglass Black card
Sheena Douglass Embossing Folder Christmas Words
Sheena Douglass Embossing Folder Icicles
Sheena Douglass Packaging
Silver Miri Card
Pebeo Silver Gilding wax
Pebeo Iridescent Paints Blue Green & Copper 
Creative Expressions Aqua Crushed Ribbon
Tim Holtz Distress Ink Peacock Feathers & Black Soot


My last card is showcasing the Twinkling Brights, Christmas Foliage and a bit of the Little Elf!
I wanted a garland of Pine branches with lights over the fireplace so I started by painting the background with Iced Spruce & Weathered Wood then painted on a fireplace with Antique Linen. The center of the Fireplace and Fire were painted using Pebeo Iridescent paints.

I then decided to add stockings hanging from the branches but  using the Elfs boots as stockings!

The firescreen was made up from the twigs that are in the Christmas Foliage set and painted Gold. A strip of Christmas ribbon completed the card.

Items Used;

Sheena Douglass Christmas Foliage Die and Stamp sets
Sheena Douglass Twinkling Brights Die & Stamp sets
Sheena Douglass Little Elf
Tim Holtz Distress Inks Iced Spruce, Weathered Wood & Antique Linen.
Pebeo Iridescent Paints
Christmas Ribbon


I hope you have loved the shows and all the stunning Design Team creations, do let me know what you have purchased if anything?

Thank you for looking, Jacquie xxx
Tuesday, 21 July 2015

Jewellery Box!

Morning my crafting friends, hope today finds you all well?

Today I am showing you the home decor piece I made for the Sheena Douglass 4 Day deal on Create and Craft RIGHT NOW!

I wanted to show that the Fiary was not just a fairy, she could be a ballerina as I have shown here.


I bought some cheap boxes and painted one up in a pale shade of Pink then rubbed Gold gilding wax around the edges. My son took the hinges and fastener off and burnt them to make them look old and not so shiny!

For the fairy I die cut her out and embossed her then snipped into her arms and legs to change the pose. I embossed some vellum in the Christmas Rose folder, cut the flowers out and placed them on her as her dress, I then ran some stickles glitter glue round the edges. I painted on her ballet shoes and positioned her on top of the box.

Using more vellum I stamped some Ivy and embossed it with Gold embossing powder before cutting it out, I painted on the back with Aquatints and stuck it round the sides of the box.
Using the Fairy wings  I die cut and embossed them with Vellum and heat resistant acetate, heat embossed with Gold embossing powder and painted on the back with Aquatints, I then matted and layered each vellum wing under the acetate one, added a gem for the body, some craft wire for their antennas and they became butterflies. I placed these on the box as seen.
 
For the inside of the box I just folded strips of card and stuck them together to form a frame inside the box, I covered this with Self Adhesive Felt in a deep Pink shade and placed inside the box to make the compartments for jewellery or whatever.


The design team have come up with some absolutely fabulous ideas for home decor so please do tune in to see their stunning creations. The Sheena Douglass 4 Day Deal shows are on Create and Craft over the next couple of days

Items used:

Sheena Douglass Little Fairy Die SetSheena Douglass Fairy Stamp Set
Sheena Douglass Embossing Folder Christmas Rose
Sheena Douglass Little Bit Festive Stamps 
Plain MDF Box
White Acrylic Paint 
Pebeo Iridescent Paint Red Blue
WOW Embossing Powder Gold
Crafters Companion Heat Resistant Acetate
Vellum
Aquatints Bright and Beautiful
White Card
Self Adhesive Felt Pink (Sorry cannot remember who sold this)
Craft Wire


Thank you for looking, Jacquie xxx
 

Monday, 20 July 2015

Elf & Fairy

Good Monday Morning to you all today, hope this finds you all safe and well, plenty of hugs to those who need them.

Well I am sure you will know by now (if not why not, have you not been reading my posts lol!) the lovely Sheena Douglass has a 4 day deal starting this morning over at Create and Craft showcasing her new and beautiful Christmas Perfect Partners designs. These are dies and stamps to match and they are gorgeous. 
May I add the card we use for all these are Sheena's White stamping card and Black card, they are 300gsm but I have never seen such wonderful thick card as in these, they are beautiful to work with and seem a lot more than 300gsm. Good price too.

So today you have a double helping as I am showing you the two other Elf & Fairy you have in the sets, these are the sitting down poses but a little snip here and there and you can have them posing anyway you want them to!!!


I made a card showing a pile of presents  that the lights wrapped round and perched the Elf as if he was sitting on the bottom present himself putting on the lights!

I think this card really shows up the beautiful colour of the Pebeo Iridescent paints, unfortunately you cannot see the shine from them here. I love the little Elf posing on the box, I just snipped into the knees and bent his legs down into a sitting pose, very easy to do. Elf was coloured using Spectrum Noir pens.
I added a little sparkle in the background by gluing through a stencil and adding glitter in the top left corner of the card.


My second card is a monochrome one showcasing the sitting down pose of the Fairy. I have kept the card fairly simple using  one of Sheena's Christmas folders, painting over with white Gesso then sanding it back to reveal the words. I then ran some acetate through the Icicle folder (both folders were on her last shows), I rubbed Silver gilding wax over the icicle design then attached it to the top of the card with Snowflake brads.


The fairy I die cut & embossed, layering her up and painted her using Black Soot, her wings were cut and embossed out of White card but then heat embossed with Black embossing powder. I sat her at the bottom of the card as seen
The whole card was then matted and layered onto White then Back card.

I hope you like these, I have more to show you over the next couple of days so I hope you don't get bored with them lol!

Items used:

Sheena Douglass Little Elf die set
Sheena Douglass Little Fairy die set
Sheena Douglass Santas Little Helper stamp set
Sheena Douglass Fairy stamp set
Sheena Douglass Christmas Words Embossing Flder
Sheena Douglass Icicles Embossing Folder
Sheena Douglass White Stamping card
Sheena Douglass Black card
Sheena Douglass Distress Stencil
Pebeo White Gesso Acrylic paint
Pebeo Iridescent Paints
Spectrum Noir pens
Snowflake brads
Crafters Companion Heat Resistant Acetate
Glitter
Ranger Archival Black Ink


Thank you for looking, Jacquie xxx