Followers

Total Pageviews

Showing posts with label Papermania. Show all posts

Friday, 27 May 2016

Two for ya!

Hello my crafting friends, well today is the day Sheena showcases her wonderful new Sketchy  Rock n Roll stamps, the shows start on Hochanda at 10am this morning so please watch and enjoy.

Here are more of my samples...


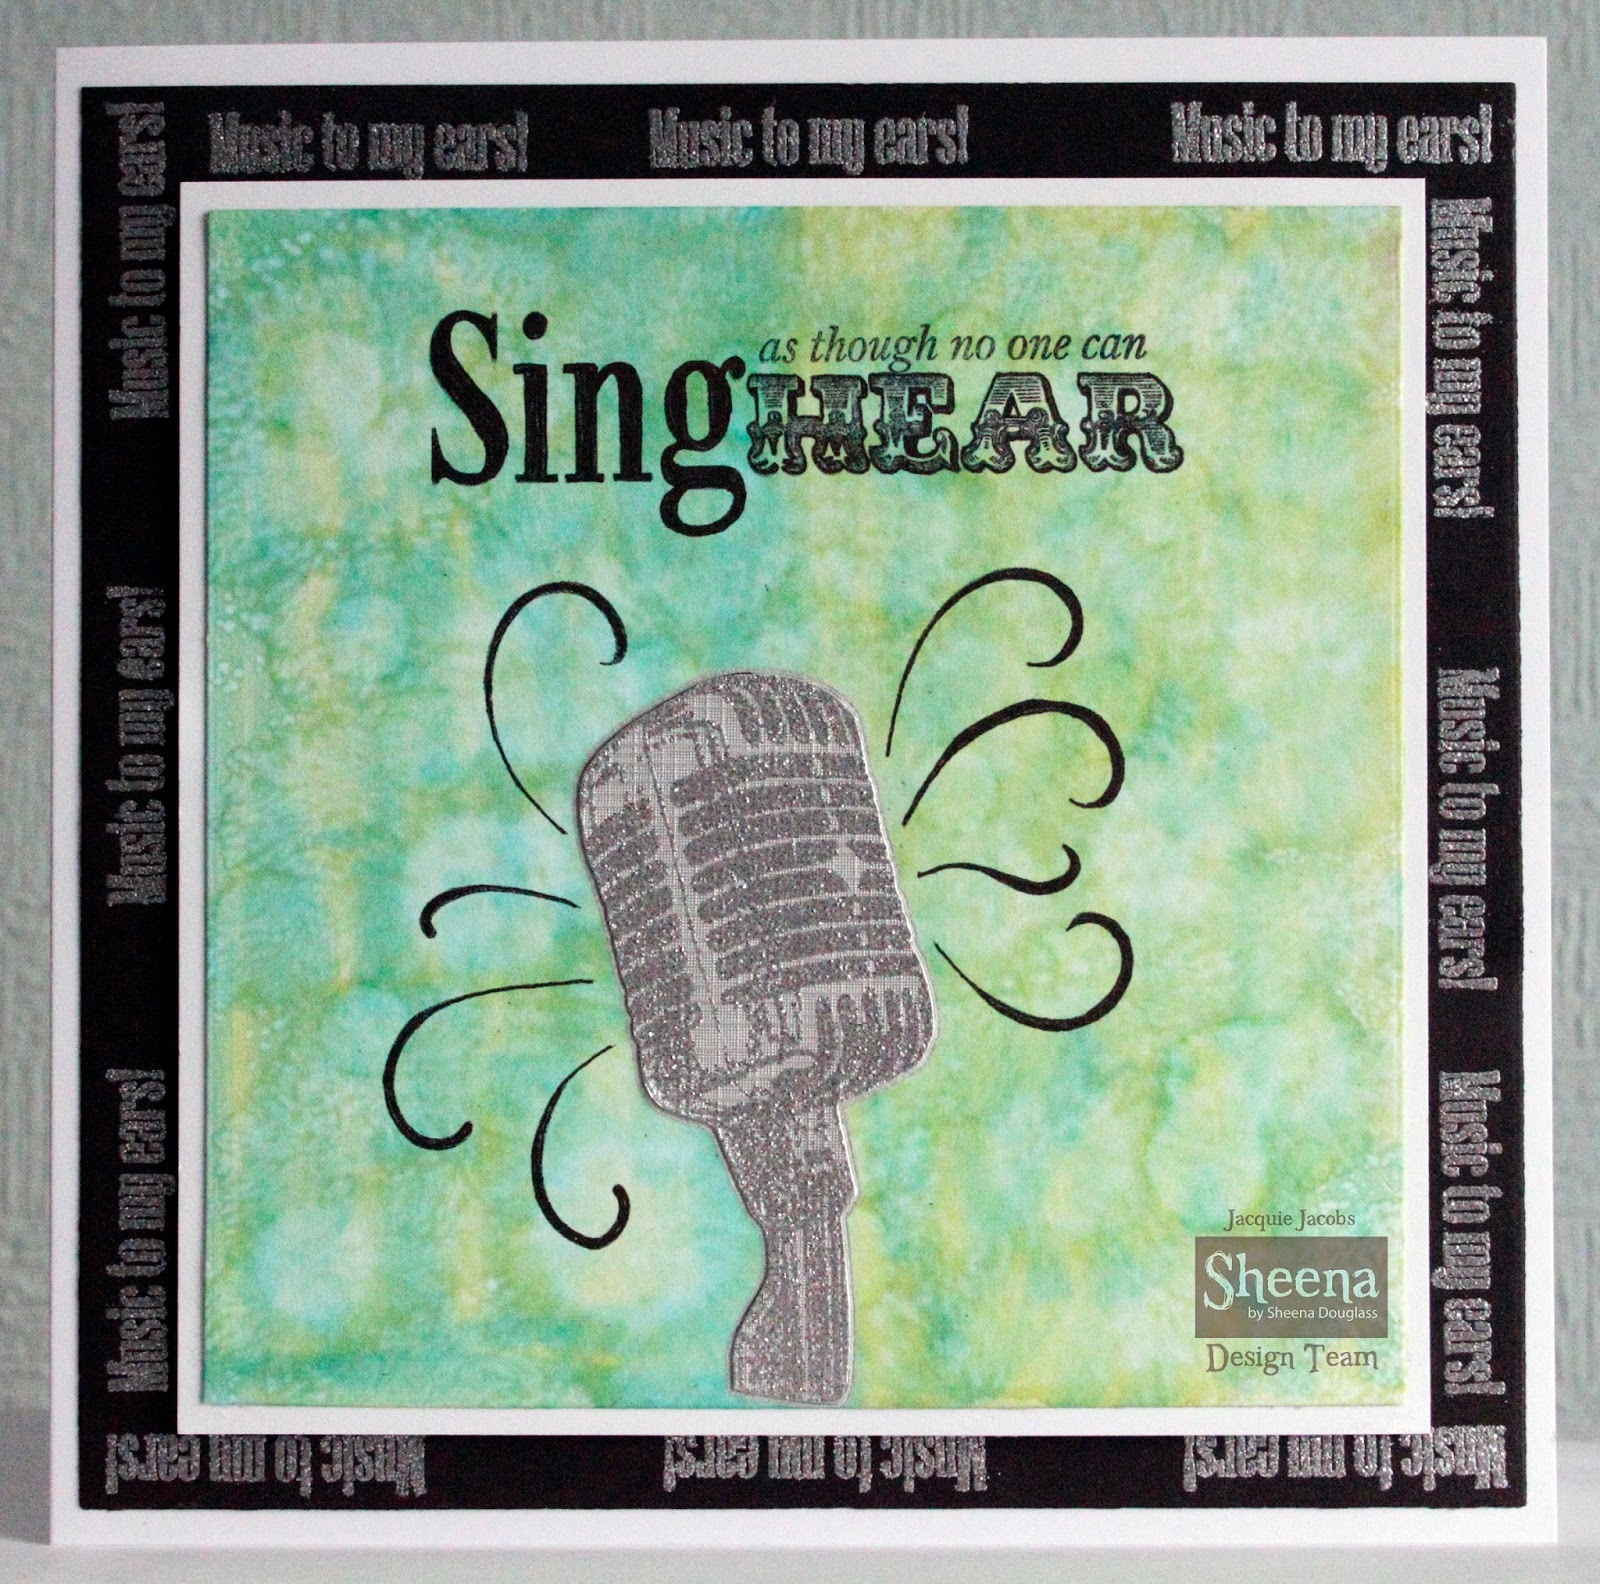
This one shows the Microphone from the 'SING' set. I have coloured the background with Spectrum Noir pens then dabbed some blending solution over the top on a cotton wool pad. The microphone is embossed with Papermania Silver Embossing Powder as are the word round the edge of the card. The sentiment is stamped on with Stazon Jet Black.


This one I stamped the two different Drum sets from the 'BEAT IT!' set on separate squares of Black Card and heat embossed them with Papermania Silver Embossing Powder. They are all matted onto Silver Card and then onto some Silver striped patterned Card. I embossed the sentiment the same way and matted it onto Silver card and placed it in the center as seen.

I hope you enjoy the shows, do let me know what you think?

Thank you for looking, Jacquie xxx


Saturday, 4 April 2015

Jordan Rock Star

Morning my crafting friends its time for another challenge, number 7 over at http://lilpatchofcraftyfriendsdt.blogspot.co.uk/  I do hope you can join us we have some lovely sponsors and some great prizes:

Prize ~ $20 to spend in store
 
Prize ~ 3 Images
     
Prize ~ €10 Gift Voucher


Here is my post its Jordan Rock Star from kith and kin stamp company.


I first die cut my image out using Grand Ovals and coloured in the background roughly with Promarkers. I then proceeded to colour in the image, again using Promarkers, before stamping across on his headband. As soon as I saw this image I knew the Guitar had to be Red and not just any Red but Glitzy Red, so I added glue to the Guitar with a glue pen and heat embossed it with Tinsel Red embossing powder. I was quite pleased with how this turned out.  

I stamped around the image 'Rock', 'Band' & 'Guitar' and coloured the stars in to match the star on his face.

Using the Grand Oval die I ran it through the E-Bosser with some Red card, cut it out and placed it behind the image bringing the embossed areas into the die cut areas of the image itself. I hope that makes sense to you all? I felt it needed the Red background to bring out the image and tie in with the Red Guitar and headband!

For the background I used a sheet of Pale Blue card cut to size, then stamped over it with the Music melody stamp in Black ink, I then ran it through the E-Bosser with Knotted Trellis Folder then inked around the edge of the card with Weathered Wood distress ink. I matted this up with a sheet of red card folded in half to make the base card.

I added my image to the front and attached the sentiment at the bottom on top of the Fancy Framed Tag I had die cut using more of the Red card.

I wanted to add an embellishment but was not sure what would look right until my son gave me a couple of his Guitar Picks, job done!


I have lined the inside of the card with more of the Pale Blue card.


Items Used:
Kith and Kin Stamp Company 'Jordan Rock Star'
Creative Expressions Foundation card Rich Red & Pale Blue
Promarkers
Spellbinders Grand Ovals 
Spellbinders Shapeabilities Fancy Framed Tags One 
Sheena Douglass Stamping Card White
Range Archival Ink Black
Studio G Clear Stamps Series 24 Rock
Inkylicious Clear Stamps Music Melody 
Sue Wilson Embossing Folder Knotted Trellis
Tim Holtz Distress Inks Weathered Wood
Sailor Rollerball Glue Pen
Papermania Embossing Powder Tinsel Red 
Do go over and view all the DT wonderful creations and why not join in yourself, the theme every challenge is 'Anything Goes' and you never know you might win a prize.
 
Thank you for looking, Jacquie xxx


Sunday, 26 October 2014

May Each Treasured Memory...

Morning my crafting friends, thank you for joining me today its so lovely to have you here, I do hope this finds you all well. Plenty of hugs coming to those who don't.

Now for todays post I thought I would try the tile effect that John Lockwood showed on one of his shows, I had before done the technique of  inking and heat embossing the raised areas but not the de- bossed areas so that's what I have done for todays post. I have to say I do quite like the look of this technique but I don't think it would suit all embossing folders, it depends on the pattern as well as the depth of the folder.Thank you John for the inspiration!


Being as I was just trying this I randomly picked up some Blue card that was in a pile on my desk that was the size I wanted, I also had a sheet of Cobalt Blue card already folded in half so Blue was my theme! They did not look right just the Blues which is why I have added some White in the mix lol! I do think this would have looked nice with Silver or Grey card instead of the White.

I embossed the Cobalt Blue card with Lattice Garden embossing folder and matted this up with some White card. I embossed the Sky Blue card with the same embossing folder, turned it over and inked the back with my brayer using my Versamark Ink pad and heat embossed with Tropic Pearl Lustre embossing powder.

Then it was decision time as to what to put on top, just a sentiment so the background was not covered up too much or what...as you can see I decided on die cutting Lables Twenty-Five twice, once with White card and once with Cobalt Blue card, before placing the White piece on my card I wrapped a piece of Blue Ribbon around the middle, I then stuck this down with the Blue die cut on top.

With another piece of White card I stamped my sentiment using Chipped Sapphire, applied a piece of Double Sided Adhesive on top then die cut with Lables Eighteen. Once out of the die I removed the adhesive sheet and sprinkled Diamond Snow all over then inked the edge with Chipped Sapphire. I die cut two of the Heirloom Flourish Two, trimmed them slightly and attached them either side of my sentiment. I placed this in the center of my card.

I made a messy bow out of the same ribbon, attached this on the side and to finish the card added a pearl flower on top.  Dimensions are 7" X 5". 

I am quite happy with the finished result and I hope you like it too.

Items Used :

Creative Expressions Cobalt Blue & Sky Blue Card
Creative Expressions Embossing Powder Cosmic Shimmer Tropic Pearl Lustre
Creative Expressions Diamond Snow
Creative Expression Unmounted Stamps Treasured Memories
Spellbinders Labels Twenty-Five
Spellbinders Lables Eighteen
Spellbinders Heirloom Flourish Two
Sheena Douglass White Stamping Card
Double Sided Adhesive Sheets
Tim Holtz Distress Ink Chipped Sapphire
GCS Imports Flowers & Beads
Papermania Blue Ribbon

Thank you for looking, Jacquie xxx



Thursday, 18 September 2014

Purple Poinsettias

Morning my crafting friends, hope today finds you all well? Thank you for looking in on me today its very much appreciated and please feel free to post a comment I would love to hear what you think of my creations.

Good luck to all those up in Scotland today, I hope you get the vote you want.


For todays post I got the old faithful Christmas bauble dies out again, I wanted to use my Purple Pearlescent card but only had one sheet left which meant not much matting & layering, I got round it by adding the one and only embossed Purple card I had with the swirly pattern on, I had three sheets of this Satin Gold Miri card left so I used that as the base card followed by the swirl embossed card, more Gold card, which I edged round with double sided tape and added glitter, this made it look like another layer!Then the sheet of Purple Pearlescent on top of this. I die cut the Christmas Ornaments 2011 out of the Gold & Purple card so you see the card behind and die cut the smaller one in Gold for the sentiment.

From the off cuts of the Gold, Purple & Purple Swirl card I die cut the Poinsettias and leaves, adding some glitter on the vines of the leaves and inking the flowers with Shaded Lilac. To finish the flowers I added a sparkly brad in the center of each flower, Gold for the Purple and Purple for the Gold. I placed these round the edge of the die cut Bauble, leaving just one for the other side. I stamped my sentiment onto the small Bauble with Versamark then heat embossed with Purple embossing powder, attaching this to the center finished the card. Dimensions are 8"X8".

Items Used:

Create and Craft Satin Gold Miri card
Hunkydory Swirl Embossed Card Purple
Crafters Companion Centura Pearl Card Pastel-Purple
Double Sided Adhesive
Purple Glitter 
SB Layered Poinsettias
SB 2011 Heirloom Ornaments
Crafty Impressions Clear Stamps
Papermania Embossing Powder Purple
Papermania Large Glitter Brads
Tim Holtz Distress Inks Shaded Lilac

I will show you the card I made from the offcuts on Saturday.

Thank you for looking, Jacquie xxx

Sunday, 31 August 2014

Hobbycutz challenge 62 Ribbons & Pearls

Morning crafters, thank you for visiting me today, much appreciated. May I welcome my new followers its lovely to have you on board.

Today is another Challenge for you from Hobbycutz, this weeks challenge was chosen by our lovely John who chose Ribbons & Pearls.

I hope you choose to join in, do go over to the Hobbycutz Challenge web site at http://hobbycutzchallenges.blogspot.co.uk/ and view all the other wonderful creations the team has made.

I have made two cards for this challenge, here is the first:


I started my card off with a piece of White card, I got the Holly leaves embossing folder and brayed over with my versamark ink pad, inserted my White card and embossed it through my machine. I sprinkled Gold embossing powder over the card and heat embossed it. I coloured in the holly leaves and berries using Spectrum Noir pens, wrapped some Gold ribbon round the bottom and matted it onto some Green card.

I folded a sheet of Gold Miri card in half and embossed one side using the same embossing folder, this formed my base card. I attached my embossed gold card in the center. With more White card I stamped my sentiment using Forest Moss ink and die cut using Labels Twenty-Five, whilst still in the die I inked round with Forest Moss in the center and coloured the outside with a gold pen. I then decided to add some Double sided adhesive and cover with Micro beads. I placed this on top of my card then added some Red pearls where my berries were to cover the 'Pearls' bit!

I die cut some holly leaves and placed these on top of the bow along with some more Red Pearls for the berries.   The finished dimensions are 5"X7".

Items Used:

Create and Craft Gold Miri card
Sheena Douglass Festive Embossing Folder Holly 
Papermania Embossing Powder Gold
Fantastic Ribbons Gold
Creative Expressions Foundation card Rich Green
Creative Expressions Unmounted Stamps Winter Greetings
Tim Holtz Distress Inks Forest Moss
Gold pen
Spellbinders Labels Twenty-Five
Spectrum Noir Pens
Versamark Ink Pad
Flat Red Pearl Beads
Spellbinders Die-lites Holly Sprigs

My second card is:


I started with my basic White card using Centura Pearl. Using more centura Pearl I ran it through the embossing folder Delicate Snowflakes but on the de-bossed side, I ran my brayer over the top with Versamark Ink and heat embossed it with Enchanted Gold embossing powder, this is the first time I have used this colour and it is so beautiful and sparkly(photo does not do it justice) I shall definitely use it again.

I wrapped some Silky Crush ribbon around it, made a bow and stuck this on to the left side. Using Sue Wilson's Vienna die I cut the middle piece out and stamped my greeting on it with Versamark and heat embossed with Gold Embossing powder, I attached this to the bottom right of the card.

To add my pearls I used Hobby house Pearls and placed one in the center of each of the large snowflakes and smaller ones in the smaller snowflakes. To finish the card I added a large Pearl in the center of the bow.

A very quick and easy card to make. Finished dimensions are 8"X8".

Items used:

Crafters Companion White Centura Pearl card
Tattered Lace Embossing Folder Delicate Snowflakes
Papermania Embossing Powder Enchanted Gold & Gold
Sue Wilson Austrian Collection Vienna
Creative Expressions White Silky Crush Ribbon
Creative Expressions Large Fancy Pearls
Hobby house Pearls


Thank you for looking, Jacquie xxx

Tuesday, 15 April 2014

Peaceful Pink Christmas

Morning my friends, hope this finds you all well? 

Today's card is another I did for the Pink Christmas Challenge I could not decide which one I liked best so entered both!

This is another easel card, I started with some old Hunkydory foiled Christmas card I had in my stash, this was a deep Pink though it looks Red in the picture! I folded the card to make the easel then added the left over Create and Craft Pink Glitter card on the inside of the base.  I had first wrapped a piece of Pink dotted Ribbon round before I stuck it down. I cut two boarders from SB Venetian Accents out of Crafters Companion Centura Pearl Card Pastel Pink and attached one to the bottom of the easel card. 

Onto some White card I stamped another image from Do Crafts Papermania Enchanted Christmas with Tim Holtz Distress Ink Black Soot and coloured it in with Promarkers before die cutting with SB Grand Decorative Circles, whilst in the die I inked up with TH Tumbled Glass to act as a sky then embossed some Crafters Companion Centura Pearl Card Pastel Pink using the same die, cut round the edge and fixed the image in place.

I attached my second boarder onto the front fold of the easel card and attached the image in the center over the top as seen.

I die cut some SB Shapeabilities Die-lites Holly Twigs and Leaves and painted the leaves with Acrylic Paints-Crimson and Titanium White then rubbed a bit of Cosmic Shimmer Gilding Wax Spring Green over the top to show up the embossed stems, I placed three medium size leaves onto my image with the Berries. 

On more White card I stamped my sentiment from Crafty Impressions Clear Stamps Christmas Snowflake Sentiments with TH Black Soot and die cut it with SB  Shapeabilities Die-lites Petite Lables One, I inked in the die with TH Victorian Velvet, attached this onto the base of the easel and added more of the smaller SB Holly Leaves and Berries on the edge.

There you have the finished card.


Thank you for looking, Jacquie xxx


Sunday, 30 March 2014

Happy Mother's Day


Morning my crafting friends and a HAPPY MOTHER'S DAY to you if you're a Mom.

I made this card yesterday for my Mother -in-Law, late I know but I got there, had no idea what to do so just played and seen what went together, I had the embossed oval frame from Justrite Lace Oval Frame Background Stamp already done so I went from there and matched things up. I decided to put it onto White card so I embossed that with Couture Creations Embossing Folder Walrus & Carpenter, this was extended, inked the edge with Tim Holtz Distress Ink Tumbled Glass then made a band out of Tattered Lace paper from their magazine. I attached this over the White card covering the join and matted it onto the base card which was a sheet of Creative Expressions Foundation Card-Blue.

I attached the oval frame that had been stamped with Versamark Pad and heat embossed with Papermania Embossing Powder Seafoam White in the center of my card.  In my stash I found some Spellbinders Shapeabilities Die-lites Floral Corner One that I had cut out of White card so I placed these in opposite corners on the card and in the center of each flower I added a Hobby House Embellishment Ocean Aurora.
The card was finally coming together but I needed the sentiment in the center of the oval, I could have written it but decided to print one on the PC using more CE Blue card and again stamped over this with the Justrite Oval stamp as before then cut out the oval in the center. As you can see I didn't quite get my sentiment in the middle! I felt this looked a bit plain as it was so I put it through my E Bosser embossing it with Clarity Tangle Stencil, I actually think this makes it look more like an Easter Egg now Lol!!! I glued this on top of the previous Oval then added a Green bow, this ribbon were the ties you sometimes get in tops to hang them up on, I cut them out and use the ribbon! In the middle of this I added another Hobby House gem and my card was complete. The Photograph does not do it justice as you cannot see the embossing, it is all slightly darker, I took it in front of a lamp hence why it is so light!

Thank you for looking, I hope you all have a great day, Jacquie xxx