
Followers

Total Pageviews

Wednesday, 19 November 2014

With Love

Morning my crafting friends, thank you for visiting me today, I hope you are all okay?

Today's post is one of those cards you want to make but then don't! A work colleague and friend of mine, a wonderful Lady who has the most gigantic heart and will do anything for anyone has just been given the news that her cancer is terminal, she only found out by accident that she had the big C just a month ago, it has spread to her Liver and there is nothing they can do. Needless to say we were all in shock last week when we were informed, they have given her 3 months to 2 years with Chemo, she has a partner and four children, she is only in her middle 40's, such terrible news so I offered to make this card for her that we could all sign, obviously I had to be careful what I put on the front so opted for  'With Love'. I did not want to make it too fancy or bulky as that makes it hard for people to sign inside but I did not want it too plain either so I hope I have managed an even ground. She has always loved my cards so I wanted it to be special, not sure whether I have achieved the 'Special' card I would have wanted but it was not just from me.
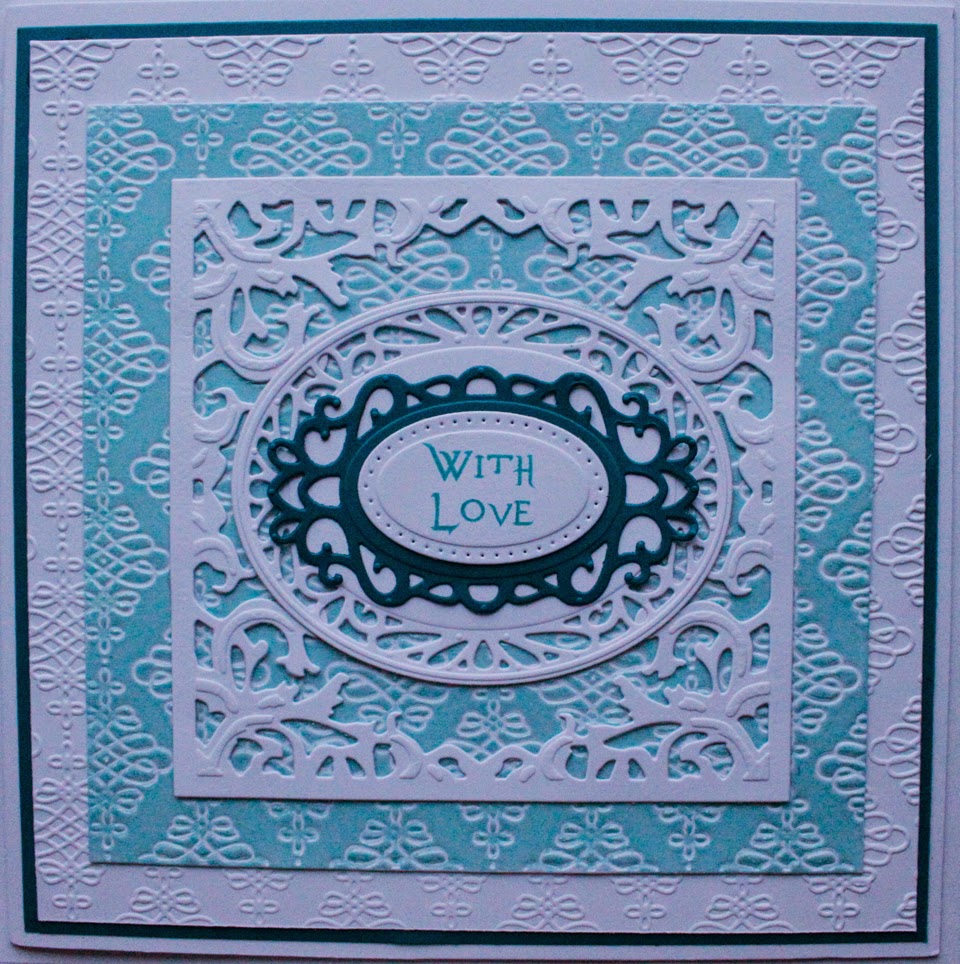

To start with I was not sure what colour to use as certain colours are used for certain occasions, so although I knew she liked Purple, that colour was out. Not sure whether she would like Pink so that went, I opted for Teal and White in the end.

I started by putting two sheets of White together to make an 8" X 8" card, matted it up with Teal Card, with more White card I embossed, trimmed to size and matted on top. Using the same embossing folder I embossed another piece of White card and turning it over I did the John Lockwood technique of inking up the de-boss side and heat embossing it with Artic Bay Lustre, this makes it look like a tiled effect, I trimmed to size and attached to the card.

Using more White card I die cut the Couture Creations Fancy Frame and placed this in the center. I die cut White card using  the Salzburg  die and placed this in the center of the frame. 

With Teal card I die cut the tag from the Austrian Collection Corner, Boarder & Tag, I stamped my sentiment onto White card with Peacock Feathers and die cut the top layer of the Tag die out placing it in the center of the Teal Tag. Hope all this makes sense?


This finished the card as I did not want to add any glitter, gems flowers or bows, just wanting the dies to work for themselves.


Items used:

Sheena Douglass White Stamping Card
Sheena Douglass Little Bit Magical Stamps Angels Amongst Us
Creative Expressions Foundation Card Teal
Creative Expressions Sue Wilson Embossing Folder Eternity
Creative Expressions Sue Wilson Dies Austrian Collection Corner, Boarder & Tag
Creative Expressions Sue Wilson Austrian Collection Salzburg
Creative Expressions Cosmic Shimmer Embossing Powder Artic Bay Lustre
Couture Creations  Fancy Frame
Versamark Ink Pad
Tim Holtz Distress Ink Peacock Feathers

Thank you for looking, Jacquie xxx

Monday, 17 November 2014

JOY!

Morning crafters, hope this finds you all safe and well, lots of hugs to those who are not. Another weekend over and wasn't it dismal? Rain, rain & more rain lol! Well a little over 5 weeks to Christmas I think! Don't you just love it when I keep reminding you?????? Got no where near getting all my Christmas presents, struggling what to get people really, same old in shops or far too expensive!  Anyhow, onto today's post...


This started out as a White on White card!!! As I was going along I thought I would add some pretty paper behind the die all glittered up, then I decided to add the ribbon around the die as the colour matched the pretty paper, unfortunately you cannot see the paper very well. I have used the same paper behind the JOY die.

Very simple card just Matt and layer white card, top card embossed and die cut out. Glitter some paper and attached it to the back of the die piece. Thread ribbon through the die and make a bow at the bottom, place the die cut back in place in the aperture along with the center die.

Die cut the JOY out of pretty paper for the back and White card for the top scroll bit, attach together with glue and place them on the card as seen.

Add a sparkly gem in the middle of the bow and there is your finished card.

Items used:

Sheena Douglass White Stamping card
Creative Expressions Sue Wilson Embossing Folder Eternity
Creative Expressions Sue Wilson Die Italian Collection Calabria
Creative Expressions Sue Wilson Die Festive Collection Joy
Creative Expressions Diamond Snow
Tattered Lace Papers
Kaisercraft Sparklets Saffron 
Copper Orange Ribbon - E-Bay


Thank you for looking, hope you visit again, Jacquie xxx


Saturday, 15 November 2014

Believe in Santa!

Morning crafters, lovely to have you visit me today. Another week has passed and Christmas is getting closer lol! Sorry to keep reminding you all!!!

May I give a very warm welcome to Michelle M, great to have you on board, thank you for following me its much appreciated and if you have a blog of your own Michelle please let me know.

Another Christmas card today, I should stop making them really as I have more than enough lol!


I decided to do a Green card as I had not done one for quite a long time, so my theme was Green & Gold.

I made an 8" X8" card from Rich Green card and matted it with some White. My next layer I put double-sided Tape around the edge and covered it with Gilding flakes. I then matted a layer of Rich Green card cut to fit inside the gilded edge boarder.

Using more White card I embossed it with the Knotted Trellis Folder, inked on the back, the de-bossed side with my Versamark and heat embossed with Gold embossing powder, I then attached this in the center of my card.

I stamped my Santa onto White card with my Versamark and heat embossed it with Black embossing powder then coloured it in with Promarkers. I die cut it out with Gold Circles One and inked whilst still in the die with Crushed Olives distress ink. I attached this to the top right hand side of the card.

I die cut the 'Believe' out of Rich Green card, went over with a glue pen and covered it with Green Glitter. This did not look right sitting straight on the card as it was so I die cut some card with Labels Eighteen and inked it up with Crushed Olives again and placed the 'Believe' on top, this helped it stand out. I attached these to the bottom left hand side of the card.

To finish the card off I placed a little green gem in each of the knots that were showing.

Items Used:

Creative Expressions Foundation Card Rich Green & Coconut White
Creative Expressions Sue Wilson Embossing Folder Knotted Trellis
Creative Expressions Singles Stamp 'Santa'
Creative Expressions Gilding Flakes Morris Dance(I think!)
Sue Wilson Dies Believe
White Card
Papermania Embossing Powders Gold & Black
Green Glitter
Promarkers
Tim Holtz Distress Ink Crushed Olives
Green Gems
Versamark Ink Pad
Glue Pen
Pinflare Double Sided Adhesive
Spellbinders Labels Eighteen
Spellbinders Imperial Gold Gold Circles One


Thank you for looking, Jacquie xxx

Thursday, 13 November 2014

Good Friends

Morning crafters, hope this finds you all safe and well. Thank you for coming and visiting me today, I love to have you here and to read all your lovely comments. 

Well its only six more weeks to Christmas and I say ...HELP!!! No problems with cards, got all those done but presents, well that's another problem. What to buy for people? Last year it was easy this year No!  I shall just have to keep thinking and looking, I keep telling myself only two more pay checks till Christmas lol!

Anyhow, enough of that, todays post focuses all around the bow! Yes you did read that right the BOW! I recently bought the Bow maker as I am hopeless at making complete bows and I love the double bows though this is not one lol! When it arrived I had to try just a basic bow, it came with two reels of organza ribbon in White and Pink so I did both colours together, seeing as I was so pleased with the result I had to use it on a card! This is the card I have sent to my friend whose Birthday is today, so HAPPY BIRTHDAY ROS!

I had already done the stenciled coloured background so I used that along with some paper I had found printed off from Tattered Lace papers CD Rom.


The base card I made using two sheets of Blush card, layered it up with the paper and background and attached the bow in the top left corner. I only wanted to add a sentiment so I stamped my sentiment onto some waste card with Victorian Velvet to keep the Pink theme, unusual for me I know as I don't like Pink but remember it was all about the bow lol! I die cut it using the Die-Lectables Baroque Oval and inked through the die, then decided to add another oval behind it so that one I die cut out of the spare paper and placed it behind the sentiment one as a shadow. I attached both of these using foam pads.

Adding some pearls in two corners and a large pearl on the bow, along with a couple of hat pins the card was complete. Dimensions are 7.5" X 7.5".

Items Used:

Creative Expressions Foundation Card Blush
Creative Expressions Cosmic Shimmers (several colours mixed)
Creative Expressions Unmounted stamps Kind Thoughts
Creative Expressions Large Fancy Pearls
Creative Expressions Pearl Hat Pins
Tattered Lace CD Rom Papers
Clarity Stamps Stencil
Create and Craft Die-Lectables Baroque Oval
Tim Holtz Distress Ink Victorian Velvet
Hobby House Self Adhesive Pearls
Foam pads

Thank you for looking, Jacquie xxx


Tuesday, 11 November 2014

WE WILL REMEMBER THEM

Morning crafters, hope today finds you all safe and well? Today as I am sure you will know is Remembrance Day LEST WE FORGET. I will be joining in with the 2 minutes silence at work at 11am as always.

Just a quick note, if anyone is wondering what has happened to your comments on my posts its ME! That's what happened, I was deleting all spam and ended up deleting all comments on all posts too sorry! Lol!

Today's post is in honour of all our brave Armed Forces past and present.


I matted and layered up my Red card with White card. I lay the stencil down on the Coconut card (before attaching it to the base card lol!) and inked through with my Versamark Ink Pad then ran it through the E-bosser to transfer the ink and emboss the card, I rubbed Cosmic Shimmer Gold all over. I wrapped some red ribbon around opposite corners then attached to my base card.

I added the poem onto the image in Photoshop, printed it onto photo paper and die cut with Grand Decorative Ovals and attached to card using foam tape.

I added a bow on top of the ribbon in the bottom corner, made my Poppy using Red card and once dry and put together added my poppy on top of the bow. This is quite a big poppy and too big to be put into an envelope so I will have to make a box for it at some stage.

Finished dimensions are 7.5" X 7.5"


Items Used:

Creative Expressions Foundation Card Red & Coconut White
Creative Expressions Cosmic Shimmer Pigments Gold
Clarity Stencil Tangle
Spellbinders Create a Flower Poppy
Spellbinders Grand Decorative Ovals
Image and John McCrae poem from the Internet
Fantastic Ribbons Red Satin 
Kaisercrafts Sparklet Gems Red
Foam Pads
White card

I would like to enter this card in the Challenge http://allsortschallenge.blogspot.com.es/2014/11/week-284-poppiesremembrance_8.html

Thank you for looking, Jacquie xxx