Followers

Total Pageviews

Tuesday, 26 August 2014

Snowy Rooftops

Morning crafters, hope today finds you all well? Thank you for visiting me today I really do appreciate it, its good to share and read your comments. If you have a blog of your own then please leave a link and I will return the favour.


On Sunday I showed you my interpretation of one of Sheena Douglas cards, well today is another one! I don't make it a habit to copy others as I like to use my own ideas but thought I would give it a try with these, this one is not exact but near enough.

I started with my base White card, I embossed some Blue Centura Pearl card with a snowflake folder and matted this onto the White card. Using Blue card I embossed with the snowy rooftops folder, I added glue to the snowflakes and covered them in Glamour Dust and inked over the Santa & Sleigh with Black ink.

I embossed the rooftops again with White card, rubbed Black Soot over the top then adding some water and painted in the roof tops. I coloured the windows in Yellow to look like lights and then using White Acrylic Paint added some snow on the roofs. I cut round the White roof tops and stuck it over the top of the Blue one, I then wrapped around some snowy acetate and matted it onto some Silver card.

Onto some White card I stamped my sentiment, cut it into a ribbon and matted this onto some Silver card. I folded the end round the back of the Silver card and secured it so it just popped round the front over the image. On top of the label I added a little snowflake with a pearl in the center.

I matted this onto the base card and there you have the finished card.

Items Used:

White Card
Crafters Companion Centura Pearl Pastel Blue card
Create & Craft Silver card
Sheena Douglass Festive Embossing Folder Snowy Rooftops
Tim Holtz Distress Inks Black Soot & Squeezed Lemonade
Creative Expressions Cobalt Blue card
Acrylic White Paint
Hunkydory Snowy Acetate
DecoArt Glamour Dust
Justrite Large Fancy Holiday Sentiments
Habico Self Adhesive Pearls
Spellbinders Snowflakes
Tattered Lace Embossing Folder Snowflakes


Thank you for looking, Jacquie xxx


Sunday, 24 August 2014

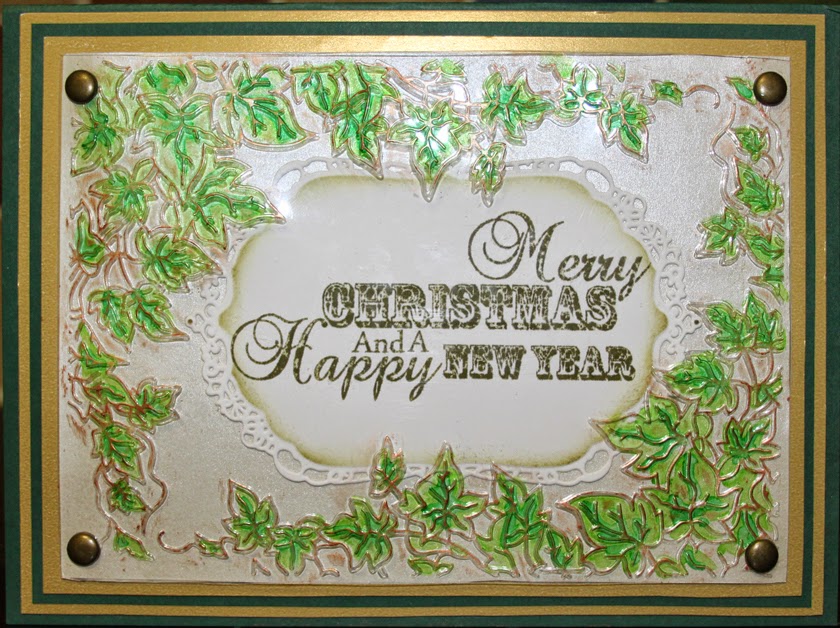
Christmas Ivy

Morning my crafting friends, hope you are all enjoying the Bank Holiday weekend, lets hope the weather holds just  a little longer.  

For todays post I thought I would try a Sheena Douglass idea that she showed recently on her TV shows, I often wonder whether I could make them look as good as she does lol!


So, using the acetate packaging from her folder I embossed the Ivy Frame then rubbed Cast Bronze Gilding Wax over the embossed areas. turning the acetate over I coloured in the Ivy with Spectrum Noirs and put to one side.

Using some Black Soot I stamped my sentiment onto some White card, die cut it out and inked round the die with Forest moss. I placed this in the center of some White card and attached the acetate over the top with some brads.

I matted this up with Gold & Green Card. The dimensions are 7"X5".

I was quite pleased with how it turned out, not quite as good as Sheena's but good enough I think!

Items Used:

Sheena Douglass Festive Embossing Folder Ivy Frame
Sheena Douglass Little Bit festive Pinescape (Sentiment)
Acetate packaging.
White card
Creative Expressions Gilding Wax Cast Bronze
Creative Expressions Foundation Card Rich Green
Spellbinders Imperial Gold Gold Labels Four
Create & Craft Gold Card
Dovecraft Metallic Brads
Spectrum Noir Pens LG5 & JG2
Tim Holtz Distress Inks Black Soot & Forest Moss

Thank you for looking, Jacquie xxx

Friday, 22 August 2014

Let it Snow!

Morning everyone, hope this day finds you all well? Where has our summer gone? Cannot believe how quickly it is flying by.

Todays card I have used one of the Tattered Lace folders, the beautiful Snowflakes.


I made up an 8"X8" card base using White Textured card and matted this up with Blue card.

I put the Periwinkle card in the embossing folder and through the machine then brayed over the embossed part with Versamark Ink Pad, covered with White embossing powder and heat embossed it. I did the same with the White strip of card but used Artic Pearl Lustre Powder.

I attached the strip of card to the Periwinkle card then matted this onto the Blue card.

I stamped my sentiment and die cut it and inked round the edge. I die cut two of the Die-lites corners & accents and attached these either side of the sentiment then attached them to the card as seen.

I felt it needed a little something under the sentiment so I added a paper bow and added a pearl in the center.

Quite a quick card to make, the snowflake folder did all the work! Sorry about the poor photograph, the white round the outside is not the card its just to cover the background!!!

Items Used:

Tattered Lace Embossing Folder Snowflake
Papermania Embossing Powder Seafoam White
Creative Expressions Foundation Card Cobalt Blue & Periwinkle
Creative Expressions Embossing Powder Artic Pearl Lustre
White Textured Card (own stash)
Spellbinders Nestabilities Labels Thirteen
Spellbinders Die-lites Corners & Accents 2
Craftworks Kirtch paper Bows
Hobbyhouse Pearls
Tim Holtz Distress Ink Black Soot
Sheena Douglass Little Bit Scenic Stamps Pinescape

I am entering this card into http://scrapology-adventuresinscrapbooking.blogspot.co.uk/2014/08/august-card-challenge-sue-wilson.html

Thank you for looking, Jacquie xxx

Wednesday, 20 August 2014

Figgy Pudding Lane

Morning my crafting friends, hope this day finds you well? Sorry I have not posted of late I have been busy catching up with chores on my return from my hols and not had much time to craft, anyhow I did manage to do this one in-between chores lol!


I thought it was about time I used my folders from Sheena Douglass so I brayed the folder on the inside with Versamark Ink Pad, placed my card inside the folder and put it through the E Bosser. I then covered it with White embossing powder and heat embossed it, this covered the walls of the buildings, I rubbed some Black ink over the embossed areas to show up the outline of the buildings.

I applied some Distress Inks, Pumice Stone first followed by Vintage Photo over the buildings I felt this gave an aged look to some of the walls, I painted in the beams using Black Soot, the windows using Squeezed Lemonade and signs with Vintage Photo, Fired Brick & Chipped Sapphire. The sky I coloured using Chipped Sapphire.

I placed a piece of snow covered Acetate over the image and made a frame for the card. Once stuck together I attached this to the front of a 5"X7" card.

I stamped my sentiment onto some White card and matted it onto some Gold card, making it a ribbon and attached it to the front of the card. I added a snowflake on top of this as well as in the upper corners to take the bareness away from the edges. There you have the finished card.

I have tried various, but similar ways of using this folder, will show these at a later date. Not your usual Christmas card but different!

Items Used:

Basic White Textured card 
Gold card
Sheena Douglass Festive Embossing Folders Figgy Pudding Lane
Tim Holtz Distress Inks Pumice Stone, Vintage Photo, Black Soot, Fired Brick, Chipped Sapphire & Squeezed Lemonade
Hunkydory Snowflake Acetate
Justrite Large Festive Sentiments
Spellbinders Snowflakes
Papermania Embossing Powder Seafoam White
Creative Expressions Self Adhesive Pearls
Versamark Ink Pad
Brayer


Thank you for looking, Jacquie xxx


Sunday, 17 August 2014

Hobbycutz Challenge 61 Favourite Challenge

Morning my crafting friends, I am now back home after a great time with Sis. The week went by so quickly, must plan for next trip over lol! I am trying to catch up with all posts, there have been some wonderful creations done by you all over the last week or so, I do apologize if I have not got round to you yet or have missed you completely! I will be spending this week trying to catch up on jobs around the house and hopefully fit in time for some crafting.

Time for another Challenge at Hobbycutz  this weeks theme is 'Favourite Challenge' as chosen by our lovely host Kobie so you can pretty much choose your own thing. I was going to choose 'Anything Goes' but once I had finished my card I realised it was all 'Shades of One Colour' so that is what I have gone for with my colour Purple!

Do pop over to the Hobbycutz Challenge Blog http://hobbycutzchallenges.blogspot.co.uk and see all the lovely creations from the Design Team. Our lovely sponsor this week is 'All Dressed Up'.


I chose my image from 'All Dressed Up' Mirror Mirror and coloured it in with Promarkers, I decided to die cut the image as an oval so used the Oval frame from Wild Rose Studio.

I found in my stash from many years ago this Lilac textured aperture card, I embossed around the aperture with SB Grand Decorative Ovals using the reverse side of the card.

I die cut another oval using Plum card, matted my image onto this  and stuck this behind the aperture of the card as seen.

With two die cut flourishes out of Plum card added in opposite corners and purple gems dotted around the oval  you have the finished card.

This was quite an easy card to do, I was going to add flowers and butterflies but decided on just the two flourishes in the end as I did not want to take the eye from the image too much.

Items Used:

Blank Aperture card ( own stash )
All Dressed Up Image
Creative Expression Foundation card Plum
Justrite Flourish Two Die
Spellbinders grand Decorative ovals
Wild Rose Studio Oval Frame
Promarkers
Kanban Purple Gems

Thank you for looking, Jacquie xxx