Followers

Total Pageviews

Showing posts with label Wild Rose Studio. Show all posts

Sunday, 17 August 2014

Hobbycutz Challenge 61 Favourite Challenge

Morning my crafting friends, I am now back home after a great time with Sis. The week went by so quickly, must plan for next trip over lol! I am trying to catch up with all posts, there have been some wonderful creations done by you all over the last week or so, I do apologize if I have not got round to you yet or have missed you completely! I will be spending this week trying to catch up on jobs around the house and hopefully fit in time for some crafting.

Time for another Challenge at Hobbycutz  this weeks theme is 'Favourite Challenge' as chosen by our lovely host Kobie so you can pretty much choose your own thing. I was going to choose 'Anything Goes' but once I had finished my card I realised it was all 'Shades of One Colour' so that is what I have gone for with my colour Purple!

Do pop over to the Hobbycutz Challenge Blog http://hobbycutzchallenges.blogspot.co.uk and see all the lovely creations from the Design Team. Our lovely sponsor this week is 'All Dressed Up'.


I chose my image from 'All Dressed Up' Mirror Mirror and coloured it in with Promarkers, I decided to die cut the image as an oval so used the Oval frame from Wild Rose Studio.

I found in my stash from many years ago this Lilac textured aperture card, I embossed around the aperture with SB Grand Decorative Ovals using the reverse side of the card.

I die cut another oval using Plum card, matted my image onto this  and stuck this behind the aperture of the card as seen.

With two die cut flourishes out of Plum card added in opposite corners and purple gems dotted around the oval  you have the finished card.

This was quite an easy card to do, I was going to add flowers and butterflies but decided on just the two flourishes in the end as I did not want to take the eye from the image too much.

Items Used:

Blank Aperture card ( own stash )
All Dressed Up Image
Creative Expression Foundation card Plum
Justrite Flourish Two Die
Spellbinders grand Decorative ovals
Wild Rose Studio Oval Frame
Promarkers
Kanban Purple Gems

Thank you for looking, Jacquie xxx

Sunday, 29 June 2014

Thanks So Much

Morning my crafting friends, I hope this finds you all so well and enjoying the weekend.

For todays post I have gone through my little box of die cuts to see what I had to put together, usually when I die cut something out I cut a few and keep the spare in a box until another time, sometime I will look and find I don't have something in the right colour or shape but at times its good for making a quick card, like this one.


The coloured background I had as a cut off from another card I made a while back so I ran it through the E bosser then just matted it on to some White card followed by the Lilac card. It was then I raided my box lol!

Items used:

Crafters Companion Centura Pearl Pastel Card Lilac
Crafters Companion Centura Pearl Card Ivory
White Textured card
Card coloured with Tim Holtz Distress Inks Seedless Preserve, Antique Linen & Victorian Velvet
Embossilious Desire Embossing Folder Rose Vine
Creative Expressions Unmounted Stamps Heartfelt Sentiments
Tattered Lace Rose Die 
Wild Rose Studio  Oval Frame
Spellbinders Imperial Gold Gold labels Four


Thank you for looking, Jacquie xxx


Sunday, 22 June 2014

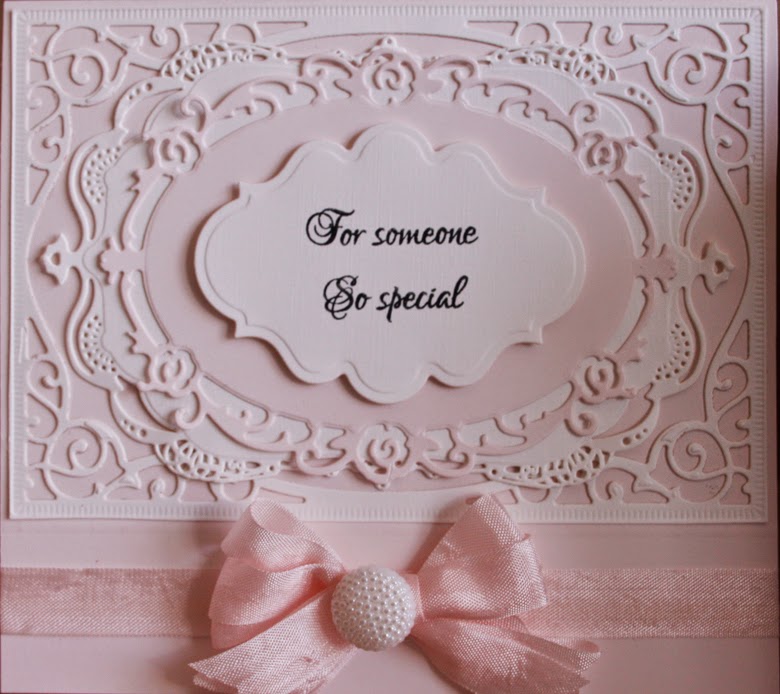
For Someone So Special

Morning crafters, I hope this finds you all safe and well. Thank you so much for visiting me today I do appreciate it and I love reading each and everyone of your comments.

Wasn't the weather gorgeous yesterday, we had a very busy day tiding up the garden, its not finished but looks a whole lot better than it did before. Today its down the allotments again to do a bit more there so we are hoping it will be a bit cooler today. No further news on our allotment issues as yet but will let you know of any further developments if any!

Thank you to everyone who commented on my post yesterday, I had some really lovely comments so Thank You.

My apologies for the poor photo for todays post, I have been trying to find other ways of photographing my cards so I put this one in a box, hence the shadow on the right!!! I don't have enough space or should I say a clear area where I can just photograph a card without having to remove all the background, the box was an idea but to paint the inside White, I have a light box but only a small one. I did like Mrs Duck post the other day with her photographing in her garden but instead of flowers in the background you would have had weeds lol! Does anyone else have this problem or are there any secrets out there to showing the cards really well? Any original ways would be nice to hear about.


Today's post was a quick one despite all the die cuts as I had it in my head what I wanted to do so once I had chosen to use the blush card it was all systems go as it had to be White to go with it.

Items used are:

Creative Expressions Foundations Card Blush
Textured White Card (own stash)
Creative Expressions Unmounted Stamps Classic Sentiments
Spellbinders majestic Lables twenty-Five
Spellbinders Imperial Gold Gold Labels Four
Wild Rose Studio Oval Frame
Spellbinders Labels Twenty
Tim Holtz Distress Ink Black Soot
Creative Expression American Seam binding Ribbon Pink
Creative Expressions Small Fancy Pearl Embellishments


I quite liked how the finished card looked and how the dies sort of went together, even if it is quite Pink lol! 

The finished dimensions of the card are 6" X 6.5" 

Thank you for looking, Jacquie xxx

Wednesday, 9 April 2014

FRIEND

Morning my crafting friends, so nice of you to join me today, I hope this finds you all safe and well? I managed to get a little play time in on Monday so this is one of the cards I made.

I started with a sheet of Crafters Companion Centura Pearl Card Pastel Yellow and folded it half to make a 7X5 Landscape card, on top of this I matted and layered some White card. With more of the CC Centura Yellow card I stamped it twice with Justrite Background Stamp Secret Garden using my Versamark Ink Pad then heat embossed it with Creative Expressions Cosmic Shimmer Embossing Powder Tropic Yellow Lustre to give a tone on tone look, I must say I did like the look of this when it was finished, its hard to see its full potential by the photograph. Before attaching this to my card I wrapped a piece of Fantastic Ribbons Yellow Satin Ribbon round the middle and stuck it round the back.


With Crafters Companion Centura Pearl White Card I die cut the outer frame from Spellbinders Nestabilities Majestic Elements Majestic Labels Twenty-Five and the Oval Frame and Tag from Wild Rose, I attached the Oval Frame onto my card in the center of the Labels Twenty-Five Frame then with the tag I stamped on 'Friends' using Creative Expressions Unmounted Stamps Heartfelt Sentiments and Tim Holtz Distress Ink Black Soot, I inked round the edge of this with TH Squeezed Lemonade and attached it to the center of the Oval with Foam Pads to raise it up slightly.
I made a bow with more Yellow Ribbon attached to the top of the card and added a Creative Expressions Small Pearl Embellishment in the center along with CE Self Adhesive Pearls on each corner.

There you have the finished card. I was quite happy with how it turned out and I love the background.

Thank you for looking, Jacquie xxx

Monday, 24 March 2014

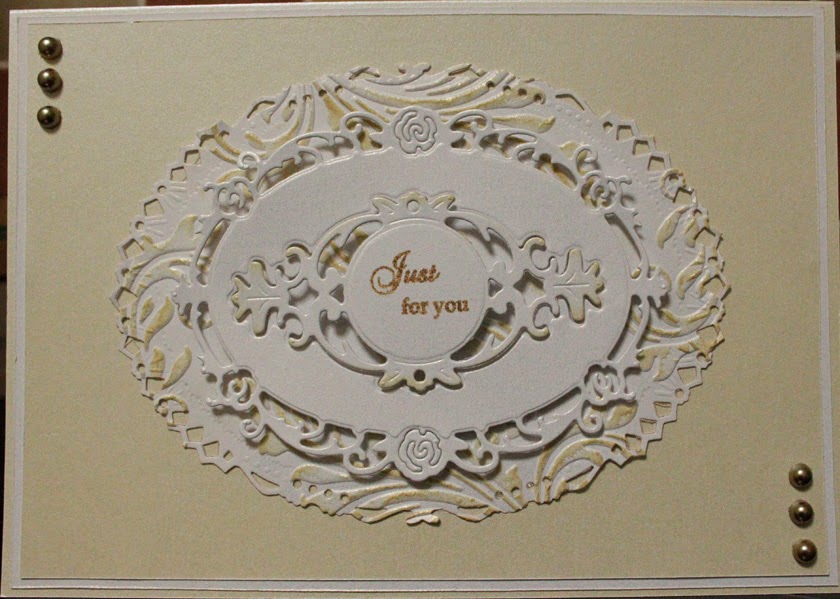
Just for You...


Morning my crafting friends, hope this finds you all safe and well? I thank you for coming back to visit me, I do appreciate it and its great to view your comments.

I wanted to do a simple and quick card, as I don't seem to have much time to play lately! As in Fridays post I had one of my new dies arrive, Wild Rose Studio Specialty Die Set Oval Frame, I thought I would try it out. I folded a sheet of Crafters Companion Centura Pearl Card Ivory in half to form a 5 X 7 inch landscape card. I matted and layered this with some White centura followed by more of the Ivory.
I die cut a piece of Centura White card with SB Grand Decorative Ovals, embossed it with Crafters Companion Regency Swirls Embossilious Embossing Folder and inked the embossed part with Tim Holtz Distress Ink Antique Linen, I was quite pleased how the colour of the ink matched the card as I was in two minds what colour to use to start with. I attached this to the center of my card then die cut some Centura White Card with the Wild Rose Studio Specialty Die Set Oval Frame, I used the smaller die in the center of the bigger one to cut it out, with the smaller die cut  I stamped my sentiment from Justrite Large Fancy Sentiments in the center with TH Vintage Photo and inked round the edge with TH Antique Linen. I attached the larger die in the center of the Grand Oval and attached the smaller die back in the center but raised up a bit.

I added some Habico Self Adhesive Pearls onto the corners of the card as seen and there you have the completed card. I don't think it turned out to bad for a quick card.

Thank you for looking, Jacquie xxx