
Followers

Total Pageviews

Saturday, 13 June 2015

Faux Leather Note Book

Hello my crafting friends, hope today finds you all safe and well, big hugs to those who need them. Another weekend is upon us, don't they come round quickly, especially when you are off work lol!

May I welcome my newest followers, good to have you here, if you have a blog of your own then please do let me know so I can return the favour.

Now over the last few weeks, yes I did say weeks as I started this before my back went, at least the cover, on Thursday I actually put the papers in and added the pictures lol! I have made this for a work colleague who is leaving at the end of term to become a Teacher of Drama and she adores The Minions so this seemed fitting.
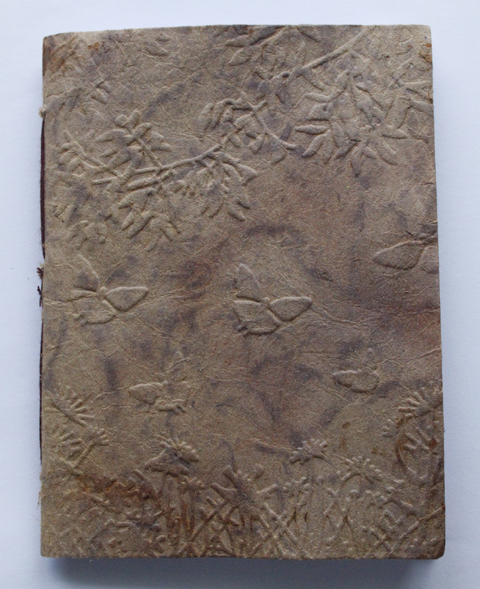

This is my first attempt at the faux leather and I am quite pleased with it, I think I could have done better on the colouring of the leather, I used Vintage Photo and Dried Marmalade and sprayed it with a Matt Varnish. For those of you who do not know how to make this there is a brilliant video on You Tube for the Queen of faux leather herself, Sheena Douglass, it would be so much better you watching that than have me try and explain it on here believe me!

The inside I lined with material cut from an old top of mine, one of my favourites and rather than throw it thought I would use the material some how, as my friend also like feathers this seemed perfect.

Now for the pages on the inside I only used copy paper, nothing special, I printed my images from the internet and mounted each one onto Black card before attaching it onto a single page. The finished book ended up fatter than anticipated so it was just as well I kept to one side of the page only! In hindsight I should have placed the image in the center of each page as the book is quite fat at the top and goes in at the bottom lol! I did say this was my first attempt lol!


Items Used:

Create and Craft Kraft Card
Sheena Douglass Embossing Folder Silhouette Grasses
Glycerine (mixed with water)
Copy Paper
Tim Holtz Distress Vintage Photo and Dried Marmalade
Internet-Minion Quotes
Black Card


Thank you for looking, Jacquie xxx


Wednesday, 10 June 2015

Butterfly Kisses

Hello my crafting friends I hope today finds you all safe and well, if not I send you plenty of hugs.

Today's card features a lucky buy that I saw  in my local craft shop. This Butterfly stamp was an ex-demo and reduced from £6.99 to 75p!!! Yes you did read correctly, I did ask before buying it whether the price was right and the Lady said it must be if that's what it says so I snapped it up before they changed their minds lol! It had only been used once so I was quite chuffed with it and thought it quite a pretty butterfly stamp.


Now before I stamped the focal image I sprayed some diluted water colour paints onto my Cream card, let it dry then stamped my Butterfly stamp using a Veramark ink pad and heat embossed with Black embossing powder. I coloured in the Butterflies using Promarker Pens. I then die cut the channel in the card.

On more card I sprayed the diluted water colours again but using different colours, more Blues and Purples this time. I attached the Butterfly stamped card over the top leaving the channel to show the sprayed coloured card underneath.

I stamped my sentiment up the top using Archival Black then matted it onto more Cream card for the base and there you have the finished card.

Items Used:

Crafty Individual Rubber Stamp Butterflies
White Card
Printable heaven Leather Look Cream Card
Cream Linen card-own stash
Spectrum Noir AquaTints Bright & Beautiful-diluted for sprays
Promarkers
Versamark Ink Pad
Archival Ink Pad Black
Papermania Embossing Powder Black
Spellbinders Boarderilities Curved Boarder Two
Cuddly Buddly Clear Stamps Little Poppets Birthday-Sentiment

Thank you for looking, Jacquie xxx


Monday, 8 June 2015

Ships Bottle

Morning to you all, start of another week. I am glad to report my back is much better though I am still off work for another week, and as I can now manage to craft I intend to play, play, play lol!

May I welcome Maria Alder, lovely to have you visit me, I do hope you come again.

The last few days I have been making a oldie type candle jar, not sure it's to every ones taste but I enjoyed creating it. Now I have to apologize for the amount of images for this...


I started with a plain glass jar and cleaned it up. I then painted it with a coat of White Gesso, just leaving the screw top clear.  I mixed up some Acrylic paints with a bit of Brown AquaTints to make a sort of sandy, sepia colour and painted over the jar.  I then rubbed the edges with a sanding block to give a distress look before rubbing over the jar with Vintage Photo.

Sheena Douglass has three fabulous stamps of Ships, Destination, Phantom Ship and Be Strong, these are what I wanted to have around the sides of the jar, unfortunately they would not stamp straight onto the jar, they looked a bit of a mess so I cleaned them off and decided to stamp straight onto printable tissue paper, the sort you have to decorate candles with. I stamped each ship on a separate piece of tissue paper using Vintage Photo, I tore round each image to make it look more old and put them to one side.

Being as there are four sides to this jar I decided to look for an image of an old map, I thought this would go with the ship images, so I printed one off the internet onto tissue paper, tore round the edge and adhered it to the jar with PVA mixed with water, letting it go round the edges of the jar.

Now going back to my Ship images, one by one I adhered them to the jar the same way as the map. So far so good lol! I was quite pleased with how each side looked but it was still to bare for me so I sorted some shells out, all different sizes and colours and glued these around the bottom of the jar to fit in with the images, coming up just a little on the corners. 

In my stash I found some little charms, two of shells and one anchor, perfect. I threaded these onto some Yellow Bakers Twine and put aside. Using some garden twine I wrapped this around the top of the jar then tied in some knots. I wrapped the Yellow twine and charms over the top of the garden twine, tying it in place but leaving the charms hanging down slightly.

To add some atmosphere to the jar I placed a small candle inside, these images were taken with the candle alight shining through the images on the jar, I am sure they would show up more when it is lit in the dark...


          Here it is in the dark using a flash         Without a flash!

I was quite pleased with the result although I know I could possibly have made a better job with more thought.

Items Used:

Sheena Douglass A Little Bit Sketchy-Be Strong & destination
Sheena Douglass A Little Bit Magical-Phantom Ship
Sheena Douglass Spectrum Noir AquaTints Bright & Beautiful-Brown
Glass Jar
Ranger Dina Wakley White Gesso
Reeves Acrylic Paint
Tim Holtz Distress Ink Vintage Photo
Printable Tissue Paper (sorry cannot remember who did these)
Shells- Newquay Beach Cornwall
Garden Twine
Creative Expressions Bakers Twine Primary Colours-Yellow
Assorted Charms-own stash


Thank you for looking, Jacquie xxx


Saturday, 6 June 2015

Toadstool Princess Fairy

Morning my crafting friends, its time for our challenge number 11 over at http://lilpatchofcraftyfriends.blogspot.co.uk/  as usual its Anything Goes so please do come along and join in and take a look at all the other DT members beautiful creations.

The sponsors this challenge are:


Kenny K  - Prize: 3 Images
 Drawn With Character - Prize: 3 Images

Lemon Shortbread - Prize: 3 Images 


My beautiful image is from Lemon Shortbread titled Toadstool Princess Fairy. You can find her HERE

I coloured her in with Spectrum Noir pens, I added some glue with my glue pen and sprinkled some Diamond Sprinkles to add some sparkle on parts of her dress.
I die cut her out using the Innsbruck, I inked round the edge with Vintage Photo then threaded some Pink ribbon in and out of the die cut round the edge and tied a bow at the bottom.

For my base card I used a 7"X 7" White card and matted it with Green card that I had embossed with Maple Leaf Embossing folder.
I cut a piece of Kraft card to size and embossed it using the Acorn Leaves Mask then rubbed two Gilding Waxes, Cast Bronze & Spring Green, over the top. I inked the edge with the chisel end of a Spectrum Noir pen. I attached this to the top of my card with foam tape.

I placed my image in the center of my card, again using foam tape, then placed some fern leaves in the bottom left corner and added a tiny bow from my stash.


I hope you like this card, you can find this and many more beautiful images  HERE

Items Used:

Lemon Shortbread Digi Toadstool Princess Fairy
White card
Spectrum Noir Pens
Creative Expressions Sue Wilson Austrian Collection Innsbruck
Creative Expressions That Special Touch Mask Acorn Leaves
Creative Expressions Foundation Card Green
Creative Expressions Gilding Wax Cast Bronze & Spring Green
Creative Expressions Diamond Sprinkles
Create and Craft Kraft card
Sheena Douglass Embossing Folder Maple Leaf
Fantastic Ribbons Pink Ribbon
Bow Own Stash


Thank you for looking, Jacquie xxx


Wednesday, 3 June 2015

Someone Very Special

Hello my crafting friends, I am back, for now at least lol! I am still off work but am starting to get round a bit more, my GP has put a request in for me to have an appointment at the Orthopedics as urgent so we wait to see how quick that comes, hopefully they will do a scan to see what is going on but I don't hold my breath for that one! I am taking it easy being very careful with what I do but at least I am managing without too many pain killers now as they just send me to sleep! Thank you all so very much for the fabulous comments I received, they are all appreciated very much, you are all such a fabulous 'family' to have around.

Now this next card I post was done a while back, by that I mean a few weeks but I have not got round to putting it on here so I may as well now until I can get to crafting again.


This is a very simple card I went for the background rather than anything else, inking an A4 sheet of card using different colour distress inks then spraying with Gold & Blue spray inks, I think the fact it was on the 'leather look' card adds interest to the background. I love doing these type of backgrounds lately for my cards.

So I did not deter from the background I just added a single Gold Sweet Pea leaf and a small sentiment in the top corner.

For the inside I placed another piece of the same patterned card and placed a piece of White card over the top to write on.

Items Used:

Printable Heaven 'Leather Look' Cream Card
Tim Holtz Distress Inks Tumbled Glass, Bundled Sage, Shaded Lilac and Abandoned Coral
Creative Expressions Cosmic Shimmer Vintage Mist Egyptian Blue & Marigold
Tattered Lace die (Free with magazine) Sweet Pea
Gold Miri Card
Sentiment old Hunkydory
White card


Thank you for looking, Jacquie xxx