Followers

Total Pageviews

Sunday, 31 July 2016

Canvas!

Hello my crafting friends, cant believe its been another week and more since I posted, where does the time go!

A few weeks ago I went to one of Sheena Douglas workshops and had such a fabulous time so I wanted to show you the canvas I made on the day.


So this is it! We first applied Bindex to our canvas over the top of some kitchen towel to add texture, we added buttons, string and beads then left to dry.  Once dry we painted over the top with Black Gesso and let that dry.

We had the flowers and leaves already die cut but painted them with Pebeo Dyna Iridescent paints and added some minol relief glue dots in the middle to add foils once dry. we also painted some of the paints over the board with a dry brush.

We rubbed some Silver gilding wax over the string, buttons etc then added the flowers where we wanted them to go. Now most people did all this at the workshop but mine was not dry in time  to do this (because I added too much bindex lol!) so I finished it off at home and added a butterfly that I had painted in the same colours.

Its a nice little simple piece that looks very effective because of the paints used and I was quite pleased with the end result.

Now in Sheena's group we are starting inspirational posts to show how all her different stamps  can be put together to make a card, painting whatever you would like, we have a rota set up so every Monday & Thursday one of us will post on the Inkettes page (Facebook) and this will link back to our blogs, my turn is this Thursday so I will show you a card I made for a work colleague using various stamps of Sheenas. We are all very excited about this so if you are a Sheena fan then come and join the Inkettes page and see all the wonderful work by the design team.

Until then thank you for looking, Jacquie xxx

Sunday, 24 July 2016

Under the Sea

Hello my crafting friends good to have you visit today and thank you all for your wonderful comments.


Today's card is quite a colourful one and was made for the lead LSA at work because she has been fantastic of late trying to run it all by herself with no line manager (as she has been off for the last 3 months) with very little help from senior staff!

This is from Heartfelt Creations Under The Sea Collection, I actually bought this set to do an album for my daughter as she loves anything to do with the sea! A summer project lol!

I made the Hibiscus flowers and coloured them with Aquablend pencils then glazed them once finished, once dry I added a little gem in the center.

I die cut the port hole and little fish coloured them in with Distress Inks and put to one side.

I coloured a piece of card with Crushed Olive & Peacock Feathers DI, which turned this darker Green, to the right I stamped the corals and leaves, coloured them in then placed the die cut port hole over the top and added the fish. In the top left corner I stamped my sentiment with Verseafine Ink in Black.

I  folded an A4 sheet of White card in half and die cut the boarder, also from Heartfelt Creations, along the edge. I placed the card with the port hole on top then added the Hibiscus flowers along with some leaves and flourishes around the port hole.

There you have the finished card.

Thank you for looking, Jacquie xxx


Thursday, 21 July 2016

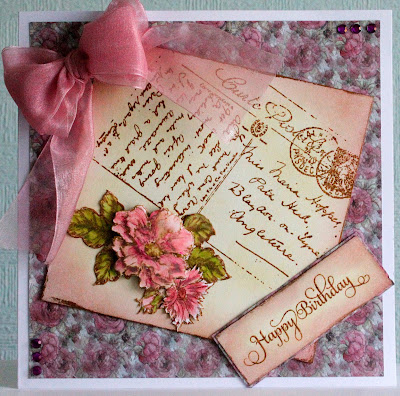
Vintage 50th Card

Hello my crafting friends, hope today finds you all safe and well? Today I am showing the third card I made for colleagues at work, this one was for someones 50th Birthday. For a special birthday I never put the age on as I know some people can get really sensitive about a 'special age'.


For the background I matted some pretty patterned paper, these may have came with the Flights of Fantasy CD ROM from Crafters Companion, I say 'may' as I am not sure as I have had them so long but I love this pretty rose one and I wanted it to have the vintage look about it which I thought this had.

I cut a piece of White card to size and inked it up with Tim Holtz Distress Inks Antique Linen and Victorian Velvet I then stamped Sheena Douglass Little Bit Festive Christmas Stamp Set Vintage Postcard at an angle on the piece of card using Tim Holtz Brushed Cordroy Distress Ink and stamped the rose from Sheena Douglass Little Bit Festive Christmas Set Christmas Child underneath it. I then stamped the rose three more times on pieces of card, cut it out and coloured in with Spectrum Noir Aquablend Pencils then decoupaged the layers. I rubbed Pebeo Gold Gilding Wax round the edge of the card then placed it at an angle on top of the pretty paper.

I stamped my sentiment from Justright Large Fancy Sentiments onto a piece of card I had coloured the same way as before, backed it with a piece of the patterned paper then attached this to the card as seen.

To finish the card I made a bow out of Pink Organza Ribbon and placed that in the top left corner and added some Pink gems in two of the opposite corners.

I am glad to say the recipient loved the card and was the only one who thanked me for the card out of the four I made!!!

Thank you for looking, Jacquie xxx

Tuesday, 19 July 2016

Victorian Wedding Card

Hello my crafting friends, good to have you back today, I really do appreciate your visit. Today I am showing the second card of the four I have made for work colleagues, this is the second wedding card for one who is getting married at the end of August.


I used Sheena Douglass new Christmas stamps A little Bit Festive Christmas for this I used the Victorian Gentleman & Victorian Lady. I stamped the Lady first and painted over the top with Pebeo Drawing Gum, once dry I then stamped the Gentleman next to her. I coloured them both in using Spectrum Noir Aquablend Pencils, the Lady was painted in using a Cream colour but for some reason it turned Grey looking I guess she wanted to match her man lol! I added some Spectrum Noir Clear Sparkle pen over the top of the Lady's coat and hand muff, the picture does not show this up at all!!!

I then die cut it out with the frame from Sue Wilson Italian Collection Calabria and cut the frame part out again and layered over the top then put to one side.

I inked up a piece of card with Tim Holtz Antique Linen Distress Ink, cut to size a piece of paper from the Crafters Companion Downton Abbey Paper Pad and ran it through the Ebosser in the Crafters Companion Downton Abbey Embossing folder Fleur De Lis then attached this to the inked card.

I cut a piece of White Satin Edged Organza Ribbon and wrapped it round both card pieces then attached it to my 8 X 8 base card and placed my framed couple on top. I made a small bow out of the same ribbon and placed this at the top of the frame.

Using a piece of Crafters Companion Centura Pearl card I die cut the  Motor Vehicle from the Crafters Companion Downton Abbey range of dies and placed this on the bottom right corner of the card, I felt this kept with the Victorian look.

To finish the card I stamped a sentiment from Crafters Companion Downton Abbey Clear Stamps Sentiments 2 on top of some inked card and paper to match the card and placed this in the top left corner of the card to balance it out.

Its a bit unusual for a wedding card but that is why I did it to be different from the normal ones they may receive.

Thank you for looking, Jacquie xxx

Sunday, 17 July 2016

Wedding Card

Hello again my crafting friends, bet you are thinking 'blimey don't see her for ages then two almost together' lol! A bit like buses I hear you say ha! ha! 


Well I did say I had been doing some cards for work colleagues this past week as two are getting married, one turned 50 and the other is having a baby! There are so many staff leaving that I have not done any leaving cards this year!


This is one of the wedding cards, I wanted it a bit different to the norm! 

I inked and distressed the bottom layer which I wrapped some vintage lace ribbon round the bottom. I added a rectangle panel then two ribbon panels on the left and placed the Sizzix Thinlits Royal Paradise die on top, I coloured this with Peacock Blue DI. On the right I added a Spellbinders Nestabilities Splendid Circles die but I cut the outer ring away, on top of this was two hearts cut out of a beautiful patterned paper with Sara Davies Signiture Collection Love & Romance Elongated Heart dies, I added their initials on top of these along with several flourish die cuts around the edge. I placed a Sara Davies Signature Collection Together Forever Wings of Love Bird die in the top right. I made two little rolls of paper and stuck then under either side of the circle top and bottom for support.


To finish it off I added Paper flowers around the circle and in the two diagonal corners of the rectangle panel. I also added two hat pins behind the larger flowers as you can see in this smaller image.


The papers I used were from a 12"X 12" paper pad from The Range, sadly I cannot remember what it was called but they are all neutral colours with beautiful subtle patterns on them.

Thank you for looking, I hope you visit me again, Jacquie xxx

Saturday, 16 July 2016

DAD!

Hello my crafting friends, so good to have you visit me today, I have had a busy week making cards for work colleagues which I hope to show you later this week.

I have three more days of work then we break up for the summer, no rest though as this house seriously needs a good clean and sorting out lol! Will I get it finished in the six weeks I ask myself...more than likely not lol!

Now today's post is one I made for my FIL for Father's Day, I have to say this was a bit of a rush job as the one I did originally for him we could not find lol! I did a wallet type card using the faux leather technique which was handy with the card pocket to fit the voucher gift card inside.


This picture does not do it justice as the wallet was flat but this just looks like crumbled paper lol! I can assure you it was better than it looks on these photos and FIL did think it was a real wallet at first! I did want to put his initials on the front using foil but time ran out of time (Hubby was waiting at the door to go round to FIL literally!!!) so made do with a stamp saying DAD!

This is the inside with space for notes and cards. We did not want to write on the wallet itself so just put a message on some card and placed it in one of the pockets.

It was not too bad a make given the time scale but I know it could have been a lot better with more time. Faux stitching round the edge would be a plus for starters lol! Oh well, next time maybe I will make sure I don't lose the card I made specially and it is still yet to be found!!!

Thank you for looking, Jacquie xxx

Thursday, 7 July 2016

More samples...

Hello my crafty friends, hope today finds you all safe and well, apologies if I have not got round to any posts to comment I will try and catch up soon.

Our Sheena starts her One Day Special shows tonight on Hochanda at 8pm, there are some really stunning samples from the Design Team and no doubt there will be some fab demos too.

Here are more of my samples...


This is the Chair stamp, I have added the Christmas hat. The chair stamp was coloured with Aqua Blend Pencils. The background is using Distress Inks and the Holly boarder was coloured in with Aquablend Pencils then painted over with Spectrum Noir sparkle pens.


The background is Distress Inks and the window scene and Gentleman were coloured with Aquablend Pencils. The wreath is made from pine branches cut down, I used gems for the berries and added some snow writer.


I cut the aperture and layered it with Blue card, the flowers are decopaged to raise them up, coloured with Aquablend pencils then gone over with Clear Spectrum Noir Sparkle Pen. The birds were coloured with Aquablend pencils.

This is the inside of the card, Blue distress ink for the background I used the Holly stamp to make a wreath around the girl, this was placed in the centre to show through the aperture.


I hope you get chance to view at least on of the shows so you are able to see the stamps in full, although they are Christmas stamps Sheena has designed most of them so they can be used all year round and not just for Christmas.

Thank you for looking, Jacquie xxx

Tuesday, 5 July 2016

Sheenas Book Lovers Christmas Stamps

Hello my crafting friends, well its been another busy week or two, don't know where the time goes lol!
As you may have guessed our Sheena has some new stamps coming out this week they are her Book Lovers Christmas Stamps. You can view them all on Hochanda on Thursday at 8pm or Friday at 9am 12 noon, 4 and 7 pm. 

Here are a couple of my samples to show you.

This Bow card  shows the head of the lady & Gentleman stamps, the Girl and the Christmas Rose

I used two Aquatint pastel colours, Blue & Purple to colour the background then on the first Bow I used one of the sentiment stamps and stamped all over the bow. I added some die cuts and Lace between the layers to give it a pretty vintage look.


This shows the lady stamp in full along with the Postcard and Roses stamps
The background was done using Aquatints and the smaller background was Distress Inks with the Christmas rose coloured in with Aqua Blend pencils. I added a bit of Spectrum Noir clear sparkle to the lady's coat.

Do look in on any of the shows the design team have made some stunning creations.

Thank you for looking, Jacquie xxx