
Followers

Total Pageviews

Friday, 30 May 2014

Friends make everyday...

Morning crafters, hope today finds you safe and well. I do appreciate you coming and visiting my blog today and I hope you will visit again. I would love for you to leave a comment and let me know what you think of today's card or any other previous ones.

I have had a very busy week so far, the days are flying by. After a wonderful long weekend with family I had a sad day Tuesday as one of my rabbits had to be put to sleep, she was having difficulty breathing which turned out to be tumors, she was almost 9 years old and I had had her for 8 years, I shall miss her darting out of her hutch each morning for a carrot, she was a rescue rabbit, as you probably can tell by now most of my pets are rescue apart from my 14 year old male cat who I have had since 8 weeks old bless him.

Wednesday I went to the cinema with my son to see X Men, that was very good and it was nice to spend some time with my son, even though he lives with me we don't see each other much as either one of us are working and in the evenings my hubby always has the soaps on and my son hates soaps so he tends to stay in the front room on his computer lol!


Anyway todays card is another quick one for you, I wanted to see what papers I had that would mix together, I eventually chose these colours, they are all from Tattered Lace Magazines

I matted and layered them onto my basic White card putting White card between two of the layers, with the top layer I die cut the center out with SB Nestabilities Decorative Labels Twenty Two so it showed the White card through it, I raised this up on foam pads. I then die cut the SB Die-lites Medallion Eight out of the same paper and attached that in the center of the White card.

Onto more White card I stamped my sentiment from Creative Expression Unmounted Stamps Classic Sentiments with TH Black Soot, die cut it out with SB Standard Circles Large, inked through the die with TH Peacock Feathers and matted it up in the center of the Medallion die cut.

Out of CE Teal Card I die cut SB Blossoms Four attached together to make a flower and added this onto the corner of the card along with some Sue Wilson Faux Quilled Leaves either side. With a Hobby House Rhinestone Sparklers Ocean Crystal in the center of the flower the card was complete.

Thank you for looking, Jacquie xxx

Wednesday, 28 May 2014

Henna

Morning my crafting friends, hope this finds you all well and I say a special thank you for coming and having a look at my blog today.

This post is another from the SD Taste of India Collection, sorry Ang lol!


I started with a sheet of Crafters Companion Centura Pearl Purple Pastel card and folded it in half, on top of this I matted some CC Centura Pearl Taupe Pastel Card.

On the Sheena Douglass Taste of India CD Rom there are some beautiful papers and this next layer is one of them, it is a Purple sheet with the Henna design all over it. I cut this to size and matted it up onto the Taupe card.

Using Sue Wilson Spanish Collection Boarders, Corners & Tags I  die cut two corners and one boarder out of CC Centura Pearl White card and attached these to the card as seen.

Using TH Distress Ink Vintage Photo I stamped the SD T of I Henna stamp onto White card and coloured it in with Creative Expressions Cosmic Shimmer Mica Pigments, cut it out and attached it to the corner of the card.

I die cut some of the Taupe card using SB Lables Thirteen, stamped my sentiment from Justrite Large Fancy Sentiments onto CC Centura Pearl White card with TH Black Soot and die cut it using the Tag die from Sue Wilson Spanish Collection Boarders, Corners and Tags. I inked through the die with TH Vintage Photo, stuck this onto the Taupe Labels Thirteen than attached it to the center of the card.

There you have the finished card.

Thank you for looking, Jacquie xxx


Tuesday, 27 May 2014

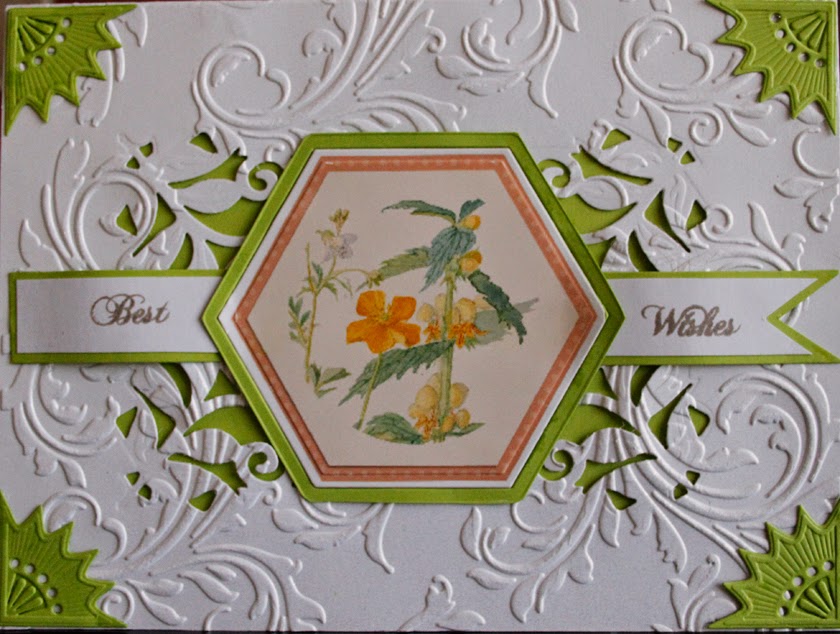
Best Wishes

Morning Crafters, sorry I have been off for a few days I had my Brother & Sister-in-Law staying with us, we don't get to see them often enough as they live in Birmingham, although that is not too far away work makes it awkward at times.

I hope everyone has had a wonderful bank holiday weekend? I will get round to looking at all your posts over the last few days as soon as possible.

I would like to give a warm welcome to Janice and Lauren Hatwell, thank you for looking I do hope you come back. Janice has a blog of her own its http://createdbyjan.blogspot.co.uk/ so do take a look.


Today's card is a fairly simple one, I started with a sheet of Crafters Companion Centura Pearl White card, folded it in half, die cut one half with Creative Expressions Sue Wilson Spanish Collection Cordoba then embossed it with Embossalicious Regency Swirls Embossing Folder.

On the inside of the card I added some Creative Expressions Spring Green Card so it shows through the die cut. On each of the four corners I have added SB Gold Corners Set One die cuts using CE Spring Green card, using more of the CE Spring Green card I die cut SB Nestabilities Hexagon to use as a background for my Image which I printed from Crafters Companion Diary of an Edwardian Lady CD Rom.

I stamped my sentiment  from CE Unmounted Stamps Treasured Memories with TH Distress Ink Pumice Stone, cut this as seen and mounted it onto CE Spring Green card which was also cut as seen, attached it across the center of the card, then attached the focal image in the center over the sentiment.

There you have the finished card.

Thank you for looking, Jacquie xxx

Friday, 23 May 2014

Shades of Purple

Morning crafters, so good of you to come and view my blog today, I do hope you will leave a comment and if you have a blog please do leave a link and I can return the favour.

As you can see by the title of today's post my card is all shades of Purple, Purple is one of my favourite colours and I don't think you can go wrong much with Purple.

I am entering this into the Hobbycutz 3 Shades of same colour Challenge and the Allsorts Purple Passion Challenge.


I started with my base 6" X 6" card, all the papers I have used are from the Tattered Lace Magazines and CD Rom, I chose two different papers both in the shade of Purple, on the second layer I wrapped some Lilac Ribbon from Fantastic Ribbons round the center.

Using some Create and Craft Pearlescent Purple card I die cut the Oval Frame from Wild Rose Studio and matted this onto the center of the card.

I printed the image from My Craft Studio Flawless  Florals & Sentiment Toppers, cut it out and attached it to the center of the oval.

By adding a bow out of the same Lilac Ribbon at the top of the oval and some Creative Expressions Self Adhesive Pearls the card was complete.

I  would like to enter this card into the following challenges:


Thank you for looking, Jacquie xxx

Wednesday, 21 May 2014

House Mouse and Leaf

Morning my crafting friends, hope this finds you all safe and well, the weather has been lovely here of late, I am not going to complain about the heat we have waited long enough for a bit of sun lol!


Well todays card I am entering into the Hobbycutz Challenge, in fact I think this is my first ever Black and White card that I have ever made, I have had a Black & White card from a kit and have made a Black & White card with a Green Peacock but this is a first 'just' Black & White!!! I am quite pleased with how it turned out, no die cutting, no ribbon and no embellishments, just stamping and embossing!

I folded my White sheet of card in half to form the base card, with some Black card I cut to size and stamped all round the edge using my Versamark Ink Pad and Joanna Sheen House Mouse Fall Float stamp using just the leaf bit then heat embossed with Papermania Embossing Powder Black Sparkle. I then matted this onto my base card.

I cut some White & Black card to form alternate squares, matting the Black onto the White and embossing it with Couture Creations Embossing Folder Endless and attaching it to the card in the top left corner.

With the other piece of White card I stamped the Joanna Sheen House Mouse Fall Float stamp with Tim Holtz Distress Ink Black Soot in the center and put it aside to dry for a few minutes, I got a paint brush and some water then painted in the stamp with the ink already on it so it was a light shade of Grey, I used more of the Black Soot to add the darker shades to the leaf and the tail of the mouse. I matted this onto the Black card then attached it in the bottom right corner of the card so it was slightly over the other square.

There you have the finished card. Quick and easy. I hope you like it?

I would like to enter this in:

http://hobbycutzchallenges.blogspot.co.uk/2014/05/challenge-48-3-shades-of-same-colour.html

http://housemouse-challenge.blogspot.co.uk/2014/05/splish-splash-challenge-hmfmc170.html


Thank you for looking, Jacquie xxx