 Morning crafters, White Rabbit, White Rabbit, White Rabbit! 1st of the month, anyone else out there do this or is it just crazy me?LOL!
Over the next few days I shall be showcasing my 'Snowman' cards, I LOVE THE SNOWMAN! Apologies for those who do not like it but I have loved it since the first original film came out, my daughter was just one year old and every Christmas I put my kids Toyah & Jon (31 & 25 respectively) through the half hour viewing, for me it would not be Christmas without The Snowman! So you can imagine my excitement when they brought out The Snowman & The Snow dog! Well! Its on my list to buy once the DVD is released and I don't think it will wait till Christmas to be viewed lol!! Anyhow, when Crafters Companion bought out all the goodies I just had to buy those that I could afford, so basically its been the CD-Roms which is where today's card comes from.
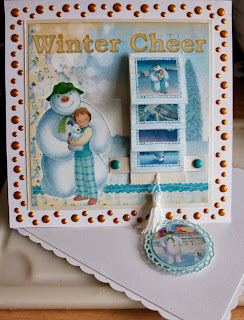
- I started with my Basic 8 x8 White Scalloped Card and folded the front diagonally to make an easel card, I trimmed and matted some Crafters Companion Centura Pearl Silver card on the front of the base card.
- I trimmed a sheet of Crafters Companion Centura Pearl Pastel card and matted and layered this onto the center of my base card. I matted another sheet of Crafters Companion Centura Pearl Silver onto the base of the card so it matched the top, matting it just inside the edge of the scalloped card.
- Using some Cosmic Shimmer Pearlescent PVA - Gold I added pearls around the edge of the image on the front of the card and put it to one side to dry.
- I printed one of the images from the Crafters Companion CD-Rom The Snowman and the Snowdog onto Photo card and printed a sheet of waterfall images onto Photo card and cut these out. With some more Centura Pearl Pastel card, the same colour as I had used on the front, I cut out the waterfall template from the CD-Rom, now obviously you want the nice pearly side showing underneath the images on the card which meant that once you have the template ready and folded you had to attach the images onto the white card at the back, I hope this make sense, if I had attached them to the centura pearl side then I would have had the back of the card showing for the pulley end of the waterfall, of course you could always cover the card with some matching paper if you so wished. This actually was my second attempt as the first one, not thinking, I stuck the whole sides of each image down which meant they did not turn over! I did not realize what I had done till I stuck the last one down then could not believe I had done such a thing lol! You could tell I had not made a waterfall card for quite some time! This sheet of images is really nice as on one sheet you have enough images to make three waterfall cards, there are three sets of images so you can choose which ever takes your fancy. Once I had stuck all the images on the template I trimmed the edge so no white card was showing around the images. I placed the bottom bar onto my main image
attaching it with two brads from Papermania Large Glitter Brads, placed the waterfall through the bar and stuck down the edge of the first image to the bar so when you pulled the pulley end the waterfall it stayed in place but the images all flicked over. I added a little White Tassel from Llewelyn-Bowen Venaissance Premium Tassel Embellishments to the pulley so you had something to grab hold of! With this attached I stuck the whole front of the image down, using strong double sided tape, onto the Centura Pearl Pastel card that I had on my base card.
- Now being an easel card I had to place something on the bottom to hold the card up, on the CD-Rom there is a sheet of small round images so printing this off onto Photo paper again, I attached my chosen image to a bit of base card I had die cut out from Create and Craft Pearlescent card - Mint Green using Spellbinders Nestabilities - Splendid Circles, in fact I cut quite a few out with odd bits of the card I had lying around and stuck different images onto each one so I had a stash of them for future use, you will notice these on my other cards over the next dew days lol! I then attached this in place with some double Foam Pads to raise it up and there you have my finished card. I hope you like it?


No comments:
Post a Comment
Thank you for leaving me a comment I do appreciate it. I love to read what you think of my creations and I hope you will visit me again.