Followers

Total Pageviews

Showing posts with label Sue Wilson. Show all posts

Tuesday, 19 July 2016

Victorian Wedding Card

Hello my crafting friends, good to have you back today, I really do appreciate your visit. Today I am showing the second card of the four I have made for work colleagues, this is the second wedding card for one who is getting married at the end of August.


I used Sheena Douglass new Christmas stamps A little Bit Festive Christmas for this I used the Victorian Gentleman & Victorian Lady. I stamped the Lady first and painted over the top with Pebeo Drawing Gum, once dry I then stamped the Gentleman next to her. I coloured them both in using Spectrum Noir Aquablend Pencils, the Lady was painted in using a Cream colour but for some reason it turned Grey looking I guess she wanted to match her man lol! I added some Spectrum Noir Clear Sparkle pen over the top of the Lady's coat and hand muff, the picture does not show this up at all!!!

I then die cut it out with the frame from Sue Wilson Italian Collection Calabria and cut the frame part out again and layered over the top then put to one side.

I inked up a piece of card with Tim Holtz Antique Linen Distress Ink, cut to size a piece of paper from the Crafters Companion Downton Abbey Paper Pad and ran it through the Ebosser in the Crafters Companion Downton Abbey Embossing folder Fleur De Lis then attached this to the inked card.

I cut a piece of White Satin Edged Organza Ribbon and wrapped it round both card pieces then attached it to my 8 X 8 base card and placed my framed couple on top. I made a small bow out of the same ribbon and placed this at the top of the frame.

Using a piece of Crafters Companion Centura Pearl card I die cut the  Motor Vehicle from the Crafters Companion Downton Abbey range of dies and placed this on the bottom right corner of the card, I felt this kept with the Victorian look.

To finish the card I stamped a sentiment from Crafters Companion Downton Abbey Clear Stamps Sentiments 2 on top of some inked card and paper to match the card and placed this in the top left corner of the card to balance it out.

Its a bit unusual for a wedding card but that is why I did it to be different from the normal ones they may receive.

Thank you for looking, Jacquie xxx

Tuesday, 22 March 2016

Thinking of You Floral

Hello my fellow crafters, hope today finds you all well, thank you for visiting me today I do appreciate it very much and I love reading any comments which you may wish to leave.

Today's post is a card I made for a friend who is not well just to let her know I am thinking of her, so I wanted it bright and cheerful.


I started by die cutting a piece of Sheena's White Stamping Card with the Creative Expressions Striplets Die Rococo three times and attached this over the top of some Dark Blue Miri card, I then attached this to my base card.

Out of Sheena's Black card I made a frame using Square Nesting Dies from Presscut and placed this over the top of the card.

To brighten the card up I die cut some flowers from Sheena Douglass Day of the Dead Floral Fantasy using copy paper and painted them with Aquatints Bright and Beautiful, these are such vibrant colours that stay true and do not fade. I stamped them using darker Distress Inks Dried Marmalade & Fired Brick to match the colours. To finish the flowers I shaped them with a embossing tool and added a Kaisercraft Sparlet Gem in the center of each one.

I also die cut some Ivy using Creative Expressions Sue Wilson Finishing Touches Trailing Ivy and coloured this with Tim Holtz Distress Ink Crushed Olive then painted over the top with Green Aquatint from the Landscape set leaving the edge to show the colour underneath. I attached this on the card as seen.

Using more White card I stamped my sentiment with Tim Holtz Distress Ink Crushed Olive and Justrite Large Fancy Sentiments then die cut with Spellbinders Nestabilities Decorative Curved Square, whilst still in the die I inked through the die with more  Crushed Olive Distress Ink. I then placed this on the card.

There you have the finished card. I am glad to say the recipient loved it.

Thank you for looking, Jacquie xxx

Tuesday, 8 December 2015

Wishing you a wonderful joy filled Christmas

Hello my crafting friends, I cannot believe it has been a week since my last post, I am so sorry, where does the time go!

I am afraid this will have to be a quick post as just about to leave for work, whoops!!! 
May I take this opportunity to wish each and everyone of you who came to visit my blog through out the year and those who will come to visit my blog a VERY MERRY CHRISTMAS and a  HAPPY NEW YEAR.


This is another Christmas card showing the lovely Poinsettias but not in their usual colour, I wanted to try them in Purple so off I went lol! These were made using two different colour distress inks then adding a little pearl in the center of each flower. I really liked this colour combination.

The background was Gold, glittered Miri card matted onto the base card then the top layer was Lilac card that had been embossed with a snowflake embossing folder then the aperture die cut out, the sentiment was also die cut from the same set of dies, the sentiment was stamped in Seedless Preserve DI to match the flowers and the leaves were also stamped through the die with the same DI to match.

Items Used:

Spellbinders Poinsettia die
Spellbinders Oval Majesty
Tim Holtz Distress Inks Seedless Preserve and Shaded Lilac
Tattered Lace Snowflake Embossing Folder
Dreamees Pearls
Papermania Silent Night Clear Stamps


Thank you for looking, Jacquie xxx

Saturday, 28 November 2015

Mixed Media Christmas card

Hello my crafting friends, so good of you to come and visit me today. This is going to be a quick post as I am off to Norwich today for a bit of Christmas shopping, can't wait!

I have started my Christmas cards, very late for me but had not time at all before, so I have been playing. This card was inspired by the lovely Pamellia, I saw her beautiful creation and just had to try my own as I loved it so much, you can find Pamellia's HERE its not quite exactly the same but close, thank you Pamellia for your inspiration.


I started by colouring in a piece of card with Pastel Aquatints using the Blue & Green and once dry applied some modelling paste through a metal grid and let that dry overnight, this is where I went wrong as I wished I had sprinkled the embossing powder on top of the wet paste then left to dry before heat embossing it that way it may have stayed only on the circles and not the places in between which I think look a bit messy. I am going to do it again that way so at some time I shall show you the results lol!

I heat embossed it with enamel embossing powder then I distressed the edges of the card a little. I took another piece of card and painted that with Aquatints but using just the Green, once dry I distressed the edge of this too. I matted this onto my base card with Foam tape and attached the top piece too.

I die cut some Christmas Fir branches, Holly leaves, Circles and Reindeer  out of various colour card, the reindeer I inked up and covered with Deco art Glamour dust, the circles I inked with Distress inks Forest Moss and Tumbled Glass, the Holly leaves I rubbed Silver gilding wax all over to add a frost look, I may have over done it a little lol!!! I attached all these on to the card as seen adding a white swirl I found in my stash just under the fir branches.

I coloured some White seam binding with Crushed Olives Distress Ink and made a bow, I did try crushing this by wetting it but this seam binding is so thick it was having none of it so I left it as it was, I placed it over the Branches and Holly leaves then added another bow out of garden twine, which I separated the four strands and used just one. On top of the bow I added a round bead, this was part of some beads I had friends save from their Christmas crackers, you know how sometimes they wrap beads and wire over the ends of these fancy ones, so in past years when we have had our Christmas meal I have claimed the beads lol!!! I attached this with some 3D glue. 

I went round the edge of the card and die cuts with a snow writer but this was a glitter one so it dried clear!!! So I went over it again adding some Deco art glamour dust so it showed up a little. I then watered down some White Acrylic paint and splashed this all over the card using a paint brush, I loved the effect this gave to the card, just like snow. The picture doe pick it up a little if you look close enough.

There you have the finished card.

Items used:

White hammer card
White card
Aquatints pastel set
Tim Holtz Distress Inks Forest Moss, Tumbled Glass and Crushed Olive
Sue Wilson dies Holly leaves
Sheena Douglass Christmas Foliage
Spellbinders Nestabilities Standard Circles Large
Memory Box Leaping Deer
Deco Art Glamour Dust
Galleria Modelling Paste
White Seam Binding
Gilding wax Silver
Acrylic paint, White and Water

Thank you for looking, Jacquie xxx

Sunday, 10 May 2015

Daisy Weave

Hello my crafting friends, hope you are all having a great weekend. Haven't we had some strong winds of late, the beautiful blossom on my Cherry Blossom tree has been blown away, only had the beautiful flowers a few days this year, mind you the drive and cars look pretty!!!

May I give a very warm welcome to my newest follower Lynn (aka LynnPenguin), thank you for joining us its lovely to have you on board.

Yesterday I had my delivery of John Lockwood stamps so I had to play, I have to admit I cheated a bit, watching John's shows Nigel May commented on the Daisy striplet and that he would cut it up and weave it, well sorry Nigel I had to give it a go so I decided on using Custard & White card.


I started with my base card, 6"x6" White scalloped card and cut a piece of Custard card to size.

On some White card and more Custard card I stamped the Daisy Quilt Striplet twice on each card using Black Archival ink then cut it into strips. Now I have never tried to do weaving before so was not sure how I was going to do this!!! I decided to start by gluing the tops of the Custard strips onto the piece of Custard card I had cut to size but leaving a gap round the edge of the card as I wanted to put a frame on top of the weave. I then took each of the White strips and weaved them one at a time in between the Custard strips pushing them up as far as I could, it was a bit fiddly but I got there in the end.  I trimmed the excess from the edges and taped them down with double sided adhesive. 

I then made a frame out of White card so it was just a tiny bit smaller than the Custard card, I cut out the middle using a craft knife and embossed the frame with Knotted Trellis, I now wished I had left it plain or just embossed a line inside it as I think the pattern is too much for the weaving and maybe being plain would have showed the weaving up more.


With the excess bits I had cut of from the weave strips I managed to cut 12 squares so these I coloured, the White in Yellow and the Custard ones in Orange, I then attached these with Foam pads on top of parts of the weave in random places so they protruded out of the card, I felt this added some depth and interest.

I did not wish to add a sentiment as I felt it may spoil the look but just added a Yellow & Orange bow, keeping to the colour scheme, in the bottom left corner and then added two of WENDY'S beautiful stick pins to finish it off.

Thank you Nigel for the idea and John for the inspiration and wonderful stamps. Now its your turn John, I know you can make a better job of it than me lol!

Items Used:

6"X6" White Scalloped Edge Base Card
Creative Expressions Foundation Card Custard
Creative Expressions John Lockwood Stamps to Die For Daisy Quilt Striplet
Creative Expressions Sue Wilson Embossing Folder Knotted Trellis
Spectrum Noir Pens
Foam Pads
Yellow & Orange Ribbon
Ranger Archival Ink Black
White Card
Wendy's Stick Pins


Thank you for looking, Jacquie xxx

Monday, 4 May 2015

Just a note!

Hello my crafting friends and a good Bank Holiday Monday to you all, as I have today off work I am hoping to play...mmm lets keep our fingers crossed lol! Anyhow, I hope you are all having a good weekend with plenty of craft time?

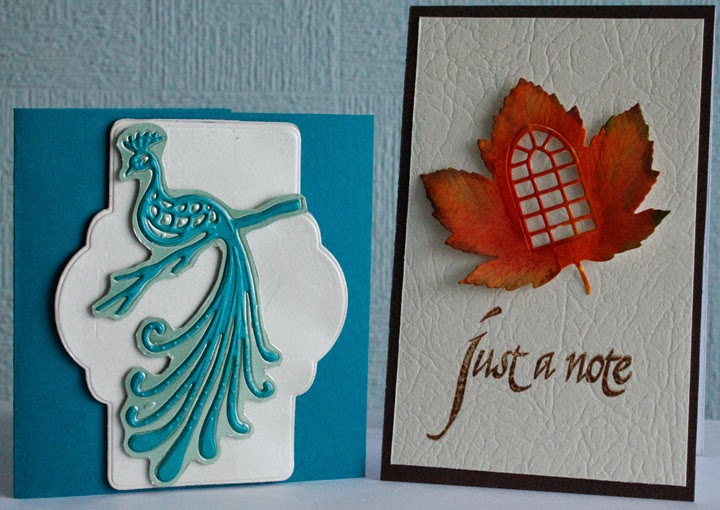
I have two little cards for you today that I made  just to send my personal contact details to two of my cousins, we have always kept in touch over the years but through their parents, now they have gone we decided it was about time we had each others details.


They are only tiny cards made out of scrap card that I had  left over from other projects. With the Peacock die I cut it out using Pearlescent Teal card then embossed some Green Miri card, cut round that and matted the Teal peacock on top, I attached it to a piece of cream leather look card (actually the reverse of it as its plain) I had die cut with the outer die from  SW French Collection Auvergne I then matted this onto a Teal card base. On the inside I added a piece of White card to write my details on.

The 'Maple Leaf' card a had a piece of Pearlescent Chocolate Brown card for the base and matted that up with a piece of Cream leather Look card. I die cut the Leaf Window out of the leather look Cream card and inked it with Squeezed Lemonade, Dried Marmalade, Fired Brick, Crushed Olive and Vintage Photo to give it a Autumn look. I attached this to my base card then stamped underneath with  stamps using Vintage photo. The inside of the Pearlescent Chocolate Brown card is White so I did not have to line this in order to write on it.


There you have two small but useful little cards.

Items Used:

Crafters Companion Pearlescent Card Teal & Chocolate Brown
Crafters Companion Kimono Dies Peacock
Sue Wilson Dies French Collection Auvergne
Spellbinders Maple leaf Open window
Printable Heaven Cream leather look Card
Tim Holtz Distress Inks Squeezed lemonade, Dried Marmalade, Fired brick, Crushed Olive & Vintage Photo

Thank you for looking, Jacquie xxx

Monday, 27 April 2015

Friends in the Sun!

Morning my crafting friends, hope today finds you all safe and well, plenty of hugs to those who need them. 

Well a few more days and it will be the end of another month, I had better start thinking about starting my Christmas cards lol! I know some of you have started already, I did intend to make one every week from January but that did not happen lol!

Well today's post is not a Christmas card, far from it. Some of you may remember a card I made of Two Cats in the Moonlight, you can view it HERE, at the time I said I would make one with the Sun so here it is.


I did make this one just after the other but waited to post it as I did not want to post the same image close to each other. 

I cut a piece of White card to size and coloured the Green landscape first using masks and two different colour Green Distress Inks, then the sky using Tumbled Glass Distress Ink. I then embossed the stencil with the same card, placing the stencil over the top again I coloured the tree in with Vintage Photo Distress Ink. Removing the stencil I coloured the Sun in with Squeezed Lemonade and Scattered Straw going over the edge of the embossing hoping to create a haze, not sure I have achieved it! 

Using Promarkers I coloured in the leaves and the Cats, I added a little Yellow Promarker across the top of the branch and on some of the leaves. I did not colour in the 'Friends' as the colours from the sky and the sun did this for me so I left it as it was.

I decided to turn this into an easel card so matted it onto some Black card, made the easel card out of Cream card and attached some Black card on the base that I had die cut with SW French Collection and added a boarder on top for the stopper that had been die cut using SW Spanish Collection.

Hope you like this version, I am sure it would also look good with a sunset behind too maybe over the sea!!!

Items Used:

Sweet Poppy Stencil Friends
Sue Wilson French Collection Corners, Boarders and Tags
Sue Wilson Spanish Collection Corners, Boarders and Tags
Creative Expression Gilding Wax Spring Green
White card
Black card
Cream Card
Tim Holtz Distress Inks Scattered Straw, Squeezed Lemonade, Tumbled Glass, Crushed Olive, Forest Moss & Vintage Photo
Promarkers
Foam Pads/Tape
Clarity Masks Hills


Thank you for looking, Jacquie xxx

Saturday, 25 April 2015

Feathers

Hello my crafting friends, good to have you here with me today and I hope you are all having a good weekend.

May I give a warm welcome to my newest follower Jenny L. great to have you on board Jenny. Jenny has a wonderful blog of her own so please do take a look you can view it HERE

Tomorrow would have been my parents 69th wedding Anniversary had they lived to celebrate it, I often wonder what they would look like now, its also coming up to my 10th wedding Anniversary on the 7th May so I had better get my thinking hat on for a card for Hubby lol! Don't know where those 10 years went!


Now I had this small piece of card, that I had stenciled through with modelling paste, that I wanted to use as well as some feathers I had die cut, one being from the coloured background I made for my friends birthday card a few weeks ago, you can view it HERE. I did cut the edge of the feathers down to the spine so they did have the effect of real feathers and once cut they did seem to find there own shape which was rather nice.

I coloured the card with the paste on in Chipped Sapphire, Iced Spruce and Peacock Feathers, matted and layered it onto some embossed card and Teal card.

I added a banner with the sentiment then arranged the Feathers on top so the ends went under the banner and stuck these down.

Inside I added a piece of Teal card followed by a piece of White card to write on.

A tiny card made up of odd bits in my stash box of left overs, I quite like the feathers and may make up a stash for future use.

Items Used;

Crafters Companion Pearlescent Card Teal
White Card
Sue Wilson Embossing Folder Eternity
Clarity Stencils Tangle
Maimer Modelling Paste
Tim Holtz Distress Inks Chipped Sapphire, Iced spruce and Peacock Feathers
Spellbinders Shapeabilities Feathers
Creative Expressions Foundation Card Teal
Creative Expression Unmounted Stamps Classic Sentiments


Thank you for looking, Jacquie xxx


Saturday, 4 April 2015

Jordan Rock Star

Morning my crafting friends its time for another challenge, number 7 over at http://lilpatchofcraftyfriendsdt.blogspot.co.uk/  I do hope you can join us we have some lovely sponsors and some great prizes:

Prize ~ $20 to spend in store
 
Prize ~ 3 Images
     
Prize ~ 10 Gift Voucher


Here is my post its Jordan Rock Star from kith and kin stamp company.


I first die cut my image out using Grand Ovals and coloured in the background roughly with Promarkers. I then proceeded to colour in the image, again using Promarkers, before stamping across on his headband. As soon as I saw this image I knew the Guitar had to be Red and not just any Red but Glitzy Red, so I added glue to the Guitar with a glue pen and heat embossed it with Tinsel Red embossing powder. I was quite pleased with how this turned out.  

I stamped around the image 'Rock', 'Band' & 'Guitar' and coloured the stars in to match the star on his face.

Using the Grand Oval die I ran it through the E-Bosser with some Red card, cut it out and placed it behind the image bringing the embossed areas into the die cut areas of the image itself. I hope that makes sense to you all? I felt it needed the Red background to bring out the image and tie in with the Red Guitar and headband!

For the background I used a sheet of Pale Blue card cut to size, then stamped over it with the Music melody stamp in Black ink, I then ran it through the E-Bosser with Knotted Trellis Folder then inked around the edge of the card with Weathered Wood distress ink. I matted this up with a sheet of red card folded in half to make the base card.

I added my image to the front and attached the sentiment at the bottom on top of the Fancy Framed Tag I had die cut using more of the Red card.

I wanted to add an embellishment but was not sure what would look right until my son gave me a couple of his Guitar Picks, job done!


I have lined the inside of the card with more of the Pale Blue card.


Items Used:
Kith and Kin Stamp Company 'Jordan Rock Star'
Creative Expressions Foundation card Rich Red & Pale Blue
Promarkers
Spellbinders Grand Ovals 
Spellbinders Shapeabilities Fancy Framed Tags One 
Sheena Douglass Stamping Card White
Range Archival Ink Black
Studio G Clear Stamps Series 24 Rock
Inkylicious Clear Stamps Music Melody 
Sue Wilson Embossing Folder Knotted Trellis
Tim Holtz Distress Inks Weathered Wood
Sailor Rollerball Glue Pen
Papermania Embossing Powder Tinsel Red 
Do go over and view all the DT wonderful creations and why not join in yourself, the theme every challenge is 'Anything Goes' and you never know you might win a prize.
 
Thank you for looking, Jacquie xxx


Sunday, 8 March 2015

Especially for You

Morning my crafting friends, Sunday already, these weekends go by far too quickly lol! I hope you have all had a wonderful weekend and I know its not quite over yet!!! 

May I welcome Tracy, thank you so much for coming over to my corner and commenting on my post, I do hope you come again. 
Ang thank you for the constant giggles you give me every time you leave a comment, I loved your last one and I must say I agree with you, I sat here at the computer giggling away for quite some time lol! You bring sunshine into my life.

Now todays post was another little quicky card I made, I am finding I'm doing more of these as I have somewhat lost my organization of time lately, it may have something to do with spending too much time on the computer, Five hours yesterday when I should have been crafting, shame on me!!!


I had this paper that I downloaded from Crafters Companion, I loved the pattern on it. 
To start I cut a piece of Centura Pearl Pastel card and matted it up with some dotted patterned paper, then using some satin card I embossed the bottom and matted this onto my card. With my paper I shaped the bottom edge with a curved die. Using more of the dotted patterned paper I die cut a boarder and die cut the tag twice, I wrapped the boarder strip round the paper, with the tags I stamped my sentiment then attached them in opposite directions on top of the card.

I added a paper bow at the bottom, decorated the inside of the card and there is the finished card.

Items Used:

Crafters Companion Centura Pearl Pastel card Taupe
Crafters Companion Paper Download
Creative Expression Teresa Collins Paper Pad
Creative Expressions Sue Wilson Scandinavian Collection Corner Boarder & Tag
Create and Craft Satin card Sand
Creative Expressions Unmounted Stamps Kind Thoughts
Craftwork cards Paper Bows Botanical
Spellbinders Curved Boarders Two
Ranger Archival Ink Black


Thank you for looking, Jacquie xxx

Tuesday, 3 March 2015

For Someone So Special

Morning my crafting friends, hope this finds you all safe and well. Many, many thanks for all your wonderful comments on my posts they are really appreciated so do keep leaving them lol!!!  I am full of cold at the moment so have not done much crafting and with going up the hospital  all weekend I have not had the time either, excuses I hear you say lol!

This is one I did have scheduled for Sunday but then realised it was my turn as DT for Lil Patch of Crafty Friends so delayed it a couple of days, so apologies for those of you who may have noticed it briefly on Sunday (Hazel lol!) What am I like????


For todays post I reluctantly used the last sheet of Teal card until I get round to purchasing more lol! I love the look of Teal & White together.

I cut my Teal card to size and pierced round the edge then put it to one side.

Using Sheena Douglass White Stamping card I die cut the Austrian background, cut this in half, trimmed it then attached to the front of the card as a square. To cover the join I die cut the Scandinavian Corners, Boarders and Tags and using the boarder across the middle to hide the join. I die cut another Tag and joined the two tags together in opposite directions, this made a beautiful little square but I attached it as a Diamond. I then attached this to my base card.

I stamped my sentiment onto White card, die cut with the  Standard Circle, inked through with Peacock Feathers and placed on top of the decorative tag die cuts.

To finish the card I added some self adhesive pearls on the boarder and tags as seen and placed some pretty Blue paper on the inside with the Salzburg die cut out of White card and left blank for a message.

Items Used:

Basic White 6" X 6" Scalloped Card
Sheena Douglass White Stamping Card
Creative Expressions Foundation Card Teal
Creative Expressions Unmounted Stamps Classic Sentiments
Sue Wilson Austrian Collection Background
Sue Wilson Austrian Collection Salzburg
Sue Wilson Scandinavian Collection Corners, Boarders and Tags
Spellbinders Nestabilities Standard Large Circles 
Paper (own stash)
Ranger Archival Ink Black


Thank you for looking, Jacquie xxx


Tuesday, 10 February 2015

Will-O and the Wisps

Morning my crafting friends, lovely to have you visit me today, I do love your visits and any comments you may make, its good to know you all support me in my creativity.

Its back to work today after a wonderful long weekend off but only four days till half term lol! We do wish our lives away in this job I can tell you. How I would love to retire or find a job where I can craft all day!!!

Anyhow, today's post is another stamped image from Norma J Burnell who designed the Moon Owl I did on Sunday.


This time I decided not to stamp straight onto the card as I felt she needed to be die cut.

I matted up a basic 6" X 6" White card with Rich Plum card then I stamped my sentiment onto a piece of White card before putting it through the E-Bosser with the California Background die to emboss the pattern onto the card, this was not wide enough to do the whole card, I could have extended it but decided to leave it plain as the image was going to go there anyway and I quite liked the contrast.

I stamped my image onto White card and coloured it in with Promarkers, I actually coloured her in with similar colours that are shown in the image on the front of the stamp packaging as I liked these colours. I die cut her out with Gold Labels Four, then die cut a piece of Rich Plum card  also using Gold Lables Four, I cut this in half and placed it under each end of the image to make it look like a larger die cut if you get my meaning? I attached the image to my card on the right side.

To finish the card off I added a Fern leaf and three little flowers, to match the colours used in my image, in the bottom left corner. There you have the finished card.

Items Used:

Basic White Card Base
Creative Expressions Foundation Card Rich Plum
Spellbinders Imperial Gold, Gold Lables Four
Sweet Pea Stamps Norma J Burnell's Will-O and the Wisps
Promarkers
Creative Expressions Unmounted Stamps Friends Sentiments
Creative Expressions Sue Wilson Dies California Background 
Creative Expressions Sue Wilson Finishing Touches Fern Trio
Creative Expressions Theresa Collins 8 X 8 Designer Pad (paper used to die cut Fern Trio)
Buckwell Craft Supplies Assorted Coloured Flowers
Ranger Archival Ink Black

Thank you for looking, Jacquie xxx

Wednesday, 4 February 2015

Friends...

Morning my crafting friends, hope this finds you all safe and well? We had a little covering of snow on Saturday but that went on Sunday, since then it has been cold but no more snow as yet, now watch it come down like a blizzard...lol!

(I had bad news this morning as my dear neighbour Joy passed away in hospital, God rest her soul, so this one is for her.)

Today's post was a bit of a quicky card I made, I could have done it better if I had raised the layers up but I wanted to keep it as flat as possible for posting, so of course I went and stuck some flowers on it!!!


I started with some Centura Pearl Ivory card for my base and layered it up with some Lilac Satin card that I had die cut the center with the Auvergne die, on top of this I put another layer of Ivory card that I had die cut using the  next size up of the Auvergne die. For the top layer I used the largest of the Auvergne dies to die cut the aperture and matted this on top. 

On two of the corners I added some flowers and fern leaves, in the opposite corners I added a Pearl.

I carefully stamped my sentiment in the middle  to finish the card.

Items Used:

Creative Expressions Unmounted Stamps Classic Sentiments
Crafters Companion Centura Pearl Card Ivory
Create and Craft Satin Card Lilac
Sue Wilson French Collection Auvergne
Sue Wilson Finishing Touches Collection Fern Trio
Buckwell Craft Supplies Assorted Flowers www.buckwellcraftsupplies.co.uk
Habio Self Adhesive Pearls
Ranger Archival Ink Black

Thank you for looking, Jacquie xxx

Saturday, 31 January 2015

Pearl the Mermaid with Long Hair

Morning my crafting friends, here is my second post for the  Design Team of http://lilpatchofcraftyfriends.blogspot.co.uk/

I do hope you come along and play and view all the other DT members fabulous creations. The theme each fortnight is 'Anything Goes'.


We have some wonderful sponsors this month and each offer prizes of 3 images so well worth joining in.

Our sponsors are:

  https://www.etsy.com/shop/FaeryInk
  https://www.etsy.com/au/shop/OddballArtCo


https://www.etsy.com/au/shop/ThatCraftPlaceLtd

My image comes from FaeryInk, https://www.etsy.com/ca/listing/188987624/pearl-the-mermaid-long-hair-summer-beach?ref=shop_home_active_1&ga_search_query=Mermaid%2Bwith%2BLong%2BHair   I stamped some rocks under the image then coloured her in with Promarkers before die cutting her out with Spellbinders Labels Twenty-Six.

The papers were from Tattered Lace, I ran the lighter Green piece through the embossing folder Sea Garden and matted and layered it on the card with the Dotted Green paper as seen. I cut a width of patterned paper and wrapped that round the middle. I attached the image on top in the center of the card.

Out of Green Lace paper and Plain Green paper I die cut two of the Seashell Waves and attached these around and behind the image.

I die cut the Art Deco Swirl out of White card and inked it up with three distress inks, Tumbled Glass, Peacock Feathers and Bundled Sage then heat embossed it with Tropic Pearl Lustre three times, I placed this on the left hand side of the card. 

I die cut a small sea shell out of beige patterned paper added this in the bottom left corner then added a small starfish to finish the card.


Items Used:

White Base Card 6" X 6"
FaeryInk Image Pearl the Mermaid with Long Hair
Tattered Lace Papers
Promarkers
Spellbinders Labels Twenty-Six
Crafts to You Art Deco Swirl
Lea'bilities Sea Shell & Wave
Cosmic Shimmer Embossing Powder Tropic Pearl Lustre
Sue Wilson Embossing Folder Sea Garden
Tim Holtz Distress Inks Tumbled Glass, Peacock Feathers and Bundled Sage
Starfish (own stash)

Do go over to http://lilpatchofcraftyfriends.blogspot.co.uk/ and check out all the wonderful DT work and join in with the fun.

Thank you for looking, Jacquie J xxx


Tuesday, 20 January 2015

French Background

Hello my crafting friends, good to have you visit me to day I really do appreciate you popping by, its lovely to read what you think of my creations or even just to have you visit and browse.

I am sad to say my neighbour is back in hospital so my craft time will be very short or none existent for the time being with visits to the hospital etc. However, I have got posts scheduled for the next week or two so fingers crossed!


For today's post I am still in the Teal mode, I love this colour card but I really must purchase some more coloured card as well as white!

For this one I used my model paste through the stencil again and added Diamond Snow before it dried so as you can imaging this has quite a bit of sparkle on it! Do remember if you use any paste through your stencils to place them in warm water straight away so they don't get ruined as it dries quicker than you think!

For the background I embossed some White card then on the reverse I inked it up with my Versamark Glue pad and heat embossed it with Artic Bay Lustre, something else I am running out of lol!

I matted and layered these with more White and Teal card.
On the side I added some Pale Blue Seam Binding Ribbon making a flat bow, I inked up a wooden embellishment and covered it in Teal Glitter before placing it in the center of the ribbon.

There you have the finished card.

Items Used:

Creative Expressions Foundation Card Teal
Malmen Acrylic Modelling Paste
Sheena Douglass White Stamping Card
Creative Expressions Sue Wilson French Collection Background
Creative Expressions Sue Wilson Embossing Folder Garden Lattice 
Creative Expressions Embossing powder Artic Bay Lustre
Creative Expressions Diamond Snow
Creative Expressions American Seam Binding Ribbon Pale Blue
Wooden Embellishment (own stash)
Teal Glitter (own stash)

Thank you for looking, Jacquie xxx

Friday, 16 January 2015

Sorry You Are Leaving

Morning my crafting friends, last day of the week, so I hope you all have a wonderful weekend ahead.

Today one of the Male members of our team at work is leaving to go and teach English to EAL students in Hong Kong, he got his Doctorate in English about 18 months ago so is now going to make use of it! We will miss him as he has a wicked sense of humour, he's young, single and got no ties so good luck to him. Anyway I was asked if I had a card in my collection, the only one I had was this one, was not sure whether it was suitable for a Man but like they said it did not matter as he would probably throw it away anyhow!!!


I made a base card out of Spring Green card, embossed some White card and layered that on top. Using a piece of the Spring Green card I placed it onto a Self Adhesive sheet and covered it with Diamond Sprinkles, I matted this onto the White embossed card. 

I die cut the Scandinavian background out of White card and attached this on top. I had some old rub on letters so I made the sentiment out of these onto a piece of Spring Green card matted onto some White card and placed this across the middle of the card as seen.

Using Rich Green card I die cut two sets of the Trailing Ivy and placed these top and bottom of the sentiment. This finished the card.


Items Used:

Creative Expressions Foundation card Spring Green
Creative Expressions Diamond Sprinkles
Creative Expressions Sue Wilson Scandinavian Collection Background
Creative Expressions Finishing Touches Trailing Ivy
Sheena Douglas White Stamping Card
Tattered Lace Embossing Folder Fretwork
Black Rub on Letters

Thank you for looking, Jacquie xxx

Wednesday, 14 January 2015

Golden Lattice

Morning crafters, hope today finds you safe and well, do take care on those roads as I know some of you have had a down fall of snow, as I type this (yesterday) we have sunshine and rain, very cold but no snow!

May I thank you all for your amazing comment on my Out at Sea post, you are an amazing bunch of gifted and talented friends.

Today's post is another card showing the Mica Pigments and Diamond Sprinkles but this time in Copper, Gold, Silver & White.


I simply laid the mask onto a piece of Double Sided Self Adhesive Sheet and dropped the colours of pigment where I wanted them, I tried to keep certain colours in certain places but some did overlap a little, I brushed these into the adhesive sheet then placed it onto some White card, I took the cover off the sheet on the other side and covered it with Diamond Sprinkles, which unfortunately does not show up too well on these photos.

I matted and layered  it onto some Brown Miri card and Silver Matt Textured card, leaving the second layer of Miri card a bit wider, this is where I added some wide Gold ribbon, gathered it up in the middle and added a sentiment that I had stamped onto White card and die cut using French Collection Auvergne, I matted this onto a Gold base die cut from Gold Miri card using the French Collection Boarder, Corner & Tag.

I matted this onto a base card made from more of the Silver Matt Textured card using Foam tape to raise it up slightly.


There you have the finished card. Dimensions 9.5" X 7.5". One of those cards you make without thinking about whether you have an envelope to fit or not lol! So much for sticking to smaller cards this year!!!

Items Used:

Creative Expressions  That Special Touch Mask lattice
Creative Expressions Cosmic Shimmer Mica Pigments
Creative Expressions Diamond Sprinkles
Creative Expressions Sue Wilson French Collection Auvergne
Creative Expressions Sue Wilson French Collection Corner, Board  & Tag
Sheena Douglass White Stamping Card
Brown Miri card
Create and Craft Silver Textured Card & Gold Miri Card
Ranger Black Archival Ink
Jayne Nestorenko Clear Stamps Just My Imagination Collection
Fantastic Ribbons Double Sided Gold/Brown Ribbon
Foam Tape

Thank you for looking and stay safe, Jacquie xxx