
Followers

Total Pageviews

Showing posts with label Create and Craft. Show all posts

Saturday, 13 June 2015

Faux Leather Note Book

Hello my crafting friends, hope today finds you all safe and well, big hugs to those who need them. Another weekend is upon us, don't they come round quickly, especially when you are off work lol!

May I welcome my newest followers, good to have you here, if you have a blog of your own then please do let me know so I can return the favour.

Now over the last few weeks, yes I did say weeks as I started this before my back went, at least the cover, on Thursday I actually put the papers in and added the pictures lol! I have made this for a work colleague who is leaving at the end of term to become a Teacher of Drama and she adores The Minions so this seemed fitting.
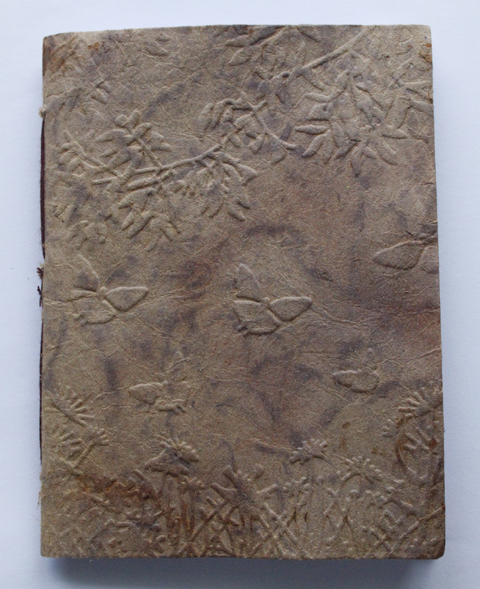

This is my first attempt at the faux leather and I am quite pleased with it, I think I could have done better on the colouring of the leather, I used Vintage Photo and Dried Marmalade and sprayed it with a Matt Varnish. For those of you who do not know how to make this there is a brilliant video on You Tube for the Queen of faux leather herself, Sheena Douglass, it would be so much better you watching that than have me try and explain it on here believe me!

The inside I lined with material cut from an old top of mine, one of my favourites and rather than throw it thought I would use the material some how, as my friend also like feathers this seemed perfect.

Now for the pages on the inside I only used copy paper, nothing special, I printed my images from the internet and mounted each one onto Black card before attaching it onto a single page. The finished book ended up fatter than anticipated so it was just as well I kept to one side of the page only! In hindsight I should have placed the image in the center of each page as the book is quite fat at the top and goes in at the bottom lol! I did say this was my first attempt lol!


Items Used:

Create and Craft Kraft Card
Sheena Douglass Embossing Folder Silhouette Grasses
Glycerine (mixed with water)
Copy Paper
Tim Holtz Distress Vintage Photo and Dried Marmalade
Internet-Minion Quotes
Black Card


Thank you for looking, Jacquie xxx


Sunday, 29 March 2015

Easter Rose

Hi there my crafting friends, good to have you back again, this is a new release from Kith and Kin Stamp Company https://www.facebook.com/kithandkinstampco/app_150178545006427 they have been kind enough for us to have the image as a preview to create as we wish to show you the beautiful Easter Rose, so thank you kithandkin, you can purchase her here http://kithandkinstampco.bigcartel.com/product/easter-rose  so go on over to the link and buy it now!


I started by die cutting the image out with Oval Majesty die leaving in all the tiny die cuts, whilst it was still in the die I inked the bottom of the image with Crushed Olive and the top with Tumbled Glass being careful not to go over the image itself.

Being an Easter image I wanted her dress to be a vibrant colour we associate with Easter so it had to be Bright Yellow!!! I coloured her shoes to match and gave her a basket of colourful eggs, the little bunny I coloured in Tan adding a touch of Light Grey to his White fur!

I found this lovely paper in my stash, I wish I could remember where it came from but I thought it matched the image so well I cut it to size, matted and layered it up onto some Green Satin card and Custard card, then attached the image on top.

For the base card I folded a sheet of Custard card in half, cut some Green Satin card to size and embossed it with Grande Floral Embossing Folder then matted this onto the base card, on top of this I added the focal image at an angle.

I was going to gather a lot of flowers together to decorate around the image but these tiny flowers looked so lovely in a circle as a flower wreath, so I kept to the two colours, I have used Green & Yellow! I die cut a small circle out to attach the flowers to then added a couple of White leaves to break them up and I attached it to the card as seen.

Inside the card I added the rest of the beautiful patterned paper I had used under the image to match the front. Adding the Gold letters to make up 'Easter' in the bottom right corner finished the card.


Card dimensions 5"X7". Do go over to http://lilpatchofcraftyfriends.blogspot.co.uk/ to see what lovely creations the other DT members have come up with.

Items Used:

Kith and Kin Easter Rose
Creative Expressions Foundation Card Custard
Create and Craft Satin Card Green
Pretty Paper ( sorry cannot remember where this came from)
Promarkers
Spellbinders Oval Majesty
Spellbinders Standard Circles Large
Sheena Douglass Embossing Folder Grande Floral
Buckwell Craft Supplies Flowers
Sue Wilson Finishing Touches Faux Quilled Leaves
White Card
Tattered Lace Die Alphabet (free with Magazine)
Gold Card

I would like to enter this card into http://craftyourpassionchallenges.blogspot.co.uk/2015/03/challenge-255-always-anything-goes.html


Thank you for looking, Jacquie xxx


Wednesday, 25 March 2015

Mixed Media

Morning my crafting friends, hope today finds you all safe and well, lots of hugs to those who are not.

Now todays post is a bit of mixed media hence the title lol! Nothing was planned I just went with it and tried adding different things to see whether they worked or looked right, overall I am pleased with the end result.


I started with a piece of Kraft card and using a stencil I pasted over part of the stencil in the middle with modelling paste.

Once this was dry I used another stencil called 'textured scraped paint' to brush through some distress inks I then ran it through the embossing folder Harlequin. Using distress inks Weathered Wood, Iced Spruce and Forest Moss I inked around the card but not over the paste part. I rubbed some Cast Bronze gilding wax over the embossed part of the card and buffed this up to a shine.
I wanted to add a stamp to the background and I found this lovely swirl like  grasses so I stamped this up the top left corner with archival ink.

I die cut Medallion Eight out of Rich Green card and used it as a pocket in the bottom right corner after I had threaded some twine through it. 

In my stash I had these parcel tags so decided to us this as the sentiment to go into the pocket. I inked the tag up with Vintage Photo then stamped my sentiment on top.

Using a little more of the Rich Green card I stamped the clock face and hands then die cut out with a circle die, I inked round the edge of this with Vintage Photo.

On some White card I inked up a section with distress inks until I got the desired colour then die cut the frameworks out, this gave a nice two tone look to the frame work. I stuck half of this down across the middle of the card then placed the stamped clock behind it as seen.

In my stash I had two Victorian Metal corners left so I heat embossed these with some Shabby Green embossing enamel and glued these in the opposite corners, by which time I wished I had left them in their original bronze metal state as they stood out far too much.

I cut some Pearlescent Chocolate brown card and embossed it, again using the harlequin embossing folder, I had to extend the pattern once. I had hope to be able to emboss the pattern 'portrait' way like the top card but the piece of card I had was too big for this so I embossed it 'landscape'. I then proceeded to distress around the edges using the edge of some scissors. Once this was done I wrapped around the card some White cord and attached it to my base card, for this I had folded in half an A4 sheet of 'Leather look' cream card. 

This just left the top piece to be attached to the Chocolate coloured card, the White cords matched up with the two metal corners so now they did not stand out as much and it all blended in together. I attached a small key in the bottom left and placed a piece of the Chocolate card inside, this finished off the card.

Items used:

Create and Craft Kraft card
Create and Craft Cream Cord
Dreamweaver Stencil Diamond
Maimen Modelling Paste
Memory box Stencil Textured Scraped Paint
Spellbinders M-Bossibilities Embossing Folder Harlequin
Spellbinders Nestabilities Standard Circles Large
Spellbinders Shapeabilities Die-lites medallion Eight
Tim Holtz Distress Inks Weathered Wood, Iced Spruce, Forest Moss, Peacock Feathers, Rusty Hinge and Vintage Photo
Tim Holtz Sizzix Alterations Frameworks
Creative Expressions Gilding Wax Cast Bronze
Creative Expressions Foundation card Rich Green
Creative Expressions Metal Corner Embellishments Victorian
Sheena Douglass Stamping card White
Sheena Douglass Little Bit Scenic Stamps Silhouette Grasses
Ranger Archival Ink Black
Sam Poole Unmounted Stamps Time Flies
Stix Alteration Tags
Twine
Stampendous Frantage Embossing Enamel Shabby Green
Crafters Companion Pearlescent card Chocolate Brown 
Printable Heaven 'Leather Look' Card Cream 

I am entering this into http://ttcrd.blogspot.co.uk/2015/03/ttcrd-challenge-week-of-march-24th.html
http://lovetoscrapchallengeblog.blogspot.co.uk/2015/03/ltscb-50-anything-goes.html 
http://mmmchallengeblog.blogspot.co.uk/2015/03/the-color-green.html 
http://aurorawingschallenge.blogspot.co.uk/2015/03/challenge-13-anything-goes.html 

Thank you for looking, Jacquie xxx


Wednesday, 4 February 2015

Friends...

Morning my crafting friends, hope this finds you all safe and well? We had a little covering of snow on Saturday but that went on Sunday, since then it has been cold but no more snow as yet, now watch it come down like a blizzard...lol!

(I had bad news this morning as my dear neighbour Joy passed away in hospital, God rest her soul, so this one is for her.)

Today's post was a bit of a quicky card I made, I could have done it better if I had raised the layers up but I wanted to keep it as flat as possible for posting, so of course I went and stuck some flowers on it!!!


I started with some Centura Pearl Ivory card for my base and layered it up with some Lilac Satin card that I had die cut the center with the Auvergne die, on top of this I put another layer of Ivory card that I had die cut using the  next size up of the Auvergne die. For the top layer I used the largest of the Auvergne dies to die cut the aperture and matted this on top. 

On two of the corners I added some flowers and fern leaves, in the opposite corners I added a Pearl.

I carefully stamped my sentiment in the middle  to finish the card.

Items Used:

Creative Expressions Unmounted Stamps Classic Sentiments
Crafters Companion Centura Pearl Card Ivory
Create and Craft Satin Card Lilac
Sue Wilson French Collection Auvergne
Sue Wilson Finishing Touches Collection Fern Trio
Buckwell Craft Supplies Assorted Flowers www.buckwellcraftsupplies.co.uk
Habio Self Adhesive Pearls
Ranger Archival Ink Black

Thank you for looking, Jacquie xxx

Tuesday, 27 January 2015

Congratulations

Morning my crafting friends, a bit of a quick post for you today as I am still not able to craft much at the moment, I am at work all day then I am at the hospital visiting my neighbour each night in between everything else there's the norm, like housework, cooking etc lol! The news is not good, the doctors have told us Joy (my neighbour) wont be coming home, she is very ill and only yesterday they had me ask her whether she would want to be resuscitated should it happen, well obviously she did not wish to discuss that, I don't know how long she has left but I want to see her as much as is possible, its so sad to see her go downhill so fast, only 6 months ago she was mowing her lawns and still driving.  I will try and post as often as possible but if I miss a few days then you know why!!! Please note I will still be looking in on your beautiful creations, just may not have the time to comment.

May I give a very warm welcome to my newest follower Anthony, welcome, good to have you on board, do take a look at his stunning creations on http://themalecardmaker.blogspot.co.uk/, well done Anthony.

Now sorry for all the doom & gloom, this is not what we are on here for and Joy would not want it, so for today's post I did a card just with an embossing folder, glitter, a die and some ribbon.


I recently bought  the Tattered Lace embossing folder by the same name as I loved the doily pattern, I had to cut this down quite a bit to fit it on the card lol! I just wanted to show its beauty by having that on a card, glittered up with just a ribbon across the middle, it was only a last decision to add the die cuts for the sentiment, I cut two out of the same die but cut the Teal one in half and tucked each half behind the White one so it looked almost like its shadow.

I have matted and layered the card onto some embossed White card & more Teal card.

I know the bow covers some of the embossing up but I felt it cried out for a fancy bow, adding a gem in the center finished the card off.

 Items Used:

Tattered Lace Embossing Folder Tattered Lace
Creative Expressions Diamond Sprinkles
Creative Expressions Foundation Card Teal
Creative Expressions Sue Wilson Embossing Folder Garden Lattice
Sheena Douglass White Stamping Card
Versamark Ink Pad
Creative Expressions Silky Crushed Ribbon Aqua
Create and Craft Die-lectables Baroque Ovals
Justrite Large Fancy Sentiments
Tim Holtz Distress Inks Peacock Feathers
Hobby House Ocean Gems

Here is another view of the card for you.


Thank you for looking, Jacquie xxx


Thursday, 13 November 2014

Good Friends

Morning crafters, hope this finds you all safe and well. Thank you for coming and visiting me today, I love to have you here and to read all your lovely comments. 

Well its only six more weeks to Christmas and I say ...HELP!!! No problems with cards, got all those done but presents, well that's another problem. What to buy for people? Last year it was easy this year No!  I shall just have to keep thinking and looking, I keep telling myself only two more pay checks till Christmas lol!

Anyhow, enough of that, todays post focuses all around the bow! Yes you did read that right the BOW! I recently bought the Bow maker as I am hopeless at making complete bows and I love the double bows though this is not one lol! When it arrived I had to try just a basic bow, it came with two reels of organza ribbon in White and Pink so I did both colours together, seeing as I was so pleased with the result I had to use it on a card! This is the card I have sent to my friend whose Birthday is today, so HAPPY BIRTHDAY ROS!

I had already done the stenciled coloured background so I used that along with some paper I had found printed off from Tattered Lace papers CD Rom.


The base card I made using two sheets of Blush card, layered it up with the paper and background and attached the bow in the top left corner. I only wanted to add a sentiment so I stamped my sentiment onto some waste card with Victorian Velvet to keep the Pink theme, unusual for me I know as I don't like Pink but remember it was all about the bow lol! I die cut it using the Die-Lectables Baroque Oval and inked through the die, then decided to add another oval behind it so that one I die cut out of the spare paper and placed it behind the sentiment one as a shadow. I attached both of these using foam pads.

Adding some pearls in two corners and a large pearl on the bow, along with a couple of hat pins the card was complete. Dimensions are 7.5" X 7.5".

Items Used:

Creative Expressions Foundation Card Blush
Creative Expressions Cosmic Shimmers (several colours mixed)
Creative Expressions Unmounted stamps Kind Thoughts
Creative Expressions Large Fancy Pearls
Creative Expressions Pearl Hat Pins
Tattered Lace CD Rom Papers
Clarity Stamps Stencil
Create and Craft Die-Lectables Baroque Oval
Tim Holtz Distress Ink Victorian Velvet
Hobby House Self Adhesive Pearls
Foam pads

Thank you for looking, Jacquie xxx


Tuesday, 28 October 2014

Christmas Platypus

Morning my crafting friends, I hope today finds you all safe and well. I had a lovely afternoon yesterday crafting, it was just so nice to be able to sit, relax and craft with no rush to be getting anything else done lol! The men were both at work so it was peaceful too!!!

As most of you know I am now on the DT for Lil' Patch of Crafty Friends and although the blog posts do not start till January we have been getting acquainted as they say to our many wonderful sponsors and todays post was a freebie from one of them Meljen's Designs Club

the Christmas Platypus so I hope you like it.


 I really enjoyed colouring this in with my Spectrum Noir & Promarkers probably as it was such an unusual image, so as my friend is married to an Australian this shall be their Christmas card lol!

I started by using Kraft card as the base and layered it up with Green miri card. I picked a choice of Christmas papers and embossed the striped, I cut two rectangles of more green miri card and Christmas paper, matted and layered then placed them on the striped paper as seen then wrapped a piece of Red Ribbon around before attaching to my base card. 

After colouring my image I added some Glaze to the beak and feet as well as the Holly leaves and some White Flower soft to the rim and  pom pom of the hat. I die cut using Lables Twenty, matted this onto some Brown paper also die cut with labels twenty, I attached this to the right side of the card on top of the Ribbon. I made a bow using the same ribbon, attached this to some Gold tulle and placed them on the left side of the card.

I have not added a sentiment as yet, not sure whether I will but will decide nearer to sending it out.

The finished dimensions are 7.5" X 7.5"


Items Used:

Create and Craft Kraft Card
Create and Craft Green Miri Card
Papermania assorted Christmas Paper
Meljens Designs Christmas Platypus Digi Stamp
Spectrum Noirs
Promarkers
White Flower Soft
Pinflare Glaze
Fantastic Ribbons Gold Edged Red Ribbon
Spellbinders Labels Twenty
Embossilicous Embossing Folder Regency Swirls


Thank you for looking, Jacquie xxx


Saturday, 18 October 2014

In All Things of Nature

Morning crafters, another weekend is upon us, I do hope its a good one for you and that you have lots of crafting time!

Now when I did my Autumn card that I posted on Sunday, I had used the stencil over the distress inks I had used, with today's card I used it straight onto White card, using again my Versamark Ink Pad and Cosmic Shimmer Precious Pigments, I quite liked the colour that this gave and it was even better when I found some Satin Card and Glitter that matched with it. I apologize now for the long post!!!


 Like my other card I thought this inked stencil was too nice to cover up so I decided on just a sentiment, looking through my stamps I found this sentiment from Sheena Douglass that fitted the bill nicely. I stamped it onto some White card with Vintage Photo, inked through the die again with Vintage photo and die cut using Delightful Circles.

I put some Double Adhesive Tape round the edge of the card and coated it with Glitter, like a Peach colour, then attached this to some Brown Corrugated card.  I made a Base card out of two sheets of Satin card, a Dusky Pink colour, this was double sided with a brighter Pink on the other side but I preferred this shade. I put more Double Sided tape round the edge of more White card and again coated it in Glitter before attaching this to my base Satin card. I then attached the Brown corrugated card on top so the Glitter formed a boarder round the sides.

I attached my sentiment with foam pads to give it some height and added interest then I wanted some leaves to go in the corner, now those of you who are regulars to my blog may remember the maple leaf I made last year, well I was going to make more of these for this card but then thought what about using real leaves from my Acer trees, they are turning lovely colours and yes you may be thinking they would go Brown and die off, well they just might still do that yet lol! I decided to experiment and completely coat each leaf & stem with Glaze in the hope of preserving them as they are. Has anyone else tried this or know of anyone who may have tried it and did it work? I am sure Top  Coat nail varnish will do the same! Perhaps some of you are thinking that's old school, been done before, after all you can press flowers, sorry if this is the case. When I took the photo of this card (Tuesday) the leaves had been on for a couple of days and still looked okay? I am hoping they stay that way as I think the natural leaves look great I have done the same with more of the leaves and leaves from another plant that has changed colour so if it does work I have a stash of them. Although I do not like stripping my Acers of their leaves they are due to be blown off by the wind very soon so I may as well make use of them!!!
I will add a bit on the end of this post before it goes 'live' to let you know how they are doing lol!


There you have the finished card, dimensions are 8" X 8".

Items Used:

Create and Craft Double Sided Satin Card
Create and Craft Glitters
White Card
Lidls Corrugated Card Brown
Joanna Sheen Signature Stencils Oak Leaves
Creative Expressions Cosmic Shimmer Pigments Precious Set 1.
Spellbinders Delightful Circles
Tim Holtz Distress inks Vintage Photo
Sheena Douglass Little Bit Scenic 'Silhouette Country Lane'
Leaves from my Acer Tree.
Pinflare Glaze


Here is a picture of my Acer tree, its now 20 years old and although it looks a bit bare its still going strong and its always been in a pot! I almost lost it last year, thankfully this year it turned a corner! I have another Acer that I have also had for 20 years with the fine feathery leaves that are turning yellow.

My Red Acer                                                                          My Yellow Acer   
                                                

Friday: I am happy to report the leaves are the same, they have not altered in anyway.     
                                                        
Thank you for looking, Jacquie xxx

Tuesday, 30 September 2014

Good Friends...

Morning crafters, thank you for joining me today, cannot believe its the last day of September already doesn't time fly? As well as the dark nights and mornings we have the cold creeping in too now, winter is on its way lol! Just thought I would cheer you all up on this fine Tuesday morning lol!

I have given you a rest from Christmas today, quite an easy card to make...


I folded in half a sheet of Pale Blue/Green Satin card for my base and matted it up with some Gold paper, these papers were from a pad I had a couple of years ago for Oriental papers, sorry I cannot remember where from.

I die cut the Californian Background out of White card , I taped the back up so the die bits stayed in and attached this to the Gold flowered paper and wrapped some Salmon coloured Seam Binding Ribbon round before matting onto the base card. I made a bow out of the same ribbon and stuck it on the right hand side of the ribbon.

In my stash I had some die cuts already cut out, one in Brown card and one with a verse on so I used these as my focal point. I did ink round the verse so it would match colour wise.

I finished my card by adding a Iridescent gem on top of the bow.

Items Used:

Create and Craft Satin Card
Oriental Papers
Sue Wilson California Collection Background Die
Spellbinders Lables Twenty-Eight
Spellbinders Lables Twenty-Two
Lidls Brown Card
White card
Creative Expressions Unmounted Stamps Kind Thoughts
Tim Holtz Distress Ink Black Soot & Vintage Photo
Create and Craft Iridescent Sparklet Gems

Thank you for looking, Jacquie J xxx

Sunday, 28 September 2014

Victorian Christmas Carol Singers

Morning crafters, hope you are having a great weekend, thank you for joining me here today its lovely to have your presence.

About a month ago I ordered some dies from C&C and they finally arrived this week after much complaining from me about the courier service seeing as they had stated on their tracking service it was out for delivery two days after I had ordered, they had hung onto my order for almost a month before delivering it, I must say I have had trouble with this same company for years, I have complained to C&C about them, it took them 4 months to return a parcel back to them once!!! It makes me very susceptible about ordering anything from there because of it but hey ho! My rant over now for todays card...


These were the dies I had been waiting for, I knew the look I wanted but failed to get it lol! I am going to try again but in a different way, I wont show that one till a much later date lol! I was trying to get the look of a few carolers around the lamppost in the background but made a right mess of it! Still it turned out to be quite an atmospheric card, ghost like as my son told me lol!

Items used:

Create and Craft Female Caroler
Create and Craft Male Caroler
Create and Craft Silver Miri card
Create and Craft White Textured card
Anne Marie Designs Victorian Christmas Stamps (Lamppost)
Tim Holtz Distress Inks Pumice Stone & Black Soot
Promarkers
Spellbinders Captivating Squares
Sentiment Computer Generated

Thank you for looking, Jacquie xxx

Saturday, 20 September 2014

Twisted Bauble

Hi fellow bloggers, lovely to see you again today. 

Remember I said I would show you today the card I made with the off cuts from Thursdays card, well here it is...


Quite simple to make, my base card was 6"X6", I matted up with the remaining Purple card. The Gold Satin card I embossed along with the Gold bauble die cut and matted and layered these on top of each other, turning the baubles round a little each layer to add interest.

I added some Gems I coloured with a Promarker and a little bow at the top of the larger bauble, the sentiment I stamped on the smaller die cut with my versamark ink pad and heat embossed with Gold embossing powder. There you have the finished card.

This must be one of the quickest cards I have ever made, as most of the elements were already cut out! In hindsight I think it would have looked better if I had raised the layers but hey ho!

Items Used:

White 6"X6" base card
Crafters Companion Centura Pearl Pastel Card-Purple
Create and Craft Satin Gold Miri Card
Hunkydory Diamond sparkles gems
Tattered Lace Embossing Folder-Fretwork Lace
Papermania Embossing powder Gold
Crafty Impressions Clear Stamps
Purple Bow (own stash)

Thank you for looking, Jacquie xxx

Thursday, 18 September 2014

Purple Poinsettias

Morning my crafting friends, hope today finds you all well? Thank you for looking in on me today its very much appreciated and please feel free to post a comment I would love to hear what you think of my creations.

Good luck to all those up in Scotland today, I hope you get the vote you want.


For todays post I got the old faithful Christmas bauble dies out again, I wanted to use my Purple Pearlescent card but only had one sheet left which meant not much matting & layering, I got round it by adding the one and only embossed Purple card I had with the swirly pattern on, I had three sheets of this Satin Gold Miri card left so I used that as the base card followed by the swirl embossed card, more Gold card, which I edged round with double sided tape and added glitter, this made it look like another layer!Then the sheet of Purple Pearlescent on top of this. I die cut the Christmas Ornaments 2011 out of the Gold & Purple card so you see the card behind and die cut the smaller one in Gold for the sentiment.

From the off cuts of the Gold, Purple & Purple Swirl card I die cut the Poinsettias and leaves, adding some glitter on the vines of the leaves and inking the flowers with Shaded Lilac. To finish the flowers I added a sparkly brad in the center of each flower, Gold for the Purple and Purple for the Gold. I placed these round the edge of the die cut Bauble, leaving just one for the other side. I stamped my sentiment onto the small Bauble with Versamark then heat embossed with Purple embossing powder, attaching this to the center finished the card. Dimensions are 8"X8".

Items Used:

Create and Craft Satin Gold Miri card
Hunkydory Swirl Embossed Card Purple
Crafters Companion Centura Pearl Card Pastel-Purple
Double Sided Adhesive
Purple Glitter 
SB Layered Poinsettias
SB 2011 Heirloom Ornaments
Crafty Impressions Clear Stamps
Papermania Embossing Powder Purple
Papermania Large Glitter Brads
Tim Holtz Distress Inks Shaded Lilac

I will show you the card I made from the offcuts on Saturday.

Thank you for looking, Jacquie xxx

Friday, 13 June 2014

Thinking of You Flourish

Morning my crafting friends, thank you for joining me here again today I do appreciate it.

I have decided to keep my posts a bit more brief as it takes up so much time explaining what I have done it leaves little time to craft what with work, house and pets, if you know what I mean so please do ask if you ever want to know more detail, this way I may manage to get a few more cards done lol!

Thank you for all your wonderful comments for my last post.
Hazel & Suzie-thank you for your kind comments on my role as an LSA, much appreciated, its not always easy and we are sometimes used as doormats but then there are sometimes rewards such as appreciation from some kids.
Janice- You must get that Cd out lol!  Wonderful images on there.
Ang-Safari ooohh lucky you, I have always wanted to go on one of those, would love to stay in those huts high up where the Elephants come of an evening, I would never go to bed lol!

Now for todays card...


This card was made using scraps out of my scrap box apart from the Base card which was a sheet of Kraft card! Once I was happy with the colour of card it was quite a quick one to make.

Items used:

Create and Craft Kraft Card
Crafters Companion Centura Pearl Ivory Card & Pastel Blue Card
Creative Expressions Unmounted Stamps Classic Sentiments
Kanban Kandi Core Card Aqua
Lidls Orange card
Papermania Gold Embossing Powder
Tattered Lace Large Flourish
Spellbinders Labels Twenty-Five
Spellbinders Radiant Rectangles
Tim Holtz Distress Ink Vintage Photo
Sheena Douglass Embossing Folder Indian Ornate Screen

Thank you for looking, Jacquie xxx


Monday, 9 June 2014

Scotland Stag

Morning crafters hope this finds you all safe and well? Thank you for visiting me today I do appreciate it, please do leave a comment and a link if you have one so I can return the favour.


I recently purchased the Card Creations 'Brush Strokes in the Wild' CD Rom, there are some fabulous images on there and this one of the Scotland Stag is one of them, I love the scenery behind him, magnificent. I tried to fit the colours of my card/paper in with the colours from the image so I used:


Create and Craft  Silk Finish Card Brown
Create and Craft Double-Sided Satin/Miri Card Peach
Create and Craft Adhesive Velvet Paper Dark Blue
Kanban Foiled Card Brown
Card Creations CD Rom Brush Strokes in the Wild Scotland Stag Image & Backing Paper

I matted and layered up the image, card & papers as seen. I wanted to use a Dark Blue card to match the image but I did not have any, luckily I found the Adhesive Velvet Paper that I had for quite a few years so that did the trick. I attached the image in the center to off set the backing paper.


Thank you for looking, Jacquie xxx