Followers

Total Pageviews

Showing posts with label John Lockwood. Show all posts

Friday, 8 April 2016

Bluebells

Hello my crafting friends, great to have you with us today please do leave a comment so I know you have visited.
I would love to know what sort of craft some of you enjoy the most, is it card making, canvas, home decor? Or maybe sewing and knitting might be more your scene. Do you like Mixed media or vintage or maybe die cuts to messy crafting? Lots to think about but I would love to know, there is so much out there at the moment.

Well today is the last day of my school holidays for a while so although I have loved posting more often it will no doubt go back to 2 or 3 times a week as I wont have as much time to craft, oh how I would love to give up work and be able to craft all day lol!

Today's post I created using some of Sheena's older stamps, I am ashamed to say I have some that I have never got round to using yet and this Bluebell on is one of those, I must say I shall most definitely be using again.
I have always loved walking through the woods to see the Bluebells once they come out so this was my inspiration of that, they have always been one of my favourite flowers since I was a child and they bring back lots of happy childhood memories and they have the most gorgeous scent too lol!


I started with a piece of Sheena White Stamping card cut to size then I stamped Sheena Floral Fantasy Bluebells & Daffodils stamp just once with Black Stazon and painted over it with Pebeo Drawing Gum, once dry, which only takes a couple of minutes, I then proceeded to stamp the Bluebells twice more each time painting with drawing gum. So in all I stamped the Bluebells three times. I was happy with that amount but you could do more.


I then took the Yellows and Greens from the Aquatints Bright & Beautiful and Pastel sets and the Blue from the Pastel set. I painted the sky in with the Blue first followed by the Pastel Yellow, B & B Yellow, Pastel Green and finally the B & B Green at the bottom, I then brushed a wet paint brush over to blend the colours together and dry with a heat gun.

For the background I love this little stamp from Sheena's Perfect partners Enjoy the Silence, I have used this many times, as if you did not know already lol! I think its lovely for scenes as it shows perspective and depth of field. So I stamped the little trees on the hill in the background so the branches were over the sky area, this stamp gives a wide print of the ground area but as I still had the drawing gum on my Bluebells that did not matter as once the gum was removed the trees would be behind the Bluebells. I mixed a little Yellow & Green from the B & B set of Aquatints and painted over the trees lightly.


With a little of the Green from the Bright & Beautiful set I painted over the Grass stamp from Sheena's Enjoy The Silence stamp set and stamped the grasses in three places, one being right over to the left so it would look behind the Bluebells. If you find the Aquatint is too runny just clean the stamp then go over the stamped image again with no ink on the stamp and this removes some of the ink but leaves the image. 

Now I removed the Drawing Gum by rubbing it off gently a bit at a time making sure it was all off. I then mixed a little Green & Light Brown from Aquatints Landscape set to make a darker Green to paint the leaves of the Bluebells with, if you go over the edge of the stamp at all just faux bleach it with a little water and dab it dry with some kitchen towel straight away and this will remove the excess paint, this should work with Aquatints or Distress inks as they are both water based. I repainted the areas of the leaves I wanted to look a little darker to add some depth. I then took the Purple from the Bright & Beautiful set of aquatints and painted the flowers, I know they are 'Blue'bells and I could have painted them with the lovely Blue but real Bluebells are a more of Purple colour so I went with the Purple. I did paint over the top of the flower heads again to make them darker but I was not getting the depth I wanted so I then went over  the flowers with Spectrum Noir Professional Colouring Pencils just in the areas I wanted darkened, I was quite pleased with the results this gave.

To finish the card I added a sentiment from Creative Expressions John Lockwood Daisy Chain Elements stamp set along with the Happy Birthday sentiment from the same set with Black Stazon.

I mounted it onto Black Card then onto my base card, there you have the completed card. I hope you like it as much as I do?


Thank you for looking, Jacquie xxx


Monday, 15 June 2015

Feathered Daisy and some really exciting news!!!

Hello my crafting friends, good of you to join me today. Well I have some exciting news to share with you, as some of you will know I have always loved Sheena Douglass products, have bought plenty and have posted cards made with her products on here in the past, well now I am ecstatic to announce that I have been accepted on Sheena's Design team, I was so gobsmacked when I received the phone call from none other than the lady herself to tell me I had been accepted as an inkoid! Sheena has taken on four new DT members and over the last couple of days we have all been getting to know the rest of the DT, such a great friendly bunch, so get ready for more of Sheena's' great art work being presented on here in the future. I could have screamed with delight when asked believe me lol!

I have more exciting news but that is in a couple of weeks, I like to tease lol!

Well that's my exciting news now onto todays post, it's not a Sheena production though I am in the middle of some but this is one I made last week and thought it about time I put it on here.


I started with a sheet of Pearlescent Teal card and folded it in half, trimmed to size then die cut the bottom using curved boarders two. I measured to fit a piece of White Linen card and die cut this at the bottom again using curved boarders two.

Using my Versamark ink pad I stamped up the Feathered Daisy stamp, stamped onto the card at an angle and heat embossed with white embossing powder. I coloured the feathers in by stenciling Forest Moss over them gently. I coloured in the Daisy and the Peacock eye with Spectrum Noir pens. I then stamped the daisy again onto more White Linen card, heat embossed it the same way, coloured that in and fussy cut it out and attached it on top of the Daisy stamp turning it slightly to show the daisy underneath and to give the card some dimension.

On the right side I stamped the sentiment from Daisy Chain Elements Clear stamps using Forest Moss.

I matted this onto the Teal Pearlescent card and there you have the finished card. 

Items Used:

Crafters Companion Pearlescent Teal card
White Linen Card (own stash)
Heartfelt Creations Craft Dies Delightful Daisy
Heartfelt Creations Cling Stamps Feathered Daisy
Papermania Embossing Powder Seafoam White
Spellbinders Boarderbilities Curved Boarder Two
Tim Holtz Distress Ink Forest Moss
Spectrum Noir Pens
Creative Expressions John Lockwood Clear Elements Stamps Daisy Chain Elements.


Thank you for looking, Jacquie xxx
Sunday, 24 May 2015

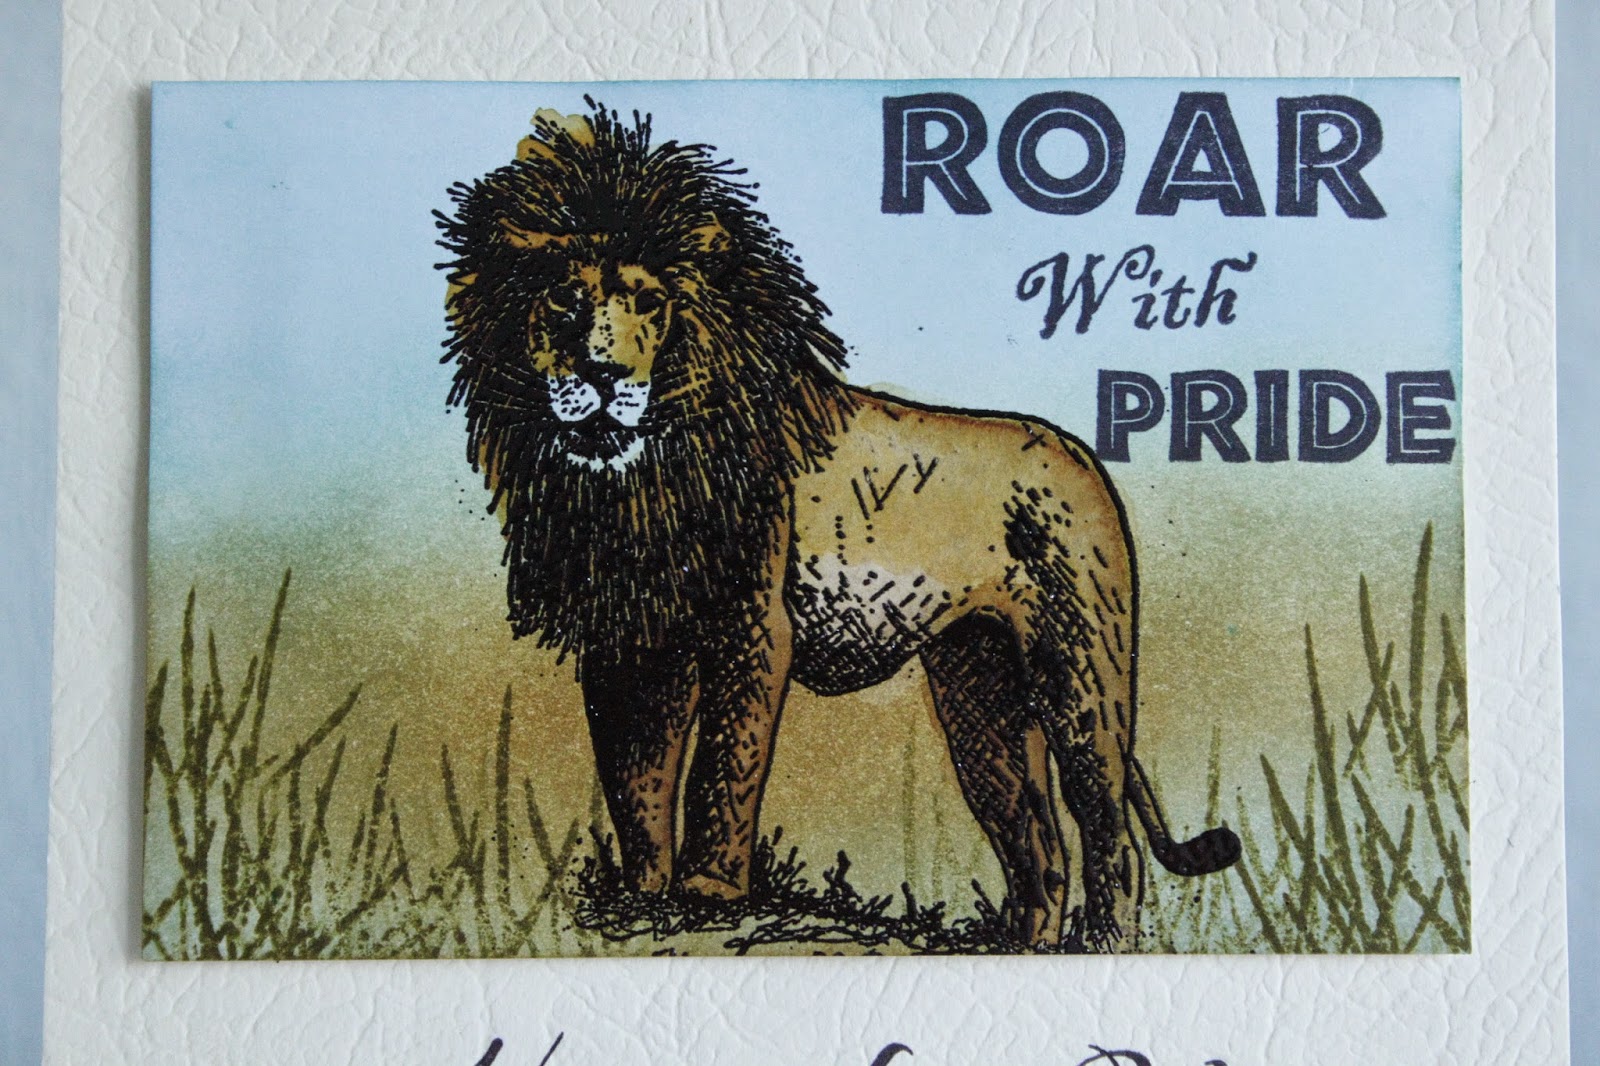
Roar with Pride

Morning my crafting friends, hope you are having an enjoyable weekend, there are plenty of hugs going round to those who need them right now.


I decided to have a play yesterday and do a sort of CAS card, one layer. I have a few stamps I bought a while back that I have not used yet, this being one of them, and I thought they would do as a male card.

I got my card base ready and cut to size then measured a piece of White card to the size I wanted.

Using distress inks I started blending them together to form the background then stamped the grasses from John Lockwood's Daffodil  Elements stamps, these are so handy! Next I inked up my Lion stamp with my versamark ink pad and heat embossed it with Black embossing powder.

I got my Aquatints water colours and mixed the Orange and Browns together until I got a colour I was happy with and painted him in as seen. 

I stamped my sentiment at the bottom of the base card, attached my image with foam tape and there you have the finished card.

Items Used:

White card
Printable Heaven Leather card Cream
Tim Holtz Distress Inks Bundled Sage, Brushed Cordroy, Tumbled Glass and Peacock Feathers & Forest Moss
Spectrum Noir Aquatints 33, 35, 39 & 42
Sheena Douglass Little Bit Sketchy Stamps-Roar
Papermania Embossing Powder Black
Creative Expressions Unmounted Stamps Friends Sentiments
Creative Expressions John Lockwood Element Stamp Daffodil Elements ( Grass)
Ranger Archival Ink Black

Thank you for looking, Jacquie xxx

Monday, 18 May 2015

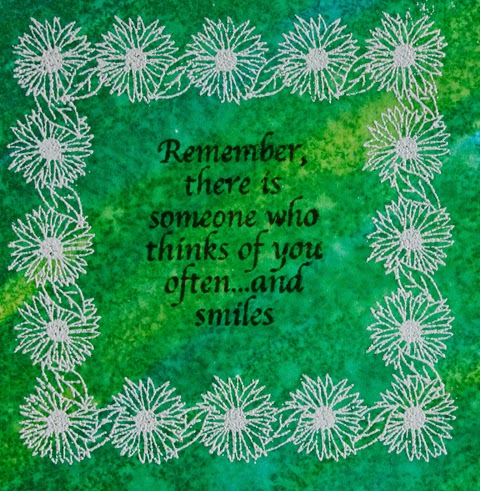
Remember...

Morning my crafting friends, hope today finds you all safe and well, have you had a good crafting weekend? I managed to make two small cards on Saturday but my time is limited at the moment.

IF ANYONE WOULD LIKE TO JOIN THE DESIGN TEAM ON LITTLE PATCH OF CRAFTY FRIENDS THERE IS A PLACE VACANT. JUST E-MAIL DENISE AT  lilpatchofcraftyfriends@gmail.com             you only have to do a card once a month, there are two teams and the challenges go out every fortnight, its always Anything Goes so not anything difficult and we have a load of fabulous sponsors.

This was one of the two I made...


I started of with a piece of White card and painted over the top with the Blue & Green Aquatints, I then sprayed water over the top and blotted dry, I was quite pleased with the result so did not wish to cover it all up. 

I decided just to stamp a couple of John Lockwood's design stamps so I stamped the grass at the bottom in two different shades of Green distress inks, Forest Moss & Crushed Olive, then using my versamark ink pad I stamped the square daisy chain and heat embossed with White embossing powder.

In the center of the Daisy Chain I added the sentiment using Forest Moss distress ink.

I matted this onto a plain White base card and there you have the finished card. Dimensions 4"X6".

Items Used.

White Card
Sheena Douglass Spectrum Noir Aquatints Bright & Beautiful
Creative Expressions John Lockwood Clear Stamps Daisy Elements
Creative Expressions John Lockwood Clear Stamps Daffodil Elements
Versamark Ink Pad
Papermania Embossing Powder Seafoam White
Tim Holtz Distress Inks Forest Moss & Crushed Olive


Thank you for looking, Jacquie xxx

Sunday, 10 May 2015

Daisy Weave

Hello my crafting friends, hope you are all having a great weekend. Haven't we had some strong winds of late, the beautiful blossom on my Cherry Blossom tree has been blown away, only had the beautiful flowers a few days this year, mind you the drive and cars look pretty!!!

May I give a very warm welcome to my newest follower Lynn (aka LynnPenguin), thank you for joining us its lovely to have you on board.

Yesterday I had my delivery of John Lockwood stamps so I had to play, I have to admit I cheated a bit, watching John's shows Nigel May commented on the Daisy striplet and that he would cut it up and weave it, well sorry Nigel I had to give it a go so I decided on using Custard & White card.


I started with my base card, 6"x6" White scalloped card and cut a piece of Custard card to size.

On some White card and more Custard card I stamped the Daisy Quilt Striplet twice on each card using Black Archival ink then cut it into strips. Now I have never tried to do weaving before so was not sure how I was going to do this!!! I decided to start by gluing the tops of the Custard strips onto the piece of Custard card I had cut to size but leaving a gap round the edge of the card as I wanted to put a frame on top of the weave. I then took each of the White strips and weaved them one at a time in between the Custard strips pushing them up as far as I could, it was a bit fiddly but I got there in the end.  I trimmed the excess from the edges and taped them down with double sided adhesive. 

I then made a frame out of White card so it was just a tiny bit smaller than the Custard card, I cut out the middle using a craft knife and embossed the frame with Knotted Trellis, I now wished I had left it plain or just embossed a line inside it as I think the pattern is too much for the weaving and maybe being plain would have showed the weaving up more.


With the excess bits I had cut of from the weave strips I managed to cut 12 squares so these I coloured, the White in Yellow and the Custard ones in Orange, I then attached these with Foam pads on top of parts of the weave in random places so they protruded out of the card, I felt this added some depth and interest.

I did not wish to add a sentiment as I felt it may spoil the look but just added a Yellow & Orange bow, keeping to the colour scheme, in the bottom left corner and then added two of WENDY'S beautiful stick pins to finish it off.

Thank you Nigel for the idea and John for the inspiration and wonderful stamps. Now its your turn John, I know you can make a better job of it than me lol!

Items Used:

6"X6" White Scalloped Edge Base Card
Creative Expressions Foundation Card Custard
Creative Expressions John Lockwood Stamps to Die For Daisy Quilt Striplet
Creative Expressions Sue Wilson Embossing Folder Knotted Trellis
Spectrum Noir Pens
Foam Pads
Yellow & Orange Ribbon
Ranger Archival Ink Black
White Card
Wendy's Stick Pins


Thank you for looking, Jacquie xxx

Wednesday, 15 April 2015

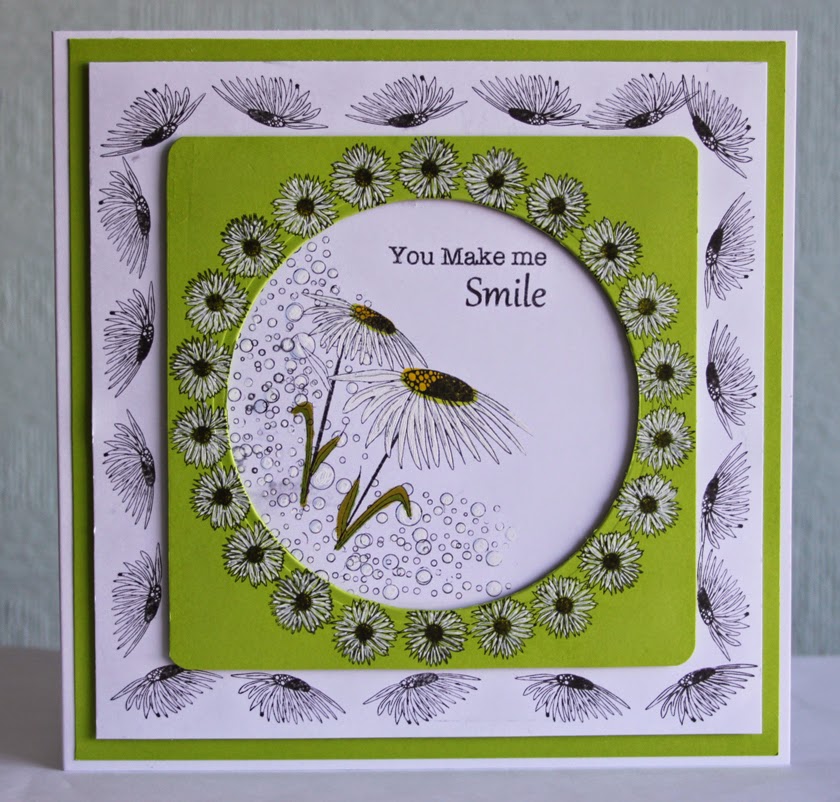
Daisy Chain Circle

Hello my friends, good to have you back with me again today. Hope you are all okay? Lots of hugs going to those who are not.


I have been playing again with these lovely stamps designed by John Lockwood, I adore Daisies and I loved these with the Bubbles around them, yes John I have added more bubbles lol!

I decided I wanted to make a Daisy Chain and as one of the stamps is a small Daisy off I went...It bought back many happy memories sitting in my Mom & Dad's front garden on the lawn which was full of Daisies and we would pick them and see who could make the longest daisy chain, simple I know but happy times.

So I started by cutting a piece of Spring Green card and die cutting a circle from the center, to work round otherwise it would not have been a circle!!! I stamped each Daisy so the petals were touching and was quite pleased with how it came out equal, I did not have to leave a gap or push one in lol!
I coloured these in with a roller ball pen in White and a Promarker pen in Yellow for the center although this does not show up to well. The pen coloured these in lovely, you could use paints or other White pens. I liked the way this looked.

I cut a piece of White card to size then choosing another of the stamps I stamped around the edge using Black Soot to give a boarder, I did not count this one out so well as the bottom is one short! Placing the Green card on top I marked out where to stamp my image for the center of the card. Taking the Green card away I stamped my image but decided I wanted more bubbles, can we have a bubble stamp on its own John without an edge please, or maybe there is one in your other sets, I shall have to look lol! This stamp does have an opposite corner with just bubbles but as it was in a frame I had to keep cleaning the edge so it did not stamp onto the card, there is a little smudge just under one of the stems of Daisies where the stamp was still too wet from me cleaning it, I did the best I could to cover it up but it is still visible lol! I proceeded to paint the petals using the White Roller Ball pen and Promarkers for the rest of the Daisies. The bubbles I coloured the edge using Promarkers then coloured them in again with the White Roller Ball pen.

I stamped my sentiment at the top then matted and layered it all with Foam Tape onto my base card which I had matted with another piece of Spring Green card.

On the inside I lined it with more Spring Green card and made a boarder  for the edge using the same stamp I used for the boarder on the background. I cut a circle out of White card to place on the inside for a message to be written on. There you have the finished card. I am quite pleased with it, do tell me what you think, good or bad.

Items used:

Creative Expressions John Lockwood Stamp Set - Daisy Corner
Creative Expressions Foundation Card - Spring Green
White Card
Roller ball Signo Pen - White
Promarkers - Canary, Lime Green, Forest green, Pear Green and Pastel Blue
Spectrum Noir - GG1
Spellbinders Standard Circles Large
Tim Holtz Distress Ink Black Soot
Foam Tape

Thank you for looking, Jacquie xxx


Friday, 10 April 2015

Daisy Birthday

Morning my crafting friends, I hope today finds you well and a BIG thank you for visiting my blog today, its always lovely to have you here, please have a browse round, it would be lovely if you could leave me a comment on what you think before you leave and I would love for you to visit me again.

I would like to give a very warm welcome to my newest follower Traci, great to have you on board. Traci has a wonderful blog of her own so please do go over and give it a look, you can find it HERE

Now todays post...


I bought these Daisy stamps designed by John Lockwood a while back, this is the first card I had made with them. Quite a simple card, I wanted the aperture on the front to show the beautiful stamp on the inside and I think it worked by framing the top aperture with a different colour. I had to cut the aperture out three times, the base card, second layer and top frame using two of the dies from Labels Twenty Six, thankfully I managed to match them all up, its hard to see the second layer as I used White hammer card and pierced round the edge.

I love the tiny bubbles around the Daisy, just right for adding little pearl drops as I have done here in White.

I coloured the Daisies in with Promarkers and Spectrum Noir pens using a lovely bright Yellow, Orange & Green, loved how this went with the Teal colour of the frame.

To finish the card I added some PVA Pearl drops on the front of the card as seen.

Items Used:

Creative Expressions John Lockwood Stamp Set- Daisy Corner
Basic 6"X6" White Base Card
Soho Creative Hammer Brilliant Card
Crafters Companion pearlescent Card- Teal
Spellbinders Nestabilities Labels Twenty Six
Cosmic Shimmer Pearl PVA- Cosmic Pearl
Promarkers
Spectrum Noir
Piercing Ruler

Thank you for looking, Jacquie xxx