Pages

Wednesday, 30 December 2015

First Book Folding!

Hello my crafting friends, I hope you have all had a wonderful Christmas, didn't it go quick!!!? Did you get what you wished for? I have to admit I think I got almost all that was on my list including more! One thing I did get was a light tent so hopefully once I find somewhere to set it up I may get better pictures of my cards lol!!

I will post the cards I made for my Son & Daughter later in the week but today I am posting the book folding I made for my daughter, I would have liked to have decorated it more but my daughter does not like anything fancy, she prefers plain and simple so that is what she got! She seemed pleased with it anyway. So may I say 'Jan I finally made it, THANK YOU for the pattern, I shall now have to go and buy the book!lol!'  I was commenting on a lovely book folding that my friend Jan made one day and mentioned I would like to do one of these with my Daughters name as we could never get anything with her name on unless it was handmade and lovely as Jan is she sent me the pattern for the letters for my Daughters name, bless you Jan. I did make a couple of mistakes and its not perfect but I was happy with it being my first attempt!


As you can see I chose not to decorate around the letters I just covered the book with some script paper and placed a strip of ribbon down the edge of spine and left it at that, I left the excess pages in as my Son said he preferred it with them in so as the inside cover was tatty we stuck the first page to the inside of the front & back cover

Once I had finished the letters I rubbed some Gold Gilding Wax over the edges of each page, yes I did do every page lol! This made the letters stand out a bit more. In this image it does look like there is a gap in the letter 'y' but there isn't, it is how the book is standing and how I took the image, sorry!

With the second image you can see the script paper which had Gold snowflakes over it too and you may just be able to make out the Blue & Black ribbon I placed down the edge of the spine.

I do hope to make a couple more for friends of my Daughters who have just had babies and have given them unusual names but I have to buy the book first lol! Its a case of watch this space!


Thank you for looking, Jacquie xxx
 

Saturday, 19 December 2015

Wishing you all a Very Merry Christmas and Dazzle Snowflake

Hello my crafting friends, I do hope you are all safe and well and ready for the big day. I have decided to make this my last post of 2015 so I can concentrate on last minute preparations before we go to my Daughters for Christmas so may I take this opportunity to WISH YOU ALL A VERY MERRY CHRISTMAS and a  HAPPY NEW YEAR.

I hope to be more organized next year and my new year resolution will be to start making my Christmas cards all year, that way by next Christmas they may be all done lol! Watch this space!!!

Today's post is of one of the few Christmas cards I have managed to make, this one was for my dear friend, I liked it so much I have made a few more like it for my Family members!!!

This was inspired by Sue Wilson's design which you can view HERE, it is very similar but not exact but I loved the design so I went with it.


I matted up my base card with some Blue hammer card. Using the shaving foam technique, which you can find HERE  I made the background, I used two different Blues from my Aquatints paints ( I also made some using two Purples) in my shaving foam, I cut to size and stuck a piece of Double Sided Adhesive sheet over the top and coated it with Micro beads then matted this onto my card. I matted up a small rectangle of Blue card onto a piece of White card and placed this in the centre of the card.

I die cut  some snowflakes out of White card and some Dazzle miri card, mounted them together and attached it in the center of the card. In the middle of the snowflake I added a Blue crystal gem. This finished the card.

Items Used:

White Base card
Blue Hammer Card
Aquatints Bright & Beautiful & Pastel sets
Shaving Foam
Spellbinders Create a Flake die
Spellbinders Snowflakes die
Hunkydory Dazzle Miri Card
White card
HobbyHouse Blue Ocean Gem 
Double Sided Adhesive Sheet
Creative Expressions Micro Beads


Wednesday, 16 December 2015

Secret Santa!

Hello my crafting friends, so sorry for the long absence again, seems to becoming a bit of a habit lol!

I hope this finds you all safe and well and maybe prepared for Christmas, I am nearly there, present wise at least, still have the food side to sort out but hey shops only close on Christmas day so why worry?!!!

I thought I had posted this project but looking back I see I haven't so here it is!!! It was my Secret Santa present to a work colleague.

I started with two wooden frames and pasted through a stencil with modelling paste and left to dry overnight. I then painted the frames Black and left to dry.


Once dry I lay the stencil over the design again and rubbed Gold Gilding Wax over the pasted design to highlight it then rubbed a little more over the edges of each frame and left to dry.

I then set about making the box to fit, I was hoping to fit them both in one box but  with the size of the frames the card was not wide enough to have a deep box, it only just made being wide enough for one box per frame!

I chose my A3 size card, measured it against the frames to make sure I got the right size and cut off the little bit of excess. I then got my score board and made the box to fit.


To add that bit of luxury I placed a sheet of tissue paper inside each box to wrap the frames in, I placed the two boxes together and tied them up with a big White bow. Using the excess card I had cut off earlier I made a gift tag to match.
There you have the finished gift and it was well received, she loved them.

Items Used:

Wooden Frames-any size
Sheena Douglass Stencil Ornate Swirls
Acrylic Paint Black 
Gilding Wax Gold
Blue Tissue Paper
Crafters Companion A3 Double Sided Centura Pearl Christmas Card 
Crafters Companion Score Board
White Organza Ribbon

Thank you for looking, Jacquie xxx

Tuesday, 8 December 2015

Wishing you a wonderful joy filled Christmas

Hello my crafting friends, I cannot believe it has been a week since my last post, I am so sorry, where does the time go!

I am afraid this will have to be a quick post as just about to leave for work, whoops!!! 
May I take this opportunity to wish each and everyone of you who came to visit my blog through out the year and those who will come to visit my blog a VERY MERRY CHRISTMAS and a  HAPPY NEW YEAR.


This is another Christmas card showing the lovely Poinsettias but not in their usual colour, I wanted to try them in Purple so off I went lol! These were made using two different colour distress inks then adding a little pearl in the center of each flower. I really liked this colour combination.

The background was Gold, glittered Miri card matted onto the base card then the top layer was Lilac card that had been embossed with a snowflake embossing folder then the aperture die cut out, the sentiment was also die cut from the same set of dies, the sentiment was stamped in Seedless Preserve DI to match the flowers and the leaves were also stamped through the die with the same DI to match.

Items Used:

Spellbinders Poinsettia die
Spellbinders Oval Majesty
Tim Holtz Distress Inks Seedless Preserve and Shaded Lilac
Tattered Lace Snowflake Embossing Folder
Dreamees Pearls
Papermania Silent Night Clear Stamps


Thank you for looking, Jacquie xxx

Tuesday, 1 December 2015

White Poinsettias

Morning my Crafting friends, well December is finally here, still cannot believe how quickly this year has gone. have you done all your Christmas shopping yet? I still have a few items to get but those will have to wait till next pay day lol!

On Saturdays post I showed you a card inspired by Pamellia, well I loved the background so much I made two cards so today I am showing you the second one.


I made the background the same way by splodging Aquatints pastels onto the card using the Blue & Green, mixing them round till you get your desired effect. I distressed the edge of the card with scissors.

Through a metal grid I added some modelling paste and let it dry before adding embossing powder, now as I did this the same time as the other one I obviously made the same mistake, you should put the embossing powder on top of the wet paste then let dry before heat embossing that way you wont get the embossing in between the circles like I did! I matted this onto some card I had coloured with just the Blue Aquatint then splattered a mixture of Acrylic White paint and water over the whole card.

I die cut some Poinsettias out of some canvas and added a crystal gem in the center of each one then placed them in the bottom right corner along with some Christmas foliage, the branches were just painted green, the Holly leaves were cut out of Rich Green card then Silver gilding wax was applied on top to give a frosty appearance.

I added a little sentiment at the top and a little swirl behind the branches and there you have the finished card. As I said on Saturday's post I shall try this again but put the embossing powder on the paste before it dries lol!

Items Used:

White Card
Spellbinders Poinsettia
Spellbinders Holly Leaves
Sheena Douglass Perfect Partners Christmas Foliage  
Aquatints Pastels
Galleria Modelling Paste
Hobbyhouse Sparkly Gems 
Embossing Enamel
Canvas Material 
Gilding Wax Silver


Thank you for looking, Jacquie xxx

Saturday, 28 November 2015

Mixed Media Christmas card

Hello my crafting friends, so good of you to come and visit me today. This is going to be a quick post as I am off to Norwich today for a bit of Christmas shopping, can't wait!

I have started my Christmas cards, very late for me but had not time at all before, so I have been playing. This card was inspired by the lovely Pamellia, I saw her beautiful creation and just had to try my own as I loved it so much, you can find Pamellia's HERE its not quite exactly the same but close, thank you Pamellia for your inspiration.


I started by colouring in a piece of card with Pastel Aquatints using the Blue & Green and once dry applied some modelling paste through a metal grid and let that dry overnight, this is where I went wrong as I wished I had sprinkled the embossing powder on top of the wet paste then left to dry before heat embossing it that way it may have stayed only on the circles and not the places in between which I think look a bit messy. I am going to do it again that way so at some time I shall show you the results lol!

I heat embossed it with enamel embossing powder then I distressed the edges of the card a little. I took another piece of card and painted that with Aquatints but using just the Green, once dry I distressed the edge of this too. I matted this onto my base card with Foam tape and attached the top piece too.

I die cut some Christmas Fir branches, Holly leaves, Circles and Reindeer  out of various colour card, the reindeer I inked up and covered with Deco art Glamour dust, the circles I inked with Distress inks Forest Moss and Tumbled Glass, the Holly leaves I rubbed Silver gilding wax all over to add a frost look, I may have over done it a little lol!!! I attached all these on to the card as seen adding a white swirl I found in my stash just under the fir branches.

I coloured some White seam binding with Crushed Olives Distress Ink and made a bow, I did try crushing this by wetting it but this seam binding is so thick it was having none of it so I left it as it was, I placed it over the Branches and Holly leaves then added another bow out of garden twine, which I separated the four strands and used just one. On top of the bow I added a round bead, this was part of some beads I had friends save from their Christmas crackers, you know how sometimes they wrap beads and wire over the ends of these fancy ones, so in past years when we have had our Christmas meal I have claimed the beads lol!!! I attached this with some 3D glue. 

I went round the edge of the card and die cuts with a snow writer but this was a glitter one so it dried clear!!! So I went over it again adding some Deco art glamour dust so it showed up a little. I then watered down some White Acrylic paint and splashed this all over the card using a paint brush, I loved the effect this gave to the card, just like snow. The picture doe pick it up a little if you look close enough.

There you have the finished card.

Items used:

White hammer card
White card
Aquatints pastel set
Tim Holtz Distress Inks Forest Moss, Tumbled Glass and Crushed Olive
Sue Wilson dies Holly leaves
Sheena Douglass Christmas Foliage
Spellbinders Nestabilities Standard Circles Large
Memory Box Leaping Deer
Deco Art Glamour Dust
Galleria Modelling Paste
White Seam Binding
Gilding wax Silver
Acrylic paint, White and Water

Thank you for looking, Jacquie xxx

Wednesday, 25 November 2015

Elephant & the Arches

Hello my crafting friends, hope today finds you safe and well? Thank you for looking in on me today I do appreciate you coming by and I love reading all your lovely comments so thank you.

Now the last post I made was showing one of the Diwali cards I had made for one of the teacher at the school where I work, today I am showing you the second card, they both loved them and was very appreciative of them.


This was for a male teacher of Science Nilesh so it had to have a masculine feel about it and I felt the arches were perfect for this so I embossed a piece of card with the Indian Arches embossing folder then coloured it in showing light coming form the doorway and windows, I started with Squeezed lemonade then Dried Marigold and finally Brushed Cordroy. I faux bleached part of the floor where the light was coming in and the rays from the window. I matted this onto some Black card and then onto the base card.

I stamped the Elephant from the Marching Elephants stamps and coloured it in with Pewter Distress Ink, the blanket and hat I coloured using Spectrum Noir Glitter pens to add that little sparkle. I cut the Elephant out and placed him in front of the Arches but not hiding the light. 

I finished the card by adding the Om (Aum) stamp up the corner, I coloured this in to match the light.

Items Used:

Sheena Douglass Taste of India Indian Arches Embossing Folder
Sheena Douglass Taste of India Stamp Marching Elephants
Tim Holtz Distress Inks Squeezed Lemonade, Dried marigold, Brushed Cordroy & Pewter
Spectrum Noir Glitter Pens
Black Card
White Card

Thank you for looking, Jacquie xxx

Sunday, 22 November 2015

Diwali Henna Sparkle

Hello my crafting friends, hope this finds you all safe and well, It's getting a lot colder here now of a night and I know some of you have had snow, let's hope its brief lol! Though I have to admit I do like to go out and play in it!!! A big kid at heart.

Some of you may know it was Diwali week last week, the festival of light and we have two Hindu teachers at our school so I made them each a card.


This one I made for Sujahta an English teacher, I knew I wanted to use Sheena's Indian products and I wanted it lovely and bright so I started by inking up a piece of card using Crushed Olives DI, I then ran it through the embossing folder  Henna and re-inked over the embossed pieces, I then coloured in the flower with Aqua Markers. I coloured in some of the edges using Spectrum Noir new Sparkle pens to add a touch of glitter too.

I stamped the flower  Henna onto some White card and cut it out the best I could then coloured it in with Spectrum Noir Sparkle pens and put this to one side to dry.

On more of the White card I stamped the decorative edge using my Versamark Ink Pad then heat embossed with Gold embossing powder, I had to repeat this process in order to get the lengths I wanted to fit round the card as its only a small stamp. I then cut it out the best I could using a sharp craft knife.

I matted the embossed background onto some Black card and then onto the base White card, I attached the decorative edge round the four sides of the card trying to match them up so they were the same both sides. I then attached the stamped flower I had cut out using 3D glue.

I made a simple sentiment and inked round with the Crushed Olives DI to match the card and there you have the finished card.

Items Used:

Sheena Douglass White Stamping Card
Sheena Douglass Black Card
Sheena Douglass Taste of India Embossing Folder Henna
Sheena Douglass Taste of India Stamp Set Henna
Tim Holtz Distress Ink Crushed Olive
Spectrum Noir Aqua Markers
Spectrum Noir Sparkle Pens
Papermania Gold Embossing Powder
Versamark Ink Pad

Thank you for looking, Jacquie xxx


Wednesday, 18 November 2015

Two for ya!

Hello my crafting friends, so good to have you join me today, hope you have all managed to stay safe and warm during this 'Barnaby' storm, if I have the name right, gosh knows where they get these names from?

Have you managed to catch any of Sheena's shows? Aren't these flowers gorgeous and so easy to put together. Sheena has two more shows, today at 8am and tomorrow at 12 noon, please don't miss them and all the wonderful demos.

I have two to show you today-


They both show the Sweet pea and I decided I wanted a lovely Yellow flower, after all Sweet peas do come in such a variety of beautiful colours. For this I first coloured the background with Distress Inks then stamped Sheena's Fusion Sweet Pea onto the card and coloured that in with Distress Inks. I stamped Sheena's Simply Scripty stamp all over the card using Versamark Ink Pad then heat embossed with White embossing Powder, love the look this gives to a background. 

Over the top of this I placed my Sweet Peas spreading them out across the card, I made a couple extra as buds. I added a sentiment and matted and layered up with Yellow card and the White base card and there you have the finished card.


For this one I did a background of Aquatints Pastels, you have to have this quite watery and coat in salt and leave to dry overnight, in the morning just rub off the excess salt and you are left with an original background, no two are the same believe me. I then inked through Sheena's Distress Stencil with Gold Aquatint in two of the opposite corners. In the middle I stamped a sentiment and placed my Red Sweet peas to the side of the card.

I matted this onto Gold Miri card before attaching it to my base card, there you have the finished card.

Two lovely cards but very different I am sure you will agree.

Sheena still has more wonderful shows on Create and Craft at 8am today and 12 noon tomorrow. 

Thank you for looking, Jacquie xxx

Sunday, 15 November 2015

SHEENA FOUR DAY DEAL ON CREATE AND CRAFT MONDAY AT 9AM SHOWCASING COUNTRY COTTAGE FLOWERS

Morning my crafting friends, good to have you with me again today, I hope you are all safe and well with all the high winds we are having? Ang I can just imagine you chasing that board lol! Pamellia, lovely dream, sounds very inviting but not sure about the Sherry lol! I do have a mixed media all waiting to be shown but waiting on the right theme lol! As soon as I can I shall do another one for you my friend.

Now its only 1 more day till our Sheena is on our TV screen again, 9am tomorrow morning on Create and Craft, she will be showcasing her wonder Perfect Partners stamps and dies of these wonderful Country Cottage flowers. I made all these flowers from the sets using just copy paper, you can cut 4 layers at one time, possibly more depending on your machine, so it was very quick to make a batch up all at once and keep in a bag to use later, they are very quick to make, a little messy but who does not like a bit of mess!!!

I have two cards for you today:


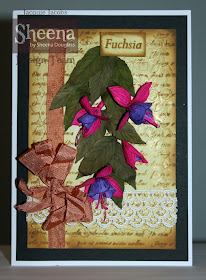
My first one is showing the beautiful Fushias again in the more natural colour we tend to find them. For this card I used Sheena's script stamp  'Simply Scripty' for the background, stamping it with Tim Holtz Brushed Cordroy Distress Ink and inking round the edge of the card with the same colour. I then ran it through an embossing folder 'Twisted Vine Frame' to add some texture to the background.

I wrapped a piece of lace ribbon around the bottom and some seam binding ribbon down the side adding a triple bow.

The Fushia's that I had painted with Aqua Markers were then placed coming down the card as seen. I stamped the word 'Fushia' onto a piece of card coloured the same way as the background and placed this over the top of the leaves as seen.

To finish this card I matted and layered it up onto Black card then onto the base card.

For this card I coloured the background with Tim Holtz Distress Inks Stormy Sky and Peeled Paint then stenciled through the branches of a tree using Sheena's 'Shady Meadow' stencil and Distress Ink Black Soot, I apologize for the lack of colour on this one as the leaves are Black and the card it was mounted on was also Black card even though it looks Brown in the photo!!! I then embossed it with Sheena's stencil 'The Grunge Tree' and inked that with Distress Ink Brushed Cordroy very lightly, just enough to show the detail. 

The two Butterflies I painted pieces of Black card with Pebeo Iridescent paints then stamped over the top using the Butterfly stamp and Black Stazon ink. I then die cut two of the Butterfly wings one out of Black card the other White card, the black card wing I covered with Dovecraft Glitter Glue Crystal, this is an iridescent colour glue which turned Green once on the card. The White card I covered with Gold Gilding Wax. These were placed on the card as seen.

I layered this up with Black card that I had stamped the word Butterfly using a White stamping ink, Ranger Pigment Ink Pad Glacier White, around each of the corners where my focal card would sit. I matted this onto the base card and there you have the finished card.

These are such easy dies and stamps to work with, I do hope you can tune into the shows to view all the stunning creations from the rest of the Design Team and to see Sheena in action.

Thank you for looking, have a wonderful Sunday.

Love Jacquie xxx

Saturday, 14 November 2015

Congratulations

Hello my crafting friends, I do hope this finds you all safe and well especially my friends up in the North with this Abigail storm causing torrential rain up there with possible flooding, keep safe. We expect the rain here from around 11am this morning, at the moment it is lovely and dry, we even had a bit of sunshine around 7 this morning!!! Calm before the storm as they say lol!

Now as I have been saying over the last couple of days Sheena Douglass has a 4DD on Create and Craft starting on Monday morning at 9am showcasing her wonderful dies and stamps of Perfect Partners Country Cottage flowers. These are so gorgeous and easy to work with. Today I am going to show you another of my makes, please do try and look in on at least one of the shows to see the stunning creations by the Design Team and of course Sheena's wonderful demonstrations.


This is another one showing the beautiful Fushias, for this I decided to make a wedding card keeping the lovely Fushias White. I had used the stamps to stamp the petals a light Green.

I got my base card and measured a piece of card to fit inside, on this I stamped one of Sheena's church stamps with Brushed Cordroy and painted it in with the same ink. I love this tone on tone look don't you? Where this image would show on the inside I cut an aperture in the front of my base card. With another piece of card I cut to size then embossed with one of Sheena's embossing folders, the Ivy,  I measured where the aperture would be and die cut a larger aperture.  I took a sheet of Gold miri card and cut to size, giving a boarder round the top layer and die cut the aperture in the center with Sue Wilson Austrian Collection Innsbruck dies but using the smaller die so the pattern would show round the edge.  I layered these together using foam tape for the top layer to lift it up slightly.

I die cut my Fushias and leaves out and coloured them with Aqua Markers, I stamped the petals with DI Bundled Sage, a lovely Pale Green. The leaves once dry were stamped with Forest Moss. This is quite easy to do as Sheena has made the stamps to fit the dies perfectly, I did not use a stamping block I just lay the stamp on my glass mat inked it up and took the die cut and placed it over the top and pressed down with my fingers, you do get a bit messy with the ink over your fingers but that's the fun part right? lol! There is always a part of the stamp and die that will have a slight curve or notch that will enable you to match them up perfectly together. Once all were dry I assembled the flowers and leaves on the card as seen, these are soooo wonderful and easy to make, we had no instructions at all so if I can do it anybody can lol! I would advise to make a hole in the bottom of the flower and petals to push the stamens through either before sticking together or after but whilst the glue is wet, easier that way. I tucked a few leaves in at the top and around the edge of the aperture as I thought they looked better than just having the end of the leaf showing, I am never quite sure how to place a leaf directly on the top as I don't like the end of the leaf showing but sometimes we have no choice lol!

To finish the card I added a sentiment stamped with Brushed Cordroy and layered up with Gold Miri card to match the rest of the card.

Items Used:

Sheena Douglass White Stamping Card
Sheena Douglass Country Flowers Fanciful Fushia Die and Stamps
Sheena Douglass Embossing Folder Ivy
Sheena Douglass Stamp Believe (Church)
Tim Holtz Distress Inks Brushed Cordroy, Bundled Sage and Forest Moss
Sue Wilson Austrian Collection Innsbruck
The Range Gold Miri Card
Foam Tape

Thank you for looking, Jacquie xxx


Friday, 13 November 2015

Take Flight

Morning my crafting friends, hope today finds you all safe and well? Are we all prepared for this 'Abigail' storm they reckon we are going to have today, if weather history is right then we shall get it here tomorrow, we always seem to get it a day later than said!!! Keep yourselves safe wherever you are.

Now my card today is another I have done for Sheena's  day deal starting on Monday at 9am on Create and Craft showcasing some wonderful country flowers stamps and dies and a beautiful Dragonfly and Butterfly. This one is showing her Butterfly, I have used it on shrink plastic to show a scene.


I started by doing the background using Sheena's stencils along with Tim Holtz Distress Inks, I then went round the edge of the card with Black Soot. Once dry I cut it into three strips and layered them onto Gold Miri card, best to make sure you have a card big enough to fit the three strips and the mount to leave a gap between each one, then I added foam tape to the three images and placed them on the card as seen.

I stamped the Butterfly twice onto shrink plastic, coloured them in and left to dry overnight, you cannot dry these with a heat gun obviously!! lol! It did take a while for them to dry but once they are dry just heat them with your heat gun and watch the magic before you eyes. I made the mistake of folding the butterfly before heating then had a job opening up the wings so it may be better to fold after you have shrunk it. Whilst still warm, which isn't very long, I shaped their wings how I wanted them to make them look in flight so to speak. I then attached these to my card with 3D glue.

There you have the finished card, one for many occasions I feel.

Please do look in on your TV on Monday or one of the following three days to see the stunning creations made by the rest of the Design Team.

Thank you for looking, Jacquie xxx

Thursday, 12 November 2015

Fabulous Fushias

Morning my crafting friends, good of you to visit me today, sorry I have been a little absent again, lots of work and long suffering toothache, now sorted!

Its that time again when our lovely Sheena has shows coming up on Create and craft showcasing some new and stunning flower dies and stamps along with stunning Butterfly and dragonfly. The shows start on Monday at 9am. So if you are able to please come and watch the lovely Sheena in action and view all the stunning creations made by the Design team.

Here is one of mine...


This is showing the beautiful Fushia die, these are so easy to make and look wonderful when finished.

For this I coloured the background with D.I then stamped over the top with Sheena's script stamp using my Versamark Ink pad and Clear embossing powder.

I then stamped over the top of that with Sheena's Fusion Fushia stamp, not the stamps that are out with the die, coloured this in with Distress Inks then placed the die cut flowers, these were coloured using Aqua markers, down the side of the stamped image.

I loved the finished look of this card, I matted and layered it with White and Plum card to match the flowers.

Items Used:
Tim Holtz Distress Inks
Sheena Douglass Die & Stamps Fushia                       

Sheena Douglass Fusion Fushia stamp
Sheena Douglass White Stamping card 
Sheena Douglass Script Stamp
Spectrum Noir Aqua Markers
Creative Expressions Plum Card
Clear Embossing Powder
Versamark Ink Pad 

Thank you for looking, Jacquie xxx

Saturday, 31 October 2015

The Potting Shed

Good morning to all you lovely crafting companions out there, and a Happy Halloween! I hope you are managing to fit in some crafting this weekend?

Tomorrow our Sheena is on our screens again at 9am, 1pm and again 9pm on Create and Craft showcasing her wonderful Man's Best Friend and It's a Perfect day Stamps and stencils, remember the Victorian Walk stencil, isn't that to die for, absolutely gorgeous. I do hope you can manage to tune into at least one of the shows.

I had the It's a Perfect Day set sent to me to work on and I have been showing you a few creations from these and today is no exception, I am showing you my little potting shed!


As the shed stamp only shows half a shed I though about reversing the stamp to make a whole shed that may be tucked away down the bottom of the garden behind trees and bushes, you get  the picture I hope, well this was my take on this.

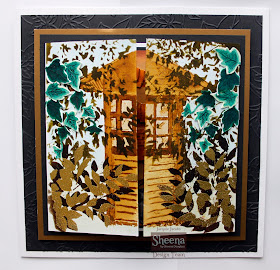
I made a gate-fold card,  stamped the shed on the one side then to reverse it you stamp the shed onto your craft sheet of Glass mat then lay the card over the top carefully and press down this should hopefully give you an impression of the stamp, I had to paint some of mine in as it did not pick it all up but its a good trick to learn. Around this I added some of the stencils with the bushes and hanging branches , the bottom bushes I stamped twice with the second time heat embossing with Gold embossing powder. I then die cut and coloured some Ivy to hang from the branches and to add some 3D to the card.


Now for the inside I first matted and layered up with Black & White card, for the back I painted the inside of a shed, i.e. the shelves and die cut and coloured loads of the little pots you get in the stamp set and placed them randomly on the 'shelves'.  On the floor I added a Plough from Sheena's last Garden stamp set and the Watering Can which I had painted and then glazed to make it look a bit like the galvanized Watering cans.

For the side panels I coloured in with the same colour as the shed from the Aquatints and stamped the sentiments you get with these stamps.

The whole card was then matted and layered onto some Black card, Gold card and finally more Black card that I had embossed before adhering it to the base card.

I hope you like it? Don't forget to tune into the shows on Create and Craft tomorrow at 9am, 1pm, and 9pm.

Thank you for looking, Jacquie xxx

Friday, 30 October 2015

Out in the Fields

Hello my crafting friends, hope you have all been busy crafting away, please do send me the link to your blogs so I can view your creations too if you have not already done so.

As I said yesterday Sheena will be on our screens again this Sunday 1st November starting at 9am with another show at 1pm and a repeat at 9pm showcasing her stamp sets Man's Best Friend & It's a Perfect day once again.


For this card I paint sprayed with Aquatints the background then embossed the trees folder in position at the back and rubbed Silver gilding wax over the top. I stamped some clouds to the right of the trees and faux bleached these to make them stand out. Then rubbed some Distress Ink round the edge of the card.

I stamped the Hare into some Air dry clay and let him set before painting over again with Aquatints and rubbing Gold gilding wax over his fur to make him stand out.

I stamped and painted some more Hares onto shrink plastic then shrunk it down with a heat gun and placed these little beauties as if they were in the background.

I matted and layered this onto some White then Blue card, adhered to the base card and there you have the finished card.

I hope you like it?

Thank you for looking, Jacquie xxx


Thursday, 29 October 2015

Hare in a Box

Hello my crafting friends, hope this finds you all safe and well. Isn't Autumn a beautiful time of year with all the different colours and the weather has not been too bad either which is always a bonus. 

Well today I am showing you another card I did for Sheena' shows, I do hope you are not getting bored with these, Sheena has done some fabulous Art work that it really needs to be shown off as there is so much you can do with them. I believe Sheena is showcasing these stamps again On Sunday on Create and Craft, not sure of the times as yet.


I made a box pop up card, I would love to say I made the box but didn't as I found a place on the internet that sold 3 for £1, quite sturdy card too so a bargain!. I simply matted and layered all the panels, added some paper under the flap and distressed the other panels before stamping and heat embossed with Gold embossing powder.

For the inside I added 3 strips of card to adhere the Hare and flowers to. I had stamped/stenciled these and cut them out, placed a strip of card under so I had something to stick them on the strips with  then  stuck them in place.

Once finished I added the little extras of a Butterfly and a Dragonfly.


Items used :

Box card (from Internet)
Sheena Stamps & Stencil from It's a Perfect Day.
Sheena swirly stamp.
Black card
White card
Gold Embossing Powder
Striped paper own stash.
Distress Inks.


Thank you for looking, Jacquie xxx

Saturday, 24 October 2015

A little Downton Abbey

Hello my crafting friends, so good to have you pop by today and pay me a little visit, I do appreciate it. If you leave a comment with your blog address I can return the favour.

Today's post is a card I made for a friends birthday last week, she is a big Downtown Abbey fan so I put this one together for her.


I loved these coloured papers that are on the Triple CD Rom, the colours are fabulous as well as the designs and I adored this die for the edge, so Lacey so I had to use it.  The images on the CD are fabulous and I feel this image could well be for a wedding as well as any occasions.

As you can see I matted a sheet of paper onto my base card, die cut the edge die four times and placed these round the edge of the inside of the card.  On the CD you have some Companions cards where they have the background to go with the image and other elements to match so I printed this one off to match the papers then raised the image in the center.

I hope this makes sense and if you are a fan of the Downton Abbey range there are some new embellishments coming this week on Create and Craft, in fact I think the shows start on Monday.

 Thank you for looking, Jacquie xxx


Wednesday, 21 October 2015

Three for ya!

Hello my crafting friends, hope this finds you all safe and well. Did you enjoy the marvelous shows Sheena did? Fabulous demos and fabulous cards made by the team.

I thought I would show you some more that I made for the shows.

This one was painted using Aquatints for the background then salt sprinkled over the top and left overnight to dry before rubbing all the excess salt away, this gives an amazing background. I just stamped on the shed and wheelbarrow and painted them in with Aqua markers. I stamped & coloured the pots & watering can with Aqua markers then cut them out and positioned them on the card as seen.

Background was painted with Aquatints and left to dry. Then using the Topiary Stencil I stenciled on the two topiary on the right and coloured them in with Aquatints, the bird topiary I spread modelling paste through the stencil and roughed it up a bit to add texture then painted this with Aquatints. The hanging branch was also painted by dabbing on the Aquatints with a sponge, mixing the colours to make the leaves look Autumn like.


For this one I started by stamping and painting the brick wall for the background, I then cut a door & frame out of White hammered card, cutting the door twice so I had two layers. I then stenciled the topiary onto some card, painted them in and cut out to stick either side of the door. Adding some finishing touches like the gold letterbox, door knob & letter.

I believe Sheena may have some more shows coming up next month showing these stamps again, dates are yet to be confirmed.

Thank you for looking, Jacquie xxx
Sunday, 18 October 2015

Sheena's shows today!

Hello my crafting friends, hope today finds you all safe and well. Well today Sheena's shows are on Create and Craft at 4pm & 7pm so lets all get messy together lol!

Here are some more of my makes for the shows, I hope you like them?


This one was painted with Aquatints then I laid the Sackcloth Stencil over the top, spritz with water then removed the stencil and covered with a piece of kitchen towel to mop up any excess water. Once completely dry I stenciled over the plants using Black Soot and rubbed gilding wax around the edge. To finish the card I matted and layered onto Black & Gold card.

This one I painted various colours of Aquatints in different directions to fill the space going over it again with a different colour in some areas then stamped the sentiments over the top along with the pots in the center. To finish matted it onto Black card then onto White card. Quite an easy card to do but very effective.

I do hope you are able to view the shows, there are some cracking creations from the rest of the team and you won't want to miss Sheena's demos will you?


Thank you for looking, Jacquie xxx

Friday, 16 October 2015

Seed Gift Folder Card

Hello my crafting friends, a bit late today but better late than never lol! There are some fabulous shows coming up on create and craft with out lovely Sheena Douglass showcasing her wonderful new stamps and stencils, if you love pets or gardening then these are a must for you. The shows will be on SUNDAY 18TH AT 4PM & 7PM then MONDAY 7AM & 11AM, try not to miss out on all the fabulous demos Sheena will be doing.

I did this card/gift with the Garden/Hare stamps & stencils.


I started by going and buying some packets of seeds first to make sure I had the correct size pockets, then I embossed two sheets of A4 Kraft card. 

I measured the seeds up against some Kraft card, cutting the strip of card a bit wider than the packet but long enough to accommodate two packets, if my memory serves me right then this was almost the whole length of the A4 card. The top card of the pockets was a little wider still so that you could fold over the edges and glue them down forming the pockets. I scored these lines before folding. 

I then cut out a half circle at top of each pocket, I did this by hand as I did not have a circle punch. I repeated this process four times but for two of them make the heights of the pockets (or length of card) about half an inch shorter, this is so they sit on top of the larger ones but once the card is closed the meet up at the top. Once the pockets were finished I rubbed some gilding wax over the embossed areas, folded them in half in the middle, so there was a pocket either side and glued one smaller pocket on top of the larger pocket just in the center so that the rest of the pocket was open for access. I hope all this makes sense? I then put these to one side.

For the cover I got 1 sheet of A4 Black card and scored two lines either side of the center forming a spine of about 1- 1 1/2  inches , I found this was large enough for the pockets to sit inside. I then decorated both the inside and outside of the cover. For the inside I used 1 sheet of A4 White card and did the shaving foam technique with Aquatints, (If you do not know the shaving foam technique you can find this on You Tube using any inks) I cut the card in half to fit and stenciled the wild flowers stencil along the bottom, I matted this onto some card I had edged with Gilding flakes then placed this on the inside of the front and back of the card.

For the outside of the card I edged some card with gilding flakes to match the inside. Using another sheet of A4 White card I brushed over with Aquatints pastels blending the colours together then laying some cling film on top and left to dry for about 2 hours. On removing the cling film it leaves some lovely line detail which is usually shiny but with the pastel colour it was quite faded, it shows up more with the Bright & Beautiful Aquatints. Once again I cut this to size to fit the front and back.

I stamped the front using the shed, hanging flowers and Pots stamps and coloured these in with Aqua Markers. I stenciled round the bottom and up one side with the Sack Cloth stencil using Forest Moss Distress Ink. I stamped my sentiment then attached this to the front of my card. I stamped the back with the wheelbarrow and tree stamp and once again coloured with Aqua markers, like the front I stenciled round the bottom and one side with the Sackcloth stencil and attached this to the back.  To finish the card off I added some ribbon round the center of the inside round to the front then added a bow on the outside of the spine. 
The one thing I should have done but forgot until it was too late was before you attach the front and back covers add a strip of ribbon horizontally round the card so it can tie at the front keeping the card closed, the covers would then hide this ribbon apart from the bit you tie up. Or if you have a rivet punch you could use this to put holes in and tie with ribbon.


This would make a lovely gift for a gardener or you can adapt it to fit anything in the pockets, specialty tea bags, book tokens, vouchers whatever you like. I do hope you have understood the instructions but if anyone doesn't or if you have any questions then please do e-mail me. 

Thank you for looking, Jacquie xxx


Thursday, 15 October 2015

Out in the Woods

Hello my crafting friends, so sorry for my absence once again. life does get in the way sometimes but all good. 

Now its that wonderful time again for all you Sheena fans as she has a One Day Wonder shows on Sunday and Monday. Show times will be 4pm and 7pm on Sunday and 7am ( live not a repeated show) and 11am on Monday.You will love, love, love her new stamps, if you are a pet lover you will WANT   them.


This is the lovely little hare, actually he's quite a big hare lol! The tree comes with him along with a few other stamps, he is soooo cute.

For this I have painted the background with Aquatints then added salt over the top and left to dry overnight, once dry you rub the salt off and you have this amazing background, this one was crying out for the hare and tree lol!

I have matted and layered onto Black card & Kraft card.

There will also be some new stencils and this is one I have used called wild flowers, I have stenciled in Black Soot round the bottom with two of the grasses up the side. Please don't confuse the pattern in the sky with the stencils that was the salt!!!

I will be bringing you more of my samples over the next few days, I hope you can watch the shows as the rest of the design team have done some stunning samples.

Thank you for looking, Jacquie xxx

Friday, 2 October 2015

Aged to Perfection!

Morning my crafting friends, good to have you join me today I am so thankful of your friendship.

Today I am showcasing another card from the Sheena shows earlier in the week, this was one that was on the display.


A very simple card to do as I just used two of the stamps, stamped them and coloured them in extending the grass and soil just a little with the sentiment in the set that goes so well with these two oldie images.

These were both painted using Aquatints Landscape and Pastel sets.  Then mounted onto some Kraft card that I had embossed with Sheena's Distress Stencil and added a little gilding wax in two opposite corners. I mounted this onto some card I had wrapped some Brown ribbon round and there you have the finished card.

I hope you enjoyed the shows for those of you who managed to see them, some fabulous demos were shown.

There will be more Sheena shows in a few weeks.

Thank you for looking, Jacquie xxx

Monday, 28 September 2015

Sheena show today at 11am on Create and Craft and double post!

Morning my crafting friends, glad to have you visit me today, here is another card showcasing Sheenas beautiful stamps, last  showing today on Create and Craft at 11am.

Another double for you.


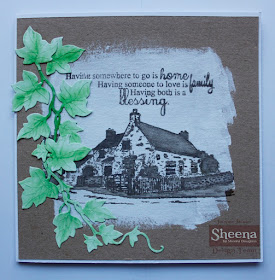
This was White Gesso painted onto Kraft card and stamped over once dry, then painted a little more with the ink. Ivy die added on top for that touch of colour.

                                         
Brick wall stamped with Iced Spruce DI then inked round edge with same DI. Two picture postcards
stamped using the tree scene and the logs, corners Gold embossed and arranged on card as seen.


I do hope you have managed to catch at least one of the shows to see all the other Design teams stunning work.

Thank you for looking, Jacquie xxx