Pages

Tuesday, 30 September 2014

Good Friends...

Morning crafters, thank you for joining me today, cannot believe its the last day of September already doesn't time fly? As well as the dark nights and mornings we have the cold creeping in too now, winter is on its way lol! Just thought I would cheer you all up on this fine Tuesday morning lol!

I have given you a rest from Christmas today, quite an easy card to make...


I folded in half a sheet of Pale Blue/Green Satin card for my base and matted it up with some Gold paper, these papers were from a pad I had a couple of years ago for Oriental papers, sorry I cannot remember where from.

I die cut the Californian Background out of White card , I taped the back up so the die bits stayed in and attached this to the Gold flowered paper and wrapped some Salmon coloured Seam Binding Ribbon round before matting onto the base card. I made a bow out of the same ribbon and stuck it on the right hand side of the ribbon.

In my stash I had some die cuts already cut out, one in Brown card and one with a verse on so I used these as my focal point. I did ink round the verse so it would match colour wise.

I finished my card by adding a Iridescent gem on top of the bow.

Items Used:

Create and Craft Satin Card
Oriental Papers
Sue Wilson California Collection Background Die
Spellbinders Lables Twenty-Eight
Spellbinders Lables Twenty-Two
Lidls Brown Card
White card
Creative Expressions Unmounted Stamps Kind Thoughts
Tim Holtz Distress Ink Black Soot & Vintage Photo
Create and Craft Iridescent Sparklet Gems

Thank you for looking, Jacquie J xxx

Sunday, 28 September 2014

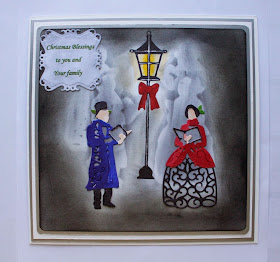
Victorian Christmas Carol Singers

Morning crafters, hope you are having a great weekend, thank you for joining me here today its lovely to have your presence.

About a month ago I ordered some dies from C&C and they finally arrived this week after much complaining from me about the courier service seeing as they had stated on their tracking service it was out for delivery two days after I had ordered, they had hung onto my order for almost a month before delivering it, I must say I have had trouble with this same company for years, I have complained to C&C about them, it took them 4 months to return a parcel back to them once!!! It makes me very susceptible about ordering anything from there because of it but hey ho! My rant over now for todays card...


These were the dies I had been waiting for, I knew the look I wanted but failed to get it lol! I am going to try again but in a different way, I wont show that one till a much later date lol! I was trying to get the look of a few carolers around the lamppost in the background but made a right mess of it! Still it turned out to be quite an atmospheric card, ghost like as my son told me lol!

Items used:

Create and Craft Female Caroler
Create and Craft Male Caroler
Create and Craft Silver Miri card
Create and Craft White Textured card
Anne Marie Designs Victorian Christmas Stamps (Lamppost)
Tim Holtz Distress Inks Pumice Stone & Black Soot
Promarkers
Spellbinders Captivating Squares
Sentiment Computer Generated

Thank you for looking, Jacquie xxx

Friday, 26 September 2014

Golden Angel of Peace

Morning crafters, so nice of you to join me today, I hope this finds you all safe and well. We are at the end of another week, the days seem to fly by, getting too close to Christmas lol!

Today's post is a card I made last week, I wanted the Angel done in Gilding flakes so that was fine but then I decided to cover the frame with micro beads, I now think it would have been better left alone or covered in snow diamond glitter! Do let me know whether you agree or not. I tried photographing it in different places around the house to show it at its best but failed, I could not get the light on the card to show all the detail so I have included the best four, sorry for the overload of piccies lol!


I decided as I was using Gilding flakes that Black card might show her up more, so for my base card I joined two sheets of Black card together to form an 8"X8" base card and matted it up with Gold card.

With another sheet of Black card I cut to size and covered with Double Sided Adhesive sheet, ran it through the E Bosser in an embossing folder then die cut the Angel & Dove out of the center(this I will save for another project later). I peeled back the Adhesive sheet and coated it with Micro beads, as soon as I had done that I wished I had used glitter as it looked so dull, even though the embossing still showed it looked rather dull, nice texture though lol!

Now as I wanted the Angel aperture to be done in Gilding flakes I added a piece of Double Sided Adhesive sheet on the back of the Black embossed card before attaching it to the base card, I then covered the aperture with Gilding flakes, I loved how this turned out. 

As I had used the Dove to go with the Angel (with this die you have several items to use to put into her hands)I thought the Peace die would be fitting, so I die cut this out of Gold Card and attached it to the top left corner. There you have the finished card.

Here are another couple of images for you:


One taken on the garden table, thinking it would show up more outside in natural light! I liked the reflection lol!

                                The other one was a side view.


Thank you for looking, Jacquie xxx

Wednesday, 24 September 2014

Vienna Christmas

Morning my crafting friends, hope today finds you all well, if not I am sending lots of hugs to you.

May I give a warm welcome to my two newest followers; Andree Clark & Nana Connie, welcome ladies its good to have you on board. Nana Connie has a great blog http://mygrammysattic.blogspot.co.uk/ so please do go and take a look. Andree if you have a blog of your own could you send me the link please?

Now to todays card, its back to Christmas I'm afraid after a short break on Monday lol!

Thank you all so much for your kind words/thoughts and concerns over the dentist, my appointment is on 7th October!!! Yes you did read that right they cannot fit me in till then but I can ring up each day to see if there is a cancellation! Amazing that this day & age you cannot get to see a GP or Dentist without a few weeks wait. Good job its not that bad lol!

On a brighter note, today's card...


I joined two sheets of Cobalt Blue card together to form an 8"X8" card then matted it up with some White Textured card. Using more of the Cobalt Blue card I embossed it with the Fretwork Embossing folder, cut to size and matted and layered this onto my card. With some Coconut White card I cut to size and applied two strips of double sided adhesive tape around the edge and covered this with Glamour Dust before matting it onto the Blue embossed card.
I die cut more of the Blue card with Sue Wilson Italian Collection Calabria, placing the center piece in the middle of the card and the frame I raised up with sticky pads over the top.

I stamped my sentiment with Chipped Sapphire onto White Textured Card and die cut with Large Standard Circles, I placed this in the center of the card as seen.

I did not have any plain Dark Blue Ribbon so I coloured a piece of White Seam Binding Ribbon with Chipped Sapphire, made a bow and attached it to my card. Adding a Large Fancy Pearl on the bow finished my card.

Items Used:

Create and Craft White Textured Card
Creative Expressions Foundation Card Cobalt Blue & Coconut White
Sue Wilson Dies Italian Collection Calabria
SB Large Standard Circles
Tim Holtz Distress Ink Chipped Sapphire
Create and Craft Printable Seam Binding Ribbon White
Creative Expressions Large Fancy Pearl
Heartfelt Creations Sweet Memories Pre Cut stamps
DecoArt Glamour Dust
Pinflare Double Sided Red Tape
Double Sided Mini Pads
Tattered Lace Embossing Folder Fretwork

I wish to enter this for  http://www.simonsaysstampblog.com/wednesdaychallenge/

Thank you for looking, Jacquie xxx

Monday, 22 September 2014

Birthday Wishes

Morning my crafting friends, thank you for visiting me today, I hope you all had a fabulous weekend and for those who visited Ally Pally I hope you enjoyed yourselves and did not spend too much lol!

I spent Saturday afternoon crafting as the weather was bad, touch of Thunder in the morning. I spent Saturday morning trying to get an emergency dentist app, they said they would call me back once they had found somewhere available, only to call back to say there were no emergency app anywhere but if I ring 111 they may find me an emergency app (at an extra cost!), well my reply to that was how are they going to find me an emergency app if there are no emergency appointments anywhere?!!! Now I have had to wait till this morning to ring and try and get one in after work, its a good job its only a bit niggly and not full blown yet but enough to keep me awake!

Anyhow, todays card is this:


I started by folding in half a sheet of White textured card to form my base card and matted this up with  Red card followed by more White.

Using a piece of Red card I inked up my embossing folder with my versamark ink pad, put the card inside and ran it through my E Bosser then heat embossed with White embossing powder, once cool I matted it on the center of my card.

With another sheet of White card I die cut with the curved boarders top and bottom to form a pretty base for my toppers. I die cut some Red damask card that I had from an old Hunkydory card kit and die cut more of the White textured card that I had stamped with my sentiment using Fired Brick distress ink. I placed the red damask card on top of the White curved boarder card and wrapped some White Seam Binding ribbon around it then attached this to my card. I placed the sentiment on top and attached a bow made out of the White Seam Binding ribbon. On the bow I attached a small die cut along with a Self Adhesive Pearl. Adding more pearls around the curved boarders finished the card. This card was time consuming because of all the die cutting and embossing but worth it. Finished dimensions 5"X7".

Items Used:

Create and Craft White Textured Card
Creative Expressions Foundation Card Red
Hunkydory Damask Inner Coil Card Red
Papermania Embossing Powder White
Tim Holtz Distress Inks Fired Brick
Habico Self Adhesive Pearls
Theresa Collins Embossing Folder Regency
Creative Expressions Self Adhesive Pearls
Creative Expressions Unmounted Stamps Classic Sentiments
Create and Craft Printable White Seam Binding Ribbon
SB Curved Boarders Two
SB Gold Lables Four
SB Venetian Motifs
SB Lables Eighteen

Thank you for looking, Jacquie xxx

Saturday, 20 September 2014

Twisted Bauble

Hi fellow bloggers, lovely to see you again today. 

Remember I said I would show you today the card I made with the off cuts from Thursdays card, well here it is...


Quite simple to make, my base card was 6"X6", I matted up with the remaining Purple card. The Gold Satin card I embossed along with the Gold bauble die cut and matted and layered these on top of each other, turning the baubles round a little each layer to add interest.

I added some Gems I coloured with a Promarker and a little bow at the top of the larger bauble, the sentiment I stamped on the smaller die cut with my versamark ink pad and heat embossed with Gold embossing powder. There you have the finished card.

This must be one of the quickest cards I have ever made, as most of the elements were already cut out! In hindsight I think it would have looked better if I had raised the layers but hey ho!

Items Used:

White 6"X6" base card
Crafters Companion Centura Pearl Pastel Card-Purple
Create and Craft Satin Gold Miri Card
Hunkydory Diamond sparkles gems
Tattered Lace Embossing Folder-Fretwork Lace
Papermania Embossing powder Gold
Crafty Impressions Clear Stamps
Purple Bow (own stash)

Thank you for looking, Jacquie xxx

Thursday, 18 September 2014

Purple Poinsettias

Morning my crafting friends, hope today finds you all well? Thank you for looking in on me today its very much appreciated and please feel free to post a comment I would love to hear what you think of my creations.

Good luck to all those up in Scotland today, I hope you get the vote you want.


For todays post I got the old faithful Christmas bauble dies out again, I wanted to use my Purple Pearlescent card but only had one sheet left which meant not much matting & layering, I got round it by adding the one and only embossed Purple card I had with the swirly pattern on, I had three sheets of this Satin Gold Miri card left so I used that as the base card followed by the swirl embossed card, more Gold card, which I edged round with double sided tape and added glitter, this made it look like another layer!Then the sheet of Purple Pearlescent on top of this. I die cut the Christmas Ornaments 2011 out of the Gold & Purple card so you see the card behind and die cut the smaller one in Gold for the sentiment.

From the off cuts of the Gold, Purple & Purple Swirl card I die cut the Poinsettias and leaves, adding some glitter on the vines of the leaves and inking the flowers with Shaded Lilac. To finish the flowers I added a sparkly brad in the center of each flower, Gold for the Purple and Purple for the Gold. I placed these round the edge of the die cut Bauble, leaving just one for the other side. I stamped my sentiment onto the small Bauble with Versamark then heat embossed with Purple embossing powder, attaching this to the center finished the card. Dimensions are 8"X8".

Items Used:

Create and Craft Satin Gold Miri card
Hunkydory Swirl Embossed Card Purple
Crafters Companion Centura Pearl Card Pastel-Purple
Double Sided Adhesive
Purple Glitter 
SB Layered Poinsettias
SB 2011 Heirloom Ornaments
Crafty Impressions Clear Stamps
Papermania Embossing Powder Purple
Papermania Large Glitter Brads
Tim Holtz Distress Inks Shaded Lilac

I will show you the card I made from the offcuts on Saturday.

Thank you for looking, Jacquie xxx

Tuesday, 16 September 2014

Periwinkle & White!

Morning my friends, so good to have you visit today. Hope you are all safe and well?


For todays post I wanted just a simple looking Christmas card but one that looked elegant at the same time, so needless to say out cam Sue Wilson's dies. They always look very elegant don't you think?

I die cut twice, the Sue Wilson die from the Austrian Collection Vienna, once in White and once in Periwinkle. I simply matted and layered up the card as seen showing a different size of the die cut each time until we got to the White bit in the middle, this I stamped my sentiment on with Chipped Sapphire before attaching it to the card.

I added a bow out of White Satin Edged Ribbon in the bottom corner of the card, I die cut the smallest poinsettia, inked it up whilst still in the die with Chipped Sapphire, added a Black pearl in the center than attached this to the middle of the bow. There you have the finished card.

It sounds quite a simple card to make but it was rather fiddly working out and measuring where exactly to die cut so they all matched up lol! 

Items Used:

Creative Expressions Foundation Card Periwinkle and Coconut White
Creative Expressions Sue Wilson Austrian Collection Vienna
SB Layered Poinsettias
Tim Holtz Distress Inks Chipped Sapphire
Do Crafts Satin Edged White Ribbon
Crafty Impressions Clear Stamps
Kanban Self Adhesive Pearls


Thank you for looking, Jacquie xxx

Sunday, 14 September 2014

Hobbycutz Challenge 65 Gold & or Silver

Morning my crafting friends, today sees the start of the latest challenge from Hobbycutz chosen by Marylee Gold & or Silver. Our sponsors this week are Sami Stamps who do some lovely images. Do pop over to the Hobbycutz Challenge Blog and view the excellent designs by the Design Team, it would be lovely if you could enter the Challenge too.

Just a quick not to my friends out there a Big Thank You for your comments yesterday in view of my question;

Patricia, you made me laugh, don't wish too much else you might find us on your doorstep lol!
Suzie, Thank you so very much for the link, most useful and much appreciated.

Here is my card for Challenge 65 Gold & or Silver:


I started with my base card, matted it up with some Satin Gold miri card.

Using the That Special Touch Mask 'Funky' I inked it with my versamark ink pad, placed it onto some White card and ran it through the E Bosser, coated it with embossing powder then heat embossed it in Silver. Once cooled I inked  over it with Shaded Lilac Distress Ink, I know it looks Blue by the photograph, sorry tried photographing it several times and they all looked Blue!

Using the beautiful image 'My Sister is a Princess' from our lovely sponsors Sami Stamps I coloured it in with Promarkers, then with a second image I cut it from the Princess Shoulder, inked it with my versamark Ink pad and heat embossed with Enchanted Gold embossing Powder, this is a lovely light, sparkly Gold, then layered this over the top of the other image so it stood out a fraction. I went over the ribbon on the dress iwth a Gold marker pen then I die cut it with Grand Decorative Ovals and inked in the die with  Antique Linen. 

Out of Silver Miri Card I die cut the Oval Frame, cut it in half and attached it behind the image so the sides were just peeking out of the Grand Oval, I then attached this to my base card.

I die cut some Cherry Blossom flowers out of Gold Miri card, this is Satin one side and Glossy the other so I cut equal amounts to go together, I added these round the frame on top of the Faux Quilled Leaves I had also cut with Gold Miri Card.

I have left the sentiment off until I need it. There you have the finished card.

Items Used:

Creative Expressions 'That Special Touch Mask' Funky.
White card
Create and Craft Satin Gold Miri Card & Silver Miri Card
Papermania Embossing Powder Silver & Enchanted Gold
SB Grand Decorative Ovals
Wild Rose Studio Oval Frame
Tim Holtz Distress Ink Shaded Lilac & Antique Linen
Staedller Metallic Gold Marker Pen
Promarkers
SB Cherry Blossom
Creative Expressions Sue Wilson Faux Quilled Leaves

Thank you for looking, Jacquie xxx


Saturday, 13 September 2014

Holly Wreath

Morning my crafting friends, thank you for visiting me today, I love having you visit and reading any comments you may make. If I can give just a little inspiration to one person then it has all been worthwhile.

Now I want to ask if any of you have ever been, or know of anyone who has been to the Faulty Towers experience in London? I am sure you all know the TV programme and the experience in London is you are the diners whilst the impersonators come round and play their roles. It is of course a comedy and I am asking as I was going to take hubby to see a musical for his 50th next year but after seeing this thought he might like it better so was wondering if any of you have been or know of any reviews as I cannot find any lol! It has apparently been going for 16 years!!!  Please do let me know. Hubby does not look at my blog so there is no fear of him finding out lol!

Now today's card...


I used the Stencil Wreath straight onto some White card, I wanted a quick and simple card and my intentions were to use just chalk  and a quick sentiment at the bottom, however, when I had finished chalking through the stencil I did not like it so rather than waste the card I die cut the holly leaves and berries out to stick over the top. Now as you can imagine with one die for each size leaf and berry it took the whole afternoon to die cut these out and attach to the card, bearing in mind to start with I needed 18 sets of berries which meant the die going through the machine 36 times!!! In the end I added extra large Holly leaves to cover up some of the berries lol!

I embossed the bottom of the card but then did not like the blank space between the wreath and embossed bit so added a curved boarder!

I die cut my sentiment ( I typed this up on the PC) using Delightful Circles and die cut again using the same die but with Rich Green card and off set it slightly, I placed this in the center of the wreath.

Adding a strip of ribbon to the side of the card finished it off. Dimensions are 5"X7". 

What was planned to be a simple and quick card turned out to take one of the longest times for me to complete a card!!!

Items Used:

Basic White/Cream card
SB Holly Leaves & Branches
SB Curved Boarders 
SB Delightful Circles
Clarity Stencil Holly Wreath
Creative Expressions Foundation card Rich Green
Joanna Sheen Red Satin Card
Green Organza Ribbon 
Gold Marker Pen 


Thank you for looking, Jacquie xxx


Thursday, 11 September 2014

Flower Blossom

Morning my crafting friends, thank you for visiting me today I hope this finds you all safe and well?

I decided to look through my CD Roms the other day and realised I had not yet used this one, Dolly Daydream goes East, shame on me!


I got my basic White card, printed the papers from the CD Rom and matted one onto the card, the other onto Silver Miri card.
I printed the pagoda image and Dolly with the peacock onto thin White card stock, cut them out and attached to the card, I then printed another Dolly out and decoupaged her and the peacock, not very good decoupage but it raised her up from the card a little.

I die cut the sentiment out (Also from the CD) inked whilst still in the die and attached it to the card as seen.
A very easy card to make once you decide on what papers and image to use lol!

Items used:

Polka Doodles CD Rom Dolly Daydream Goes East
Create and Craft Silver Miri card
SB Standard Circles Large
Tim Holtz Distress Ink Shaded Lilac

Thank you for looking, Jacquie xxx


Tuesday, 9 September 2014

Peace At Christmas

Morning my crafting friends, so nice of you to join me today. If you have a blog of your own then please do leave a comment with a link back to your blog and I shall return the favour.

For those of you who may be interested I think Sue Wilson's dies are on Create and Craft this Saturday at 9am onwards, its a special weekender so lots of shows.


Today's card is the rescued Stags Head from the other week. You can still see the spots of ink but I just coloured it in more around the head to try and hide it a little. Once finished I applied a piece of Double Adhesive sheet and covered it with Micro beads, I am afraid the photo does not do it justice. I then matted it onto some Brown foiled card.

I matted some White card with some Gold Miri card and Christmas paper I had found with a tree scene that I have had for a number of years, cutting it down just to show the row of trees in the background. I attached my image to the left of the trees.

I stamped my sentiment from two different stamps onto White card using Forest Moss Ink and die cut with Imperial Gold Four. I placed this into the bottom right corner to finish the card.

Dimensions are 7.5" X 7.5".

Items used:

Basic White Textured card
Create and Craft  Gold Miri Card
Dovecraft Victorian Christmas 12" X 12" Paper Pack
Hunkydory Foiled card Brown
Sweet Poppy Stencil Stags Head
Tim Holtz Distress Inks Rusty Hinge, Vintage Photo & Forest Moss
Creative Expressions Micro Beads
Spellbinders Imperial Gold Gold Lables Four
Creative Expressions Unmounted Stamps Winter Greetings
Crafty Impressions Clear Stamps


Thank you for looking, Jacquie xxx


Sunday, 7 September 2014

Figgy Pudding Lane Three

Morning my crafting friends, hope this finds you all well? Thank you for visiting me today I do hope you come and visit again, please do leave a comment as its always nice to know what people think of my creations.

I would love to welcome my latest followers Marie-Louise, (Marie has a beautiful blog you can find here http://myworld-marie-louise.blogspot.co.uk/), Doreen (Doreen's beautiful blog is here http://doreensdream.blogspot.co.uk/,  & Pamellia, welcome Ladies and welcome to any others I may have forgotten, so sorry if I have.

I promised you my other Figgy Lane card today, I promise this is the last you will see of it for a while as I know it can be quite boring seeing the same card even if there is a slight difference. Today's is still an aperture one but I have heat embossed the outline only this time and coloured the rest, its a combination of the last two if you like?


I inked the folder up with my Versamark Ink pad and heat embossed the outline with White embossing powder. Coloured the rest in with Distress Inks and again, overlaid some snow acetate over the top.

I put it into an aperture card but with a wider edge so I could decorate it with two boarders and some ribbon, then coloured in the sentiment to match the card. The most fiddly bit of this, believe it or not was doing the boarders. I used Satin card, something I have used many times but for some reason this would not cut, five times it went through the machine and even then the  Satin film was starting to come off the card whilst taking it out of the die, luckily it only came off the back so the front was okay to use. I added the ribbon, not to hide anything but because I felt it needed it rather than just two boarders back to back.
Items Used:

Sheena Douglass Festive Embossing Folder Figgy Lane
Creative Expressions Cobalt Blue Card
Spellbinders Venetian Accents
Craft Ribbon Blue Check
Create and craft Gold Satin Card
Tim Holtz Distress Inks-Rusty Hinge, Vintage Photo, Squeezed Lemonade, Fired Brick, Chipped Sapphire & Black Soot.
Papermania Embossing Powder Seafoam White
Hunkydory Snowy Acetate
Kanban Christmas Kit Sentiment
Versamark Ink Pad

Out of the three I think I prefer the inked one, no embossing powder just coloured.


Thank you for looking, Jacquie xxx

Friday, 5 September 2014

Figgy Pudding Lane Two

Morning my crafting friends, hope today finds you all well? I do appreciate you visiting my blog and its especially great to see how many viewers I have around the world not just in the UK so Thank you.

Remember the other Wednesday when I showed you Figgy Pudding Lane  well here is another take on it, the last one will be on Sunday! Where I heat embossed the whole image last time this time I have just inked all the outline with Black Soot and coloured in with Distress Inks then adding some Polar White Flower-soft as snow (sorry Ang) and covered in the snow acetate again.


I put this into an aperture frame like the last one just adding a sentiment at the top. This was quick to do and I know more could be done with it if I had the time, I would love to add an old lamp post and carol singers, or Santa & Sleigh in the sky, even an embossed, wider frame would look good. I am sure many of you could think of more to add to it.

Items used:

Basic White card
Sheena Douglass Festive Embossing Folder Figgy Lane
Tim Holtz Distress Inks-Black Soot, Pumice Stone,Vintage Photo, Squeezed                
Lemonade,Rusty Hinge, Chipped Sapphire.
Flower soft Polar White
Hunkydory Snow Acetate
Kanban Christmas Kit Sentiment


Thank you for looking, Jacquie xxx


Wednesday, 3 September 2014

Autumn Fall

Hi my crafting friends, bit of a late post today but never mind. I have had quite a boring day at work today, a lot of what we have to listen to is irrelevant to us LSA's and more towards the Teachers but we have to stay and listen before we have our meeting in the afternoon. Children are back on Friday so that should be fun!!!

Anyhow, I thought I would give you a break from Winter/Christmas cards and do an Autumn one instead lol!


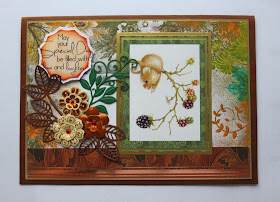
I recently purchased some beautiful papers from Bearly-Mine and I used one in the background here, the papers are called Fall Fancy, all lovely Autumn design in different colours, this one is one of my favourites.

I found a sheet of brown card in my stash so I used that for the base card, I took the paper and matted it onto Gold Miri card then attached it to my base card. I found an 'Autumn' strip of card in my stash so I matted this along the bottom. In my box of Hunkydory cards I found this lovely image of a Field mouse so attached this onto the card just off center.

Also in my box were these flowers so I put them together and cut some leaves out of Brown & Green card and placed them to the left of the image. 

My sentiment was from a CD Rom which I die cut using Exquisite circles and inked whilst in the die with Dried Marmalade and Fired Brick.I placed this on the card just above the flowers. There you have the finished card. Dimensions 7"X5".

Items used:

Brown Card ( Own stash)
Hunkydory Autumn card set (Last years)
Bearly-Mine Papers Fall Fancy
Tim Holtz Distress Inks Dried marmalade & Fired Brick
Creative Expressions Sue Wilson Finishing Touches Petite Vinery & Faux Quilled Leaves
Create and C raft Gold Miri Card

I would like to enter this card into these challenges:


Thank you for looking, Jacquie xxx


Tuesday, 2 September 2014

Thomas Kinkade Lighthouse

Morning my crafting friends, hope today finds you all well? Well its back to work for me tomorrow, where has this Summer gone, countdown to Christmas now lol! You can tell I don't like my job can't you lol!?

Well I think I have got most of the jobs on my list done that I wanted to get done over the summer, I was hoping to get most of my Christmas cards done too but just not had the time, cannot believe how quickly the time has gone. 
I am hoping to keep on top of my cards so apologies if I lack behind some, gotta get in a routine again now, with the dark nights drawing in I shall have to start taking the dog out for a walk as soon as I get home from work which will leave me very little craft time, it will be a case of do I do dinner/housework or craft Mmmm... I know which I would prefer lol! Many a time hubby has come home around 6.30pm and found me crafting with no dinner done, not that he expects it on the table as soon as he gets in lol! I have now been told no more late dinners please (usually get it around 8!) so gotta find a new routine lol!

Anyhow, today is my Father-in-Laws birthday so we will be round there for a Chinese!!! My poor Son will have to fend for himself tonight!!! Here is the card I have made for FIL.


My base card was using a sheet of Blue card folded in half Landscape. I embossed a strip of darker Blue card and attached it across the middle to add some interest.

Out of White card I die cut SB Labels Twenty-Five and SW Vienna. I cut a piece of Teal card so the die cut frame would fit then added the Vienna die cut in the center. I chose an image from Thomas Kinkade CD Rom and die cut it with SB Lables Twenty-Five and attached it over the top of SW Vienna die. To add interest I attached the Teal card at an angle on the center strip. Mind you looking at it it fits well as it looks like the sea is running that way onto the rocks lol!

To finish the card I added a sentiment from an old card kit that matched the colours!

Items Used:

Creative Expressions Foundation card Blue, Cobalt Blue, Teal & Coconut White.
Spellbinders Lables Twenty-Five
Sue Wilson Austrian Collection Vienna
Joanna Sheen Thomas Kinkade CD Rom
Hunkydory card kit-Sentiment
Embossing Folder-

Thank you for looking, Jacquie xxx